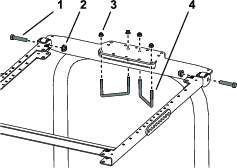
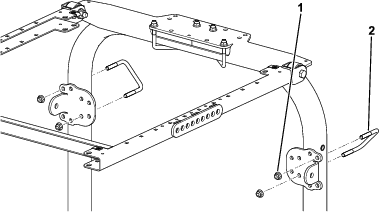
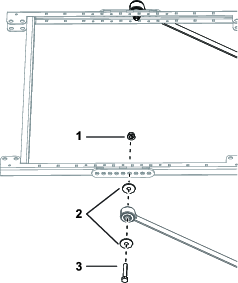
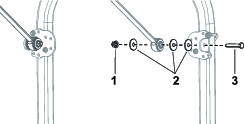
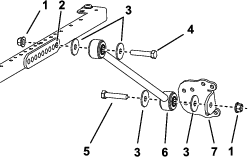
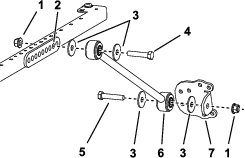
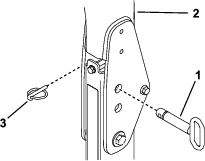
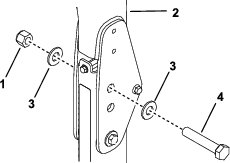
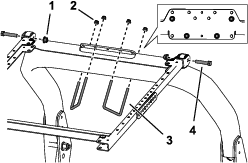
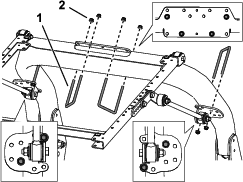
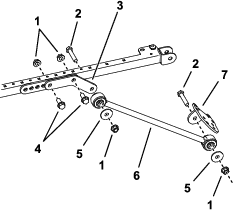
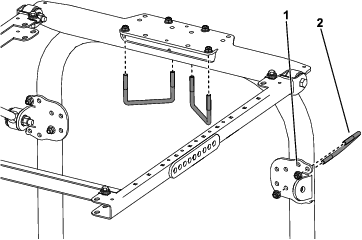
This product complies with all relevant European directives. For details, please see the Declaration of Incorporation (DOI) at the back of this publication.

Important: If you install the Universal Sunshade on a Reelmaster 3100 traction unit or a Groundsmaster 3500/3505 traction unit, install the Wheel Weight Kit. Contact your authorized Toro distributor for the correct Wheel Weight Kit.

Safety

General

Before Operating

  1. Review and understand the contents of the Installation Instructions before installing the sunshade.

  2. Keep all shields, safety devices and decals in place. If a shield, safety device or decal is defective, illegible, or damaged, repair or replace it before operating the machine.

  3. Do not weld, cut, drill, modify, or remove the roll bar in any manner.

  4. Tighten any loose nuts, bolts, or screws to ensure that the machine is in safe operating condition.

While Operating

  1. Use extreme care when working close to fences, ditches, or on hillsides.

  2. Check carefully for overhead clearances (i.e., branches, doorways, electrical wires) before driving under any objects and do not contact them.

  3. Tie down the sunshade frame when transporting the machine.

  4. Wear hearing protection when operating any machine with a sunshade.

Maintenance and Service

  1. Before servicing or making adjustments, lower the implement, shut off the engine, engage the parking brake, and remove the key.

  2. Make sure that the machine is in safe operating condition by keeping all nuts, bolts, and screws tight.

  3. When working on the sunshade installation, wear eye protection.

  4. Replace a damaged sunshade. Do not repair or revise.

  5. When installing the sunshade or performing service, use correct supports, hoists, and jacks. If the sunshade is not properly supported, it may move or fall, which may result in personal injury.

  6. To ensure optimum performance and safety, always purchase genuine Toro replacement parts and accessories. Replacement parts and accessories made by other manufacturers could be dangerous. Such use could void the product warranty of The Toro Company.

Safety and Instructional Decals

Graphic

Safety decals and instructions are easily visible to the operator and are located near any area of potential danger. Replace any decal that is damaged or missing.

Safety and instruction decals are affixed to your sunshade. If any decal becomes illegible or damaged, install a new decal.

decal98-4387

Installation

Preparing the Machine

  1. Park the machine on a level surface.

  2. Lower the cutting units and engage the parking brake.

  3. Shut off the engine and remove the key.

Note: Not every machine uses the same parts to install the kit.

Identifying and Installing the U-Bolts

There are 5 different U-bolts included with this kit. U-bolts are listed by dimension (span x length) in the parts list. Refer to Figure 1 to determine the dimensions of the U-bolts.

g246183

Perform the following steps when you install the U-bolts to the ROPS mount bracket:

  • Use only hand tools to tighten the nuts that secure the U-bolts to the mount bracket.

  • To ensure even distribution, tighten the nuts in an alternating pattern as shown in Figure 2.

g482777

Installing the Sunshade

Groundsmaster 5900 Machine

Parts needed for this procedure:

Bolt (3/4 x 4 inches)2
Nut (3/4 inch)2
Washer (13/16 x 1-1/2 inches)4
Frame assembly 1
ROPS-mount bracket1
Brace2
Brace bracket2
Extension link2
Bolt (1/2 x 1-1/2 inches)4
Bolt (1/2 x 2-1/2 inches) 4
Bolt (1/2 x 2-3/4 inches)4
Large washer10
Flange nut (1/2 inch)10
U-bolt (4-7/8 x 2-3/4 inches)2
U-bolt (3-7/8 x 2-3/4 inches)2
U-bolt (3-7/8 x 4 inches)2
U-bolt (4-7/8 x 4 inches)2
U-bolt (3-7/8 x 5 inches)4
Flange nut (3/8 inch)8
Sunshade 1
Flange-head bolt (5/16 x 1-1/4 inches)4
Small washer4
Grommet4
Clip nut4
  1. Position the ROPS-mount bracket onto the top of the traction unit roll bar (Figure 3).

    Note: Make sure that the roll bar is centered in the mount bracket.

    g246182
  2. Install the frame assembly to the ROPS-mount bracket (Figure 3).

  3. Using the mounting holes shown in Figure 3, mount the ROPS-mount bracket to the top of the roll bar with 2 U-bolts (4-7/8 x 4 inches) and 4 flange nuts.

  4. Using the mounting holes shown in Figure 4, loosely secure each of the brace brackets to the roll bar posts with a U-bolt (3-7/8 x 4 inches) and 2 flange nuts.

    g482768
  5. On each side of the sunshade frame, loosely mount a brace to the second hole of the brace mount with a bolt (1/2 x 2-3/4 inches), washer (1/2 inch), and flange nut (1/2 inch) as shown in Figure 5.

    g267172
  6. Loosely install a brace bracket to each brace with a bolt (1/2 x 2-1/2 inches), washer (1/2 inch), and flange nut (1/2 inch) as shown in Figure 5.

  7. Move the brace brackets up or down, on the vertical roll bar posts, until the sunshade frame is level to the floor.

    Note: Use a level to make sure that the frame is level to the ground.

    Note: Use the front or rear mounting holes in the brace bracket, if you need more adjustability.

  8. Tighten the U-bolt flange nuts, securing the mounting brackets to the posts.

  9. Tighten all the remaining flange nuts as follows:

    • Torque the flange nuts (3/8 inch) 41 to 55 N∙m (30 to 41 ft-lb).

    • Torque the flange nuts (1/2 inch) 113 to 141 N∙m (84 to 104 ft-lb).

  10. While aligning the mounting holes, position the sunshade onto the frame as shown in Figure 6.

    g245151
  11. Loosely mount each corner of the sunshade to the frame with a flange-head bolt (5/16 x 1-1/4 inches), a small washer, and a grommet (Figure 6).

  12. Tighten the sunshade-mounting bolts 5 to 6 N∙m (45 to 55 in-lb).

    Important: Do not overtighten the mounting bolts as the sunshade may crack.

Installing the Sunshade

Groundsmaster 3200 or 3300 Machine
  1. With the roll bar in the raised position, remove the hairpin cotters and the 2 pins (Figure 7).

    g001199
  2. Insert a washer (13/16 x 1-1/2 inches) onto each bolt (3/4 x 4 inches) as shown in Figure 8.

    g018100
  3. In the holes where the pins were removed, install the bolts and washers (Figure 8).

  4. Install another washer onto each bolt and secure with nuts (3/4 inch) as shown in Figure 8. Torque the nuts 323 to 396 N∙m (238 to 292 ft-lb).

  5. Torque the ROPS pivot bolt (Figure 8) 91 to 113 N∙m (67 to 83 ft-lb) to avoid any bouncing of the roll bar and sunshade.

  6. Position the ROPS-mount bracket onto the top of the turf sprayer roll bar (Figure 9).

    Note: Make sure that the roll bar is centered in the ROPS-mount bracket.

    g246185
  7. Install the frame assembly to the ROPS-mount bracket (Figure 9).

  8. Using the mounting holes shown in Figure 10, mount the ROPS-mount bracket to the top of the roll bar with 2 U-bolts (4-7/8 x 2-3/4 inches) and 4 flange nuts.

  9. Using the mounting holes shown in Figure 10, loosely secure each of the brace brackets to the roll bar posts with a U-bolt (3-7/8 x 2-3/4 inches) and 2 flange nuts.

    g482769
  10. On each side of the sunshade frame, loosely mount an extension link to the fourth hole of the brace mount with 2 bolts (1/2 x 2-3/4 inches), 2 large washers, and 2 flange nuts (1/2 inch) as shown in Figure 11.

    g297973
  11. On each side of the machine, loosely install a brace bracket to each brace with a bolt (1/2 x 2-3/4 inches), 3 large washers, and flange nut (1/2 inch) as shown in Figure 12.

    g297972
  12. Move the brace brackets up or down on the vertical roll bar posts until the sunshade frame is level to the ground, then tighten the U-bolt flange nuts, securing the mounting brackets to the posts.

    Note: Use a level to make sure that the frame is level to the ground.

  13. Tighten all the remaining flange nuts as follows:

    • Torque the flange nuts (3/8 inch) 41 to 55 N∙m (30 to 41 ft-lb).

    • Torque the flange nuts (1/2 inch) 113 to 141 N∙m (84 to 104 ft-lb).

  14. While aligning the mounting holes, position the sunshade onto the frame as shown in Figure 13.

    g245151
  15. Loosely mount each corner of the sunshade to the frame with a flange-head bolt (5/16 x 1-1/4 inches), a small washer, and a grommet (Figure 13).

  16. Tighten the sunshade-mounting bolts 5 to 6 N∙m (45 to 55 in-lb).

    Important: Do not overtighten the mounting bolts as the sunshade may crack.

Installing the Sunshade

Groundsmaster 3280 Machine
  1. With the roll bar in the raised position, remove the hairpin cotters and the 2 pins (Figure 14).

    g001199
  2. Insert a washer (13/16 x 1-1/2 inches) onto each bolt (3/4 x 4 inches) as shown in Figure 15.

    g018100
  3. In the holes where the pins were removed, install the bolts and washers (Figure 15).

  4. Install another washer onto each bolt and secure with nuts (3/4 inch) as shown in Figure 15. Torque the nuts 323 to 396 N∙m (238 to 292 ft-lb).

  5. Torque the ROPS pivot bolt (Figure 15) 91 to 113 N∙m (67 to 83 ft-lb) to avoid any bouncing of the roll bar and sunshade.

  6. Position the ROPS-mount bracket onto the top of the traction unit roll bar (Figure 16).

    Note: Make sure that the roll bar is centered in the ROPS-mount bracket.

    g246185
  7. Install the frame assembly to the ROPS-mount bracket (Figure 16).

  8. Using the mounting holes shown in Figure 16, mount the ROPS-mount bracket to the top of the roll bar with 2 U-bolts (4-7/8 x 2-3/4 inches) and 4 flange nuts.

  9. Using the mounting holes shown in Figure 17, loosely secure each of the brace brackets to the roll bar posts with a U-bolt (3-7/8 x 2-3/4 inches) and 2 flange nuts.

    g482770
  10. On each side of the sunshade frame, loosely mount an extension link to the fourth hole of the brace mount with 2 bolts (1/2 x 2-3/4 inches), and 2 flange nuts (1/2 inch) as shown in Figure 18.

    g267174
  11. Loosely install a brace bracket to each brace with a bolt (1/2 x 2-1/2 inches), washer (1/2 inch), and flange nut (1/2 inch) as shown in Figure 18.

  12. Move the brace brackets up or down on the vertical roll bar posts until the sunshade frame is level to the ground, then tighten the U-bolt flange nuts, securing the mounting brackets to the posts.

    Note: Use a level to make sure that the frame is level to the ground.

  13. Tighten all the remaining flange nuts as follows:

    • Torque the flange nuts (3/8 inch) 41 to 55 N∙m (30 to 41 ft-lb).

    • Torque the flange nuts (1/2 inch) 113 to 141 N∙m (84 to 104 ft-lb).

  14. While aligning the mounting holes, position the sunshade onto the frame as shown in Figure 19.

    g245151
  15. Loosely mount each corner of the sunshade to the frame with a flange-head bolt (5/16 x 1-1/4 inches), a small washer, and a grommet (Figure 19).

  16. Tighten the sunshade-mounting bolts 5 to 6 N∙m (45 to 55 in-lb).

    Important: Do not overtighten the mounting bolts as the sunshade may crack.

Installing the Sunshade

Groundsmaster 360 or 7200 Machines
  1. With the roll bar in the raised position, remove the hairpin cotters and the 2 pins (Figure 20).

    g187726
  2. Insert a washer (13/16 x 1-1/2 inches) onto each bolt (3/4 x 4 inches) as shown in Figure 21.

    g018099
  3. In the holes where the pins were removed, install the bolts and washers (Figure 21).

  4. Install another washer onto each bolt and secure with nuts (3/4 inch) as shown in Figure 21. Torque the nuts 323 to 396 N∙m (238 to 292 ft-lb).

  5. Torque the ROPS pivot bolt (Figure 21) 91 to 113 N∙m (67 to 83 ft-lb) to avoid any bouncing of the roll bar and sunshade.

  6. Position the ROPS-mount bracket onto the top of the traction unit roll bar (Figure 22).

    Note: Make sure that the roll bar is centered in the ROPS-mount bracket.

    g246185
  7. Using the mounting holes shown in Figure 22, mount the bracket to the top of the roll bar with 2 U-bolts (4-7/8 x 2-3/4 inch) and 4 flange nuts.

  8. Using the mounting holes shown in Figure 23, loosely secure each of the brace brackets to the roll bar posts with a U-bolt (3-7/8 x 2-3/4 inches) and 2 flange nuts.

    g482771
  9. On each side of the sunshade frame, loosely mount a brace to the sixth hole of the bracket mount with a bolt (1/2 x 2-3/4 inches), washer (1/2 inch), and flange nut (1/2 inch) as shown in Figure 24.

    g267175
  10. Loosely install a brace bracket to each brace with a bolt (1/2 x 2-1/2 inches), washer (1/2 inch), and flange nut (1/2 inch) as shown in Figure 24.

    Note: The U-bolts are not installed symmetrically.

  11. Move the brace brackets up or down on the vertical roll bar posts until the sunshade frame is level to the floor. Use a level to make sure that the frame is level to the ground. Then, tighten the U-bolt flange nuts, securing the brace brackets to the posts.

    Note: Use the front or rear mounting holes, in the brace bracket, if more adjustability is required.

  12. Tighten all the remaining flange nuts as follows:

    • Torque the flange nuts (3/8 inch) 41 to 55 N∙m (30 to 41 ft-lb).

    • Torque the flange nuts (1/2 inch) 113 to 141 N∙m (84 to 104 ft-lb).

  13. While aligning the mounting holes, position the sunshade onto the frame as shown in Figure 25.

    g245151
  14. Loosely mount each corner of the sunshade to the frame with a flange-head bolt (5/16 x 1-1/4 inches) a small washer, and a grommet (Figure 25).

  15. Tighten the sunshade-mounting bolts 5 to 6 N∙m (45 to 55 in-lb).

    Important: Do not overtighten the mounting bolts as the sunshade may crack.

Installing the Sunshade

Groundsmaster 3500, 3505, 4000, and 4100 Machines or Reelmaster 3100, 3555, and 3575 Machines
  1. When you install the Universal Sunshade on a Reelmaster 3100 traction unit or a Groundsmaster 3500/3505 traction unit, install the Wheel Weight Kit.

  2. For Reelmaster 3555 and 3575 traction units, skip to step 12. For all other models, with the roll bar in the raised position, remove the hairpin cotters and the 2 pins (Figure 26).

    g020023
  3. Insert a washer (13/16 x 1-1/2 inches) onto each bolt (3/4 x 4 inches) as shown in Figure 27.

    g020024
  4. In the holes where the pins were removed, install the bolts and washers (Figure 27).

  5. Install another washer onto each bolt and secure with nut (3/4 inch) as shown in (Figure 27). Torque the nuts 323 to 396 N∙m (238 to 292 ft-lb).

  6. Torque the ROPS pivot bolt (Figure 27) 91 to 113 N∙m (67 to 83 ft-lb) to avoid any bouncing of the roll bar and sunshade.

  7. Position the ROPS-mount bracket onto the top of the traction unit roll bar (Figure 28). Make sure that the roll bar is centered in the ROPS-mount bracket.

    g246190
  8. Using the mounting holes shown in Figure 28, secure the ROPS-mount bracket to the top of the roll bar with 2 U-bolts (4-7/8 x 4 inches) and 4 flange nuts.

  9. Using the mounting holes shown in Figure 29, loosely secure each of the brace brackets to the roll bar posts with a U-bolt (3-7/8 x 4 inches) and 2 flange nuts.

    g482772
  10. On each side of the sunshade frame, loosely mount a brace to the brace bracket as follows:

    • For Models 03820, 03821, 30604, 30605, 30608, and 30609 on each side of the sunshade frame, loosely mount a brace to the rear hole of the brace bracket with a bolt (1/2 x 2-1/2 inches), washer (1/2 inch) washer, and flange nut (1/2 inch) as shown in Figure 30.

    • For Models 30446, 30446N, 30447, and 30447N, on each side of the sunshade frame, loosely mount a brace to the second hole of the brace bracket with a bolt (1/2 x 2-1/2 inches), washer (1/2 inch), and flange nut (1/2 inch) as shown in Figure 31.

    g267177
    g267178
  11. Loosely install a brace bracket to each brace with a bolt (1/2 x 2-1/2 inches), washer (1/2 inch), and flange nut (1/2 inch) as shown in Figure 30.

  12. Move the brace bracket up or down, on the vertical roll bar posts, until the sunshade frame is level to the floor.

    Note: Use a level to make sure that the frame is level to the ground.

  13. Tighten the U-bolt flange nuts, securing the mounting brackets to the posts.

  14. Tighten all the remaining flange nuts as follows:

    • Torque the flange nuts (3/8 inch) 41 to 55 N∙m (30 to 41 ft-lb).

    • Torque the flange nuts (1/2 inch) 113 to 141 N∙m (84 to 104 ft-lb).

  15. While aligning the mounting holes, position the sunshade onto the frame as shown in Figure 32.

    g245151
  16. Loosely mount each corner of the sunshade to the frame with a flange-head bolt (5/16 x 1-1/4 inches), a small washer, and a grommet (Figure 32).

  17. Tighten the sunshade-mounting bolts to 5 to 6 N∙m (45 to 55 in-lb).

    Important: Do not overtighten the mounting bolts as the sunshade may crack.

Installing the Sunshade

Groundsmaster 4500 and 4700 Machines or Reelmaster 6700 and 7000 Machines
  1. With the roll bar in the raised position, remove the hairpin cotter and pin.

    g215450
  2. Insert a washer (13/16 x 1-1/2 inches) onto each bolt (3/4 x 4 inches) as shown in Figure 34.

  3. In the holes where the pins were removed, install the bolts and washers (Figure 34).

  4. Install another washer onto each bolt and secure with nut (3/4 inch) as shown in Figure 34.

  5. Torque the ROPS pivot bolt to 91 to 113 N∙m (67 to 83 ft-lb) to avoid any bouncing of the roll bar and sunshade.

    g215449
  6. Position the ROPS-mount bracket onto the top of the traction unit roll bar (Figure 35). Ensure that the roll bar is centered in the ROPS-mount bracket.

    g246186
  7. Using the mounting holes shown in Figure 35, mount the ROPS-mount bracket to the top of the roll bar with 2 U-bolts (3-1/2 inches) and 4 flange nuts.

  8. Using the mounting holes shown in Figure 36, loosely secure each of the brace brackets to the roll bar posts with a U-bolt (3-7/8 x 5 inches) and 2 flange nuts.

    g245424
  9. On each side of the sunshade frame, loosely mount an extension link to the rear and center holes of the mount bracket with 2 bolts (1/2 x 1-1/2 inches), and 2 flange nuts (1/2 inch) as shown in Figure 37.

  10. Attach a brace to the outside of each extension link with a bolt (1/2 x 2-1/2 inches), washer (1/2 inch), and flange nut (1/2 inch) as shown in Figure 37.

    g245195
  11. Loosely install a brace bracket to each brace with a bolt (1/2 x 2-1/2 inches), washer (1/2 inch), and flange nut (1/2 inch) as shown in Figure 37.

  12. Move the brace brackets up or down, on the vertical roll bar posts, until the sunshade frame is level to the floor.

    Note: Use a level to make sure that the frame is level to the ground.

  13. Tighten the U-bolt flange nuts, securing the mount brackets to the posts.

  14. Tighten all the remaining flange nuts as follows:

    • Torque the flange nuts (3/8 inch) 41 to 55 N∙m (30 to 41 ft-lb).

    • Torque the flange nuts (1/2 inch) 113 to 141 N∙m (84 to 104 ft-lb).

  15. While aligning the mounting holes, position the sunshade onto the frame as shown in Figure 38.

    g245151
  16. Loosely mount each corner of the sunshade to the frame with a flange-head bolt (5/16 x 1-1/4 inches), a small washer, and a grommet (Figure 38).

  17. Tighten the sunshade-mounting bolts to 5 to 6 N∙m (45 to 55 in-lb).

    Important: Do not overtighten the mounting bolts as the sunshade may crack.

Installing the Sunshade

Reelmaster 5010 Machine or Groundsmaster 4300 Machine
  1. Position the ROPS-mount brackets onto the top of the traction unit roll bar (Figure 39). Make sure that the roll bar is centered in the ROPS-mount bracket.

    g246190
  2. Using the mounting holes shown in Figure 39, mount the ROPS-mount bracket to the top of the roll bar with 2 U-bolts (4-7/8 x 2-3/4 inches) and 4 flange nuts.

  3. Using the mounting holes shown in Figure 40, loosely secure each of the brace brackets to the roll bar posts with a U-bolt (3-7/8 x 4 inches) and 2 flange nuts.

    g482773
  4. On each side of the sunshade frame, loosely mount a brace to the rear hole of the brace mount with a bolt (1/2 x 2-3/4 inches), 2 washers (1/2 inch), and a flange nut (1/2 inch) as shown in Figure 41.

    g267177
  5. Loosely install a brace bracket to each brace with a bolt (1/2 x 2-1/2 inches), 2 washers (1/2 inch), and a flange nut (1/2 inch) as shown in Figure 41.

  6. Move the brace brackets up or down on the vertical roll bar posts until the sunshade frame is level to the floor.

    Note: Use a level to ensure that the frame is level to the ground.

  7. Tighten the U-bolt flange nuts, securing the mounting brackets to the posts.

  8. Tighten all the remaining flange nuts as follows:

    • Torque the flange nuts (3/8 inch) 41 to 55 N∙m (30 to 41 ft-lb).

    • Torque the flange nuts (1/2 inch) 113 to 141 N∙m (84-104 ft-lb).

  9. While aligning the mounting holes, position the sunshade onto the frame as shown in Figure 42.

    g245151
  10. Loosely mount each corner of the sunshade to the frame with a flange-head bolt (5/16 x 1-1/4 inches), a small washer, and a grommet (Figure 42).

  11. Tighten the sunshade-mounting bolts to 5 to 6 N∙m (45 to 55 in-lb).

    Important: Do not overtighten the mounting bolts as the sunshade may crack.

Installing the Sunshade

Multi Pro 1750 Machine
  1. Position the ROPS-mount bracket onto the top of the turf sprayer roll bar (Figure 43).

    Note: Make sure that the roll bar is centered in the ROPS-mount bracket.

    g246185
  2. Install the frame assembly to the ROPS-mount bracket (Figure 43).

  3. Using the mounting holes shown in Figure 43, mount the ROPS-mount bracket to the top of the roll bar with 2 U-bolts (4-7/8 x 2-3/4 inches) and 4 flange nuts.

  4. Using the mounting holes shown in Figure 44, loosely secure each of the brace brackets to the roll bar posts with a U-bolt (3-7/8 x 2-3/4 inches) and 2 flange nuts.

    g482774
  5. On each side of the sunshade frame, loosely mount an extension link to the fourth hole of the brace mount with 2 bolts (1/2 x 2-3/4 inches), and 2 flange nuts (1/2 inch) as shown in Figure 45.

    g267174
  6. Loosely install a brace bracket to each brace with a bolt (1/2 x 2-1/2 inches), washer (1/2 inch), and flange nut (1/2 inch) as shown in Figure 45.

  7. Move the brace brackets up or down on the vertical roll bar posts until the sunshade frame is level to the ground, then tighten the U-bolt flange nuts, securing the mounting brackets to the posts.

    Note: Use a level to make sure that the frame is level to the ground.

  8. Tighten all the remaining flange nuts as follows:

    • Torque the flange nuts (3/8 inch) 41 to 55 N∙m (30 to 41 ft-lb).

    • Torque the flange nuts (1/2 inch) 113 to 141 N∙m (84 to 104 ft-lb).

  9. While aligning the mounting holes, position the sunshade onto the frame as shown in Figure 46.

    g245151
  10. Loosely mount each corner of the sunshade to the frame with a flange-head bolt (5/16 x 1-1/4 inches), a small washer, and a grommet (Figure 46).

  11. Tighten the sunshade-mounting bolts 5 to 6 N∙m (45 to 55 in-lb).

    Important: Do not overtighten the mounting bolts as the sunshade may crack.

Operation

Transporting the Machine

When transporting the machine, use the 2 holes in the front of the sunshade frame (under the sunshade) to tie down the sunshade to a secure location on the machine and prevent it from raising up in the wind (Figure 47).

g018101

Maintenance

Checking and Tightening the Hardware

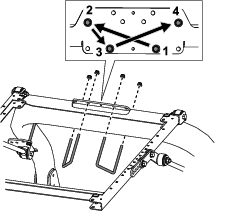
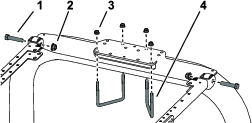
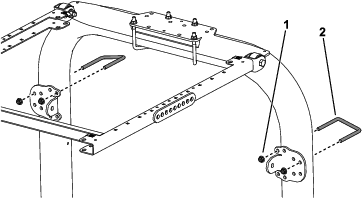
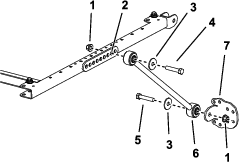
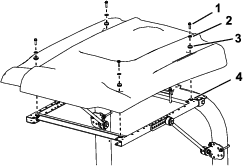
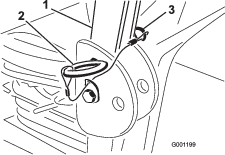
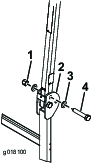
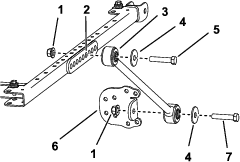
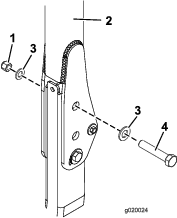
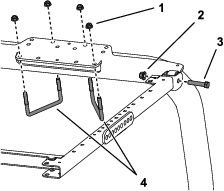
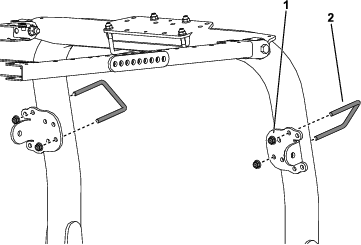
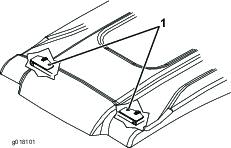
Check and tighten the mounting hardware after 8 hours of operation. Periodically inspect and tighten the hardware.

Cleaning the Sunshade

Wash with a mild soap or detergent using your bare hands, soft cloth, or sponge to free or dislodge any caked-on dirt or other foreign particles.

Note: Using some cleaners or cloths may scratch or degrade the surface of the sunshade. Test the cleaner or cloth in an inconspicuous area.