Safety
Rear Discharge or Mulch Grass
Warning
Without the grass deflector mounted in place, you and others are exposed to blade contact and thrown debris. Contact with rotating mower blade(s) and thrown debris will cause injury or death.
-
Never remove the grass guard from the mower because the grass guard routes material down toward the turf. If the grass guard is ever damaged, replace it immediately.
-
Never put your hands or feet under the mower.
-
Never try to clear the discharge area or mower blades unless you engage the parking brake, disengage the power take off (PTO) lever, shutoff the engine, remove the ignition key, and wait for all motion to stop. Also pull the wire off the spark plug(s).
Ensure that the mower has the rear grass guard to disperse clippings rearward and down toward the turf while in rear discharge mode.
To mulch grass clippings, install the baffles on the mower deck as instructed in the following procedures.
Warning
While maintenance or adjustments are being made, someone could start the engine. Accidental starting of the engine could seriously injure you or other bystanders. Remove the key from the ignition switch, engage parking brake, and pull the wire(s) off the spark plug(s) before you do any maintenance. Also push the wire(s) aside so it does not accidentally contact the spark plug(s).
Installation
Preparing the Mower
Note: Determine the left and right sides of the machine from the normal operating position.
-
Park the machine on a level surface.
-
Disengage the drives and the power take-off.
-
Shut off the machine and remove the key.
-
Wait for all moving parts to stop.
-
Electric models only: turn the battery-disconnect switch to the OFF position.
-
Thoroughly clean the mower deck. Remove all debris to ensure that the baffles fit properly against the mower deck.
-
Repair all bent or damaged areas of the mower deck and replace any missing or damaged parts.
Installing the Mulch Kit
Parts needed for this procedure:
| Screws (5/16 x 1 inch) | 4 |
| Flanged nyloc nut (5/16 x 1 inch) | 4 |
| Mulch cover plate | 1 |
| Mulch baffle | 1 |
| Mulch blade | 1 |
-
Ensure that all moving parts have stopped, the parking brake is engaged, and the key has been removed.
-
Raise the front of the machine and support with jack stands.
Warning
Raising the mower deck for service or maintenance relying solely on mechanical or hydraulic jacks could be dangerous. The mechanical or hydraulic jacks may not be enough support or may malfunction allowing the unit to fall, which could cause injury.
Do not rely solely on mechanical or hydraulic jacks for support. Use adequate jack stands or equivalent support.
-
Flip up the discharge chute. If the mower has been used, scrape underside of mower deck clean.
-
Remove and retain the existing blades from the unit. Keep the hardware to install the mulch blades.
-
Remove the discharge baffle and its hardware from the deck.
-
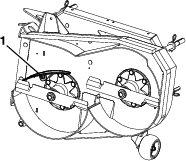
Install the new mulching baffle using the existing hardware. If existing hardware on the deck interferes with the installation, remove the hardware and retain to plug the holes when the mulch kit is removed.
-
Using 4 screws (5/16 x 1 inch) and 4 flanged nyloc nuts (5/16 inch x 1 inch), install the cover plate to the right side of deck. Install the bolts with the heads to the outside of deck.
-
Install the new mulching blades in place of existing blades. Torque the blade bolt to 75 to 81 N•m (55 to 60 ft-lb).
Warning
Incorrect installation of the blade or components used to retain the blade can be dangerous. Failure to use all original components and assembled as shown could allow a blade or blade component to be thrown out from under the deck resulting in serious personal injury or death.
-
Using the retained parts, install the hex head capscrew (5/16-18 x 5/8 inch) with a whizlock nut back into hole in top of deck where discharge baffle was removed.
Note: All open holes in the top of the deck that are not covered by shields must be plugged to prevent sand or other small objects from being thrown up through the deck.
-
Tighten all hardware.
-
Carefully remove the jack stands and lower the machine to the ground.
Removing the Mulch Kit
Perform the following steps to convert the deck back to side discharge:
-
Shut off the engine and wait for all moving parts to stop, engage the parking brake, remove the key, and disconnect the negative battery cable.
-
Remove the mulching baffles, blocker baffle, and cover plate.
-
Install the retained discharge baffle.
-
Replace the mulching blades with standard blades.
-
Install a hex-head capscrew (5/16-18 x 5/8 inch) and a whizlock nut in the hole on top of the deck with the bolt head underneath. All the open holes not covered by belt shields must be plugged to prevent sand or other small objects from being thrown up through the deck.
Danger
An uncovered discharge opening will allow objects to be thrown in an operator's or bystander's direction. Also, contact with the blade could occur. Thrown objects or blade contact can cause serious injury or death.
Never operate the mower with the side discharge door raised, removed, or altered unless there is a discharge deflector and mulch plug in place and working properly.
-
Flip down the discharge chute.