Installation
Warning
While maintenance or adjustments are being made, someone could start the engine. Accidental starting of the engine could seriously injure you or other bystanders.
Remove the key from the ignition switch, engage parking brake, and pull the wire(s) off the spark plug(s) before you do any maintenance. Also push the wire(s) aside so it does not accidentally contact the spark plug(s).
Note: Determine the left and right sides of the machine from the normal operating position.
Note: Park the unit on a level surface. Ensure that all moving parts have stopped, the parking brake is engaged, the key has been removed, and the spark-plug wire has been disconnected. Allow the unit to cool before starting these instructions.
Installing the Trash Container Kit
Parts needed for this procedure:
| Bag mount bracket | 1 |
| Trash-bag rod | 1 |
| Trash bag | 1 |
| Bolt | 2 |
| Nut | 2 |
Warning
Using a drill without proper eye protection may allow debris to enter the eye, causing injury.
When drilling, always wear eye protection.
There is a possibility of hitting the tire with a drill bit when drilling close to the tire.
-
If the right fender on the machine has pilot holes proceed to step 4. If it does not, continue with step 2.
-
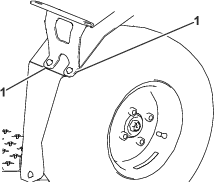
Place the bracket on the right rear fender and align the edges as shown in Figure 1.
-
Mark the hole locations and remove the bracket. Drill 2 pilot holes (0.094 inch).
-
Drill 2 pilot holes (0.343 inch) where the pilot holes are located.
-
Use 2 bolts and 2 nuts to secure the bracket to the right fender.
-
Slide the bag onto the rod.
-
Insert the bag assembly into the slots on the bracket.