Introduction

This machine is intended to be used by professional, hired operators in commercial applications. This machine is designed to level brush, tall weeds, saplings, and small trees and heavy vegetation up to 1.8 m (6 feet) tall and 5.1 cm (2 inches) in diameter.

Read this information carefully to learn how to operate and maintain your product properly and to avoid injury and product damage. You are responsible for operating the product properly and safely.

You may contact Toro directly at www.Toro.com for product safety and operation training materials, accessory information, help finding a dealer, or to register your product.

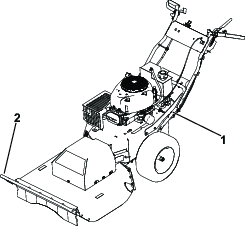
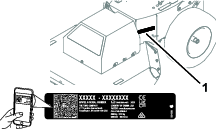
Whenever you need service, genuine Toro parts, or additional information, contact an Authorized Service Dealer or Toro Customer Service and have the model and serial numbers of your product ready. Figure identifies the location of the model and serial numbers on the product. Write the numbers in the space provided.

Important: With your mobile device, you can scan the QR code (if equipped) on the serial number decal to access warranty, parts, and other product information.

g464864

This manual identifies potential hazards and has safety messages identified by the safety-alert symbol (Figure 2), which signals a hazard that may cause serious injury or death if you do not follow the recommended precautions.

g000502

This manual uses 2 words to highlight information. Important calls attention to special mechanical information and Note emphasizes general information worthy of special attention.

This product complies with all relevant European directives; for details, please see the separate product specific Declaration of Conformity (DOC) sheet.

Because in some areas there are local, state, or federal regulations requiring that a spark arrester be used on the engine of this machine, a spark arrester is available as an option. If you require a spark arrester, contact your Authorized Toro Service Dealer.

Genuine Toro spark arresters are approved by the USDA Forestry Service.

It is a violation of California Public Resource Code Section 4442 or 4443 to use or operate the engine on any forest-covered, brush-covered, or grass-covered land unless the engine is equipped with a spark arrester, as defined in Section 4442, maintained in effective working order or the engine is constructed, equipped, and maintained for the prevention of fire.

Warning

CALIFORNIA

Proposition 65 Warning

The engine exhaust from this product contains chemicals known to the State of California to cause cancer, birth defects, or other reproductive harm.

Battery posts, terminals, and related accessories contain lead and lead compounds, chemicals known to the State of California to cause cancer and reproductive harm. Wash hands after handling.

Use of this product may cause exposure to chemicals known to the State of California to cause cancer, birth defects, or other reproductive harm.

Safety

General Safety

This product is capable of amputating hands and feet and of throwing objects. Always follow all safety instructions to avoid serious personal injury.

Using this product for purposes other than its intended use could prove dangerous to you and bystanders.

  • Read, understand, and follow the instructions and warnings in this Operator’s Manual and on the machine and attachments before starting the engine.

  • Use your full attention while operating the machine. Do not engage in any activity that causes distractions; otherwise, injury or property damage may occur.

  • Do not put your hands or feet near moving parts of or under the machine. Keep clear of any discharge opening.

  • Do not operate the machine without all guards and other safety protective devices in place and working on the machine.

  • Keep bystanders and children a safe distance away from the machine. Do not allow children to operate the machine. Allow only people who are responsible, trained, familiar with the instructions, and physically capable to operate the machine.

  • Stop the machine, shut off the engine, remove the electric-start key (if equipped), and wait for all moving parts to stop before servicing, fueling, or unclogging the machine.

Improperly using or maintaining this machine can result in injury. To reduce the potential for injury, comply with these safety instructions and always pay attention to the safety-alert symbol, which means Caution, Warning, or Danger—personal safety instruction. Failure to comply with these instructions may result in personal injury or death.

Safety and Instructional Decals

Graphic

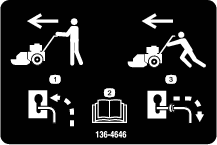
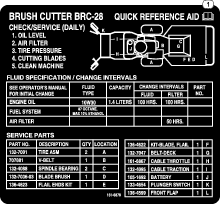
Safety decals and instructions are easily visible to the operator and are located near any area of potential danger. Replace any decal that is damaged or missing.

decal93-7814
decal115-9625
decal127-0392
decal130-9670
decal133-8062
decal136-4646
decal161-6879
decal132-4005

Setup

Installing the Handle

Parts needed for this procedure:

Cable tie1
Handle bolt4
Nut (5/16 inch)4
Slotted-head bolt (#10)2
Locknut (#10)2
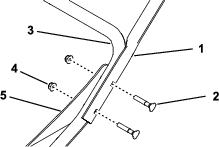
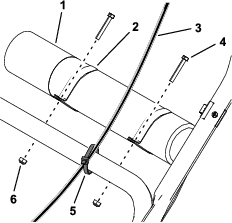
  1. Install the upper handle tubes to the lower handle and braces using 2 handle bolts and 2 nuts (5/16 inch) on both sides of the machine (Figure 3).

    g194930
  2. Secure the throttle cable over the lower handle using a cable tie (Figure 4).

    g195541
  3. Slide the clamps onto the Operator’s Manual tube and install it on top of the lower handle using 2 slotted-head bolts and 2 locknuts (Figure 4).

Connecting the Negative Battery Cable

  1. Remove the plastic cap from the negative battery terminal.

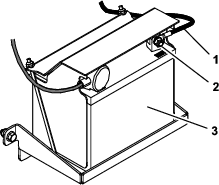
  2. Connect the negative battery cable to the negative (-) battery post using the bolt and nut attached to the cable (Figure 5).

g195546

Product Overview

g464863

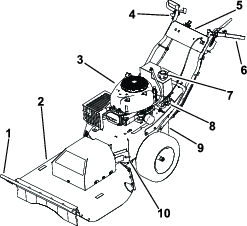
Become familiar with all the controls (Figure and Figure 7) before you start the engine and operate the machine.

g186771

Blade-Control Clutch

Use the blade-control clutch to engage and disengage the mower blade.

Ignition Switch

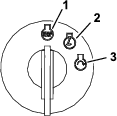
The ignition switch has 3 positions: OFF, RUN, and START. The key turns to START and moves back to RUN upon release. Turning the key to the OFF (“STOP”) position shuts off the engine; however, always remove the key from the ignition switch when leaving the machine to prevent someone from accidentally starting the engine and to prevent the battery from inadvertently draining (Figure 8).

g192199

Throttle/Choke Lever

1 lever controls both the throttle and the choke. The throttle controls the engine speed and has a continuous-variable setting from SLOW to FAST. Engage the choke by moving the lever past the FAST setting until it stops

Traction Control

Use the traction control to move the machine forward and rearward with continuously variable speed.

Fuel-Shutoff Valve

Close the fuel-shutoff valve for transport, maintenance, and storage.

Ensure that the fuel-shutoff valve is open when starting the engine.

Parking Brake

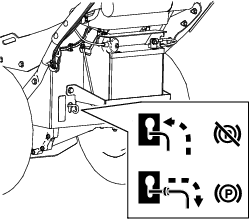
The parking brake is located near the battery. To engage the parking brake, pull the lever outward through the keyhole and down to lock it in place (Figure 9). Disengage the parking brake by lifting the lever and push it inward through the keyhole.

g195543

Hour Meter

The hour meter displays the number of hours of operation logged on the machine (Figure 10).

g186773

Note: Specifications and design are subject to change without notice.

Length229 cm (90 inches)
Width88 cm (35 inches)
Height101 cm (40 inches)
Weight173 kg (382 lb)
Cutting width71 cm (28 inches)

Attachments/Accessories

A selection of Toro approved attachments and accessories is available for use with the machine to enhance and expand its capabilities. Contact your Authorized Service Dealer or Distributor or go to www.Toro.com for a list of all approved attachments and accessories.

To ensure optimum performance and continued safety certification of the machine, use only genuine Toro replacement parts and accessories. Replacement parts and accessories made by other manufacturers could be dangerous, and such use could void the product warranty.

Operation

Before Operation

Note: Determine the left and right sides of the machine from the normal operating position.

Before Operation Safety

General Safety

  • Become familiar with the safe operation of the equipment, operator controls, and safety signs.

  • Check that all guards and safety devices, such as deflectors and/or grass catcher, are in place and working properly.

  • Always inspect the machine to ensure that the blades, blade bolts, and cutting assembly are not worn or damaged.

  • Inspect the area where you will use the machine, and remove all objects that could interfere with the operation of the machine or that the machine could throw.

Fuel Safety

  • Fuel is extremely flammable and highly explosive. A fire or explosion from fuel can burn you and others and can damage property.

    • To prevent a static charge from igniting the fuel, place the container and/or machine directly on the ground before filling, not in a vehicle or on an object.

    • Fill the fuel tank outdoors, in an open area, when the engine is cold. Wipe up any fuel that spills.

    • Do not handle fuel when smoking or around an open flame or sparks.

    • Do not remove the fuel cap or add fuel to the tank while the engine is running or hot.

    • If you spill fuel, do not attempt to start the engine. Avoid creating a source of ignition until the fuel vapors have dissipated.

    • Store fuel in an approved container and keep it out of the reach of children.

  • Fuel is harmful or fatal if swallowed. Long-term exposure to vapors can cause serious injury and illness.

    • Avoid prolonged breathing of vapors.

    • Keep your hands and face away from the nozzle and the fuel-tank opening.

    • Keep fuel away from your eyes and skin.

Fuel Specification

Petroleum fuelUse unleaded gasoline with an octane rating of 87 or higher ((R+M)/2 rating method).
Ethanol blended fuelUse an unleaded-gasoline blend with up to 10% ethanol (gasohol) or 15% MTBE (methyl tertiary butyl ether) by volume is acceptable. Ethanol and MTBE are not the same.
Gasoline with 15% ethanol (E15) by volume is not approved for use. Never use gasoline that contains more than 10% ethanol by volume, such as E15 (contains 15% ethanol), E20 (contains 20% ethanol), or E85 (contains up to 85% ethanol). Using unapproved gasoline may cause performance problems and/or engine damage which may not be covered under warranty.

Important: For best results, use only clean, fresh fuel (less than 30 days old).

  • Do not use gasoline containing methanol.

  • Do not store fuel either in the fuel tank or fuel containers over the winter unless you use a fuel stabilizer.

  • Do not add oil to gasoline.

Using Stabilizer/Conditioner

Use a fuel stabilizer/conditioner in the machine to provide the following benefits:

Important: Do not use fuel additives containing methanol or ethanol.

Add the correct amount of fuel stabilizer/conditioner to the gasoline.

Note: A fuel stabilizer/conditioner is most effective when mixed with fresh gasoline. To minimize the chance of varnish deposits in the fuel system, use fuel stabilizer at all times.

Filling the Fuel Tank

  1. Park the machine on a level surface and shut off the engine.

  2. Allow the engine to cool.

  3. Clean around the fuel-tank cap and remove it (Figure 6).

  4. Add fuel to the fuel tank until the level of fuel is at the bottom of the filler neck.

  5. Install the fuel-tank cap securely.

  6. Wipe up any fuel that may have spilled.

Checking the Engine-Oil Level

Before you start the engine and use the machine, check the oil level in the engine crankcase; refer to Checking the Engine-Oil Level.

During Operation

During Operating Safety

General Safety

  • Wear appropriate clothing including eye protection; hearing protection; protective gloves; long pants; and substantial, slip-resistant footwear. Tie back long hair and do not wear loose clothing or loose jewelry.

  • Do not operate the machine while ill, tired, or under the influence of alcohol or drugs.

  • The blade is sharp; contacting the blade can result in serious personal injury. Shut off the engine, remove the ignition key (if equiped), and wait for all moving parts to stop before leaving the operating position.

  • Keep bystanders, especially small children, out of the operating area. Stop the machine if anyone enters the area.

  • Always look down and behind you before moving the machine in reverse.

  • Operate the machine only in good visibility and appropriate weather conditions. Do not operate the machine when there is the risk of lighting.

  • Wet grass or leaves can cause serious injury if you slip and contact the blade. Avoid mowing in wet conditions.

  • Use extreme care when approaching blind corners, shrubs, trees, or other objects that may block your view.

  • Watch for holes, ruts, bumps, rocks, or other hidden objects. Uneven terrain could cause the machine to overturn or cause you to lose your balance or footing.

  • If the machine strikes an object or starts to vibrate, immediately release the blade-control clutch, shut off the engine, remove the key, wait for all moving parts to stop, and disconnect the wire from the spark plug before examining the machine for damage. Make all necessary repairs before resuming operation.

  • Before leaving the operating position, shut off the engine, remove the ignition key, and wait for all moving parts to stop.

  • If the engine has been running the muffler will be hot and can severely burn you. Keep away from the hot muffler.

  • Check the rear deck flap frequently for any wear or deterioration and replace them with the manufacturer's recommended parts when necessary.

  • Use accessories and attachments approved by The Toro® Company only.

Slope Safety

  • Slopes are a major factor related to loss of control and rollover accidents, which can result in severe injury or death. The operator is responsible for safe slope operation. Operating the machine on any slope requires extra caution. Before using the machine on a slope, do the following:

    • Review and understand the slope instructions in the manual and on the machine.

    • Evaluate the site conditions of the day to determine if the slope is safe for machine operation. Use common sense and good judgment when performing this evaluation. Changes in the terrain, such as moisture, can quickly affect the operation of the machine on a slope.

  • Operate across slopes, never up and down. Avoid operation on excessively steep or wet slopes. Poor footing could cause a slip and fall accident.

  • Identify hazards at the base of the slope. Do not operate the machine near drop-offs, ditches, embankments, water or other hazards. The machine could suddenly roll over if a wheel goes over the edge or the edge collapses. Keep a safe distance between the machine and any hazard. Use a hand held tool to work in these areas.

  • Avoid starting, stopping, or turning the machine on slopes. Avoid making sudden changes in speed or direction; turn slowly and gradually.

  • Do not operate a machine under any conditions where traction, steering or stability is in question. Be aware that operating the machine on wet grass, across slopes or downhill may cause the machine to lose traction. Loss of traction to the drive wheels may result in sliding and a loss of braking and steering. The machine can slide even if the drive wheels are stopped.

  • Remove or mark obstacles such as ditches, holes, ruts, bumps, rocks or other hidden hazards. Tall grass can hide obstacles. Uneven terrain could overturn the machine.

  • If you lose control of the machine, step away from the direction of travel of the machine.

  • Use the traction control to slow the machine when going down slopes. Do not fully engage the traction control downhill.

Starting and Shutting Off the Engine

Starting the Engine

Note: You may need multiple attempts to start the engine when you start it the first time or after the engine has run out of fuel completely.

  1. Move the throttle lever forward past the FAST position and hold it against the forward stop to activate the choke.

  2. Turn the ignition key to the START position (Figure 11).

    Important: Do not engage the starter for more than 5 seconds at a time. If the engine fails to start, wait 15 seconds between attempts. Failure to follow these instructions can burn out the starter motor.

    g192135
  3. When the engine starts, release the key and move the throttle lever back to the FAST position.

Shutting Off the Engine

  1. Release the blade-control clutch to disengage the blade.

  2. Turn the ignition key to the STOP position to shut off the engine and remove the key.

Operating the Traction Control

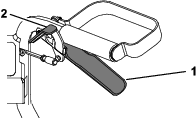
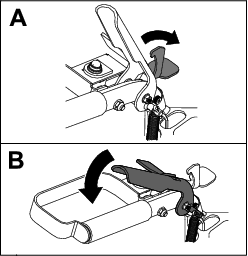
To move the machine forward, squeeze the traction control toward the hand grip (Figure 12).

To move the machine rearward, push the thumb pad down to move the traction control away from the hand grip (Figure 12).

The more you move the traction control in either direction, the faster the machine moves in that direction.

To disengage the traction drive, release the traction control.

g186864

Operating the Blade-Control Clutch

This machine is capable of cutting brush and saplings up to 1.8 m (6 feet) tall and 5.1 cm (2 inches) in diameter. The cutting deck pivots to follow the contour of the ground as you move the machine.

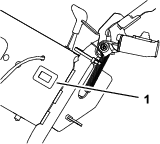
To engage the blade, use your right hand to open the safety latch and then use your left hand to squeeze the blade-control clutch to the left handle (Figure 12).

To disengage the blade, release the blade-control clutch.

g188811

After Operation

After Operation Safety

General Safety

  • Clean grass and debris from the machine to help prevent fires. Clean up oil or fuel spills.

  • Shut off the engine, and remove the key. Wait for all movement to stop and allow the machine to cool before cleaning, adjusting, repairing, or storing the machine in any enclosure.

  • Never store the machine or fuel container where there is an open flame, spark, or pilot light, such as on a water heater or on other appliances.

Hauling Safety

  • Remove the ignition key (if equipped) before loading the machine for hauling.

  • Use care when loading or unloading the machine.

  • Secure the machine from rolling.

Moving a Nonfunctioning Machine

  1. Park the machine on a level surface and disengage the blade-control clutch.

  2. Engage the parking brake, shut off the engine, remove the key, and wait for all moving parts to stop.

  3. Move the bypass lever outward through the keyhole and down to lock it in place.

  4. Disengage the parking brake.

  5. Push the machine as required.

  6. Engage the parking brake.

  7. Move the bypass lever up and inward through the keyhole to disengage the bypass.

g464929g188887

Transporting the Machine

Use a heavy-duty trailer or truck to transport the machine. Ensure that the trailer or truck has all necessary brakes, lighting, and marking as required by law. Please carefully read all the safety instructions. Knowing this information could help you, your family, pets, or bystanders avoid injury.

  1. If using a trailer, connect it to the towing vehicle and connect the safety chains.

  2. If applicable, connect the trailer brakes.

  3. Load the machine onto the trailer or truck.

  4. Shut off the engine, remove the key, engage the parking brake, and close the fuel valve.

  5. Use the brush bar and 2 tie-down loops on the machine to securely fasten the machine to the trailer or truck with straps, chains, cable, or ropes (Figure 15).

    g466742

Maintenance

Note: Determine the left and right sides of the machine from the normal operating position.

Recommended Maintenance Schedule(s)

Maintenance Service IntervalMaintenance Procedure
Before each use or daily
  • Check the engine-oil level.
  • Clean the cooling system(more often in dusty, dirty conditions).
  • Inspect the condition of the tires.
  • Clean the engine air-intake screen.
  • Inspect the blade.
  • Remove debris from the machine.
  • Every 25 hours
  • Clean the air-cleaner foam element(more often in dusty, dirty conditions).
  • Check tire pressure.
  • Check the belts for wear/cracks.
  • Every 100 hours
  • Replace the in-line fuel filter.
  • Clean the engine-cooling fins and shrouds.
  • Before storage
  • Charge the battery and disconnect battery cables.
  • Change the engine oil and filter.
  • Service the air cleaner.
  • Empty the fuel tank.
  • Lubricate inside the engine cylinder.
  • Yearly
  • Replace the air-cleaner paper and foam elements(more often in dusty, dirty conditions).
  • Check and adjust the valve clearance. Contact an Authorized Service Dealer.
  • Change the spark plug(s).
  • Caution

    If you leave the key in the switch, someone could accidently start the engine and seriously injure you or other bystanders.

    Remove the key from the switch before you perform any maintenance.

    Maintenance Safety

    • Disconnect the spark-plug wire from the spark plug before performing any maintenance procedure.

    • Wear gloves and eye protection when servicing the machine.

    • The blade is sharp; contacting the blade can result in serious personal injury. Wear gloves when servicing the blade.

    • Never tamper with safety devices. Check their proper operation regularly.

    • Tipping the machine may cause the fuel to leak. Fuel is flammable and explosive, and can cause personal injury. Run the engine dry or remove the fuel with a hand pump; never siphon the fuel.

    Engine Maintenance

    Engine Safety

    • Keep your hands, feet, face, other body parts, and clothing away from the muffler and other hot surfaces. Allow engine components to cool before performing maintenance.

    • Do not change the engine governor speed or overspeed the engine.

    Servicing the Air Cleaner

    Maintenance Service IntervalMaintenance Procedure
    Every 25 hours
  • Clean the air-cleaner foam element(more often in dusty, dirty conditions).
  • Yearly
  • Replace the air-cleaner paper and foam elements(more often in dusty, dirty conditions).
  • Check and adjust the valve clearance. Contact an Authorized Service Dealer.
  • Note: Service the air cleaner more frequently (every few hours) if operating conditions are extremely dusty or sandy.

    Removing the Air-Cleaner Elements

    1. Park the machine on a level surface, shut off the engine, wait for all moving parts to stop, and remove the key from the ignition switch before leaving the operating position.

    2. Shut off the engine, remove the key, and wait for all moving parts to stop before leaving the operating position.

    3. Clean around the air-cleaner cover to prevent dirt from getting into the engine and causing damage.

    4. Rotate the latches counterclockwise and remove the cover.
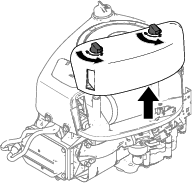
      g374186
    5. Lift the end of the filter and remove it from the air intake.
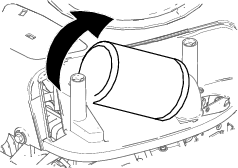
      g374187
    6. Separate the foam and paper elements.

      g305608

    Servicing the Foam Element

    1. Wash the foam element in liquid soap and warm water. When the element is clean, rinse it thoroughly.

    2. Dry the element by squeezing it in a clean cloth.

      Important: Replace the foam element if it is torn or worn.

    3. Lightly oil the foam element using new engine oil and squeeze out any excess oil.

    Servicing the Paper Air-Cleaner Element

    1. Clean the paper element by tapping it gently to remove dust.

      Note: If it is very dirty, replace the paper element with a new one.

    2. Inspect the element for tears, an oily film, or damage to the rubber seal.

    3. Replace the paper element if it is damaged.

      Important: Do not clean the paper filter.

    Installing the Air Cleaner

    1. Install the foam pre-cleaner element over the paper element.

      Note: Ensure that you do not damage the elements.

    2. Install the air-cleaner elements onto the air-cleaner base.

    3. Install the cover and secure it with the latches.

    Servicing the Engine Oil

    Engine-Oil Specifications

    Oil Type: Detergent oil (including synthetic) of API service SJ or higher

    Crankcase Capacity: 1.4 L (47 fl oz) with oil filter

    Viscosity: See the table below.
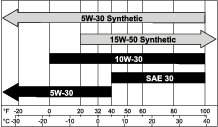
    g359987

    Checking the Engine-Oil Level

    Maintenance Service IntervalMaintenance Procedure
    Before each use or daily
  • Check the engine-oil level.
  • Note: Check the oil when the engine is cold.

    Important: If you overfill or underfill the engine crankcase with oil and run the engine, you may damage the engine.

    1. Park the machine on a level surface, shut off the engine, wait for all moving parts to stop, and remove the key from the ignition switch before leaving the operating position.

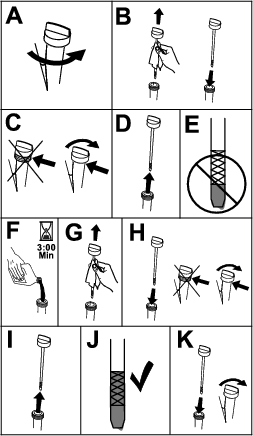
    2. To keep dirt, grass clippings, etc., out of the engine, clean the area around the oil-fill cap and dipstick before removing it.

    3. Check the engine-oil level.

    g373146

    Changing the Engine Oil and Oil Filter

    Maintenance Service IntervalMaintenance Procedure
    1. Park the machine on a level surface, shut off the engine, wait for all moving parts to stop, and remove the key from the ignition switch before leaving the operating position.

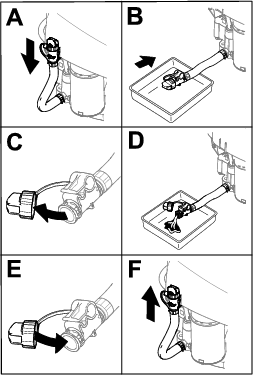
    2. Drain the oil from the engine.

      g373547
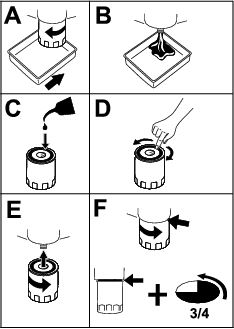
    3. Change the engine-oil filter.

      Note: Ensure that the oil-filter gasket touches the engine and then turn the filter an extra 3/4 turn.
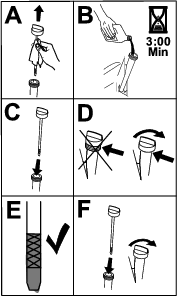
      g373564
    4. Slowly pour approximately 80% of the specified oil into the filler tube and slowly add the additional oil to bring it to the Full mark.
      g373565
    5. Dispose of the used oil at a recycling center.

    Servicing the Spark Plug

    Maintenance Service IntervalMaintenance Procedure
    Yearly
  • Change the spark plug(s).
  • Ensure that the air gap between the center and side electrodes is correct before installing the spark plug. Use a spark plug wrench for removing and installing the spark plug and a gapping tool or feeler gauge to check and adjust the air gap. Install a new spark plug if necessary.

    Type: Briggs and Stratton® 491055 or Champion® XC92YC

    Air gap: 0.76 mm (0.03 inch)

    Removing the Spark Plug

    1. Park the machine on a level surface, shut off the engine, wait for all moving parts to stop, and remove the key from the ignition switch before leaving the operating position.

    2. Clean the area around the base of the plug to keep dirt and debris out of the engine.

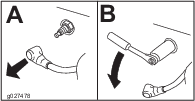
    3. Remove the spark plug.

      g027478

    Checking the Spark Plug

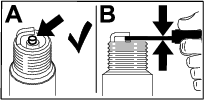
    Important: Do not clean the spark plug(s). Always replace the spark plug(s) when it has a black coating, worn electrodes, an oily film, or cracks.

    If you see light brown or gray on the insulator, the engine is operating properly. A black coating on the insulator usually means the air cleaner is dirty.

    Set the gap to 0.75 mm (0.03 inch).
    g206628

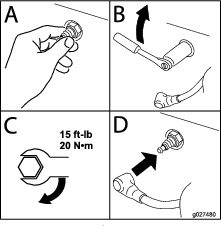
    Installing the Spark Plug

    g027480

    Cleaning the Cooling System

    Maintenance Service IntervalMaintenance Procedure
    Before each use or daily
  • Clean the cooling system(more often in dusty, dirty conditions).
    1. Park the machine on a level surface, shut off the engine, wait for all moving parts to stop, and remove the key from the ignition switch before leaving the operating position.

    2. Remove the air filter from the engine.

    3. Remove the engine shroud.

    4. To prevent debris entering the air intake, install the air filter to the filter base.

    5. Clean debris and grass from the parts.

    6. Remove the air filter and install the engine shroud.

    7. Install the air filter.

    Fuel System Maintenance

    Danger

    In certain conditions, gasoline is extremely flammable and highly explosive. A fire or explosion from gasoline can burn you, others, and can damage property.

    • Perform any fuel-related maintenance when the engine is cold. Do this outdoors in an open area. Wipe up any gasoline that spills.

    • Never smoke when draining gasoline and stay away from an open flame or where a spark may ignite the gasoline fumes.

    Replacing the In-Line Fuel Filter

    Maintenance Service IntervalMaintenance Procedure
    Every 100 hours
  • Replace the in-line fuel filter.
  • Never install a dirty filter if it is removed from the fuel line.

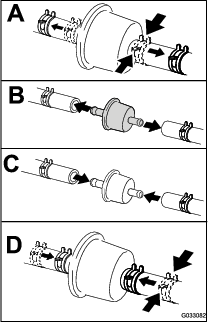
    1. Park the machine on a level surface, shut off the engine, and remove the key from the ignition switch.

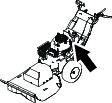
    2. Close the fuel-shutoff valve.

    3. Replace the in-line filter (Figure 27).
      g464940g033082

    Electrical System Maintenance

    Electrical System Safety

    • Disconnect the battery before repairing the machine. Disconnect the negative terminal first and the positive last. Connect the positive terminal first and the negative last.

    • Charge the battery in an open, well-ventilated area, away from sparks and flames. Unplug the charger before connecting or disconnecting the battery.

    • Wear protective clothing and use insulated tools.

    Removing the Battery

    Warning

    Battery terminals or metal tools could short against metal machine components, causing sparks. Sparks can cause the battery gasses to explode, resulting in personal injury.

    • When removing or installing the battery, do not allow the battery terminals to touch any metal parts of the machine.

    • Do not allow metal tools to short between the battery terminals and metal parts of the machine.

    Warning

    Incorrect battery-cable routing could damage the machine and cables causing sparks. Sparks can cause the battery gasses to explode, resulting in personal injury.

    • Always disconnect the negative (black) battery cable before disconnecting the positive (red) cable.

    • Always connect the positive (red) battery cable before connecting the negative (black) cable.

    1. Park the machine on a level surface, shut off the engine, and remove the key from the ignition switch.

    2. Disconnect the negative (black) battery cable from the battery.

    3. Disconnect the positive (red) battery cable from the battery.

    4. Remove the nuts and securing rods from both sides of the battery, battery cover, and battery tray.
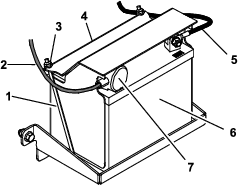
    g187024

    Charging the Battery

    Maintenance Service IntervalMaintenance Procedure
    Before storage
  • Charge the battery and disconnect battery cables.
    1. Remove the battery from the chassis; refer to Removing the Battery.

    2. Charge the battery for a minimum of 1 hour at 6 to 10 amps.

      Note: Do not overcharge the battery.

    3. When the battery is fully charged, unplug the charger from the electrical outlet, then disconnect the charger leads from the battery posts (Figure 29).
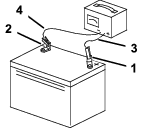
      g466741

    Installing the Battery

    1. Place the battery on the tray and secure it using the battery cover, 2 securing rods, and 2 nuts (Figure 28).

    2. Install the positive battery cable to the positive (+) battery post.

    3. Install the negative battery cable to the negative (-) battery post.

    4. Slide the red terminal boot onto the positive battery post (Figure 28).

    Servicing a Replacement Battery

    The original battery is maintenance-free and does not require service. For servicing a replacement battery, refer to the battery manufacturer’s instructions.

    Drive System Maintenance

    Checking the Tire Pressure

    Maintenance Service IntervalMaintenance Procedure
    Before each use or daily
  • Inspect the condition of the tires.
  • Every 25 hours
  • Check tire pressure.
  • Maintain the air pressure in the tires as specified. Check the pressure at the valve stem (Figure 30). Check the tires when they are cold to get the most accurate pressure reading.

    Inflate the tires to 97 kPa (14 psi).

    g000554

    Cooling System Maintenance

    Cleaning the Engine Screen

    Maintenance Service IntervalMaintenance Procedure
    Before each use or daily
  • Clean the engine air-intake screen.
  • To ensure proper cooling, ensure that the air-intake screen, cooling fins, and other external surfaces of the engine are kept clean at all times.

    Use a dry brush to clean accumulated debris from the air-intake screen and around the engine.

    Important: To prevent contaminating the fuel system, do not use water to clean the engine.

    Cleaning the Engine-Cooling Fins and Shrouds

    Maintenance Service IntervalMaintenance Procedure
    Every 100 hours
  • Clean the engine-cooling fins and shrouds.
    1. Park the machine on a level surface, shut off the engine, and remove the key from the ignition switch.

    2. Remove the air-intake screen and cooling shrouds.

    3. Clean the debris and grass from the engine parts.

    4. Install the air-intake screen and cooling shrouds.

    Belt Maintenance

    Inspecting the Belts

    Maintenance Service IntervalMaintenance Procedure
    Every 25 hours
  • Check the belts for wear/cracks.
  • Check the belts for cracks, frayed edges, burn marks, or any other damage. Replace damaged belts.

    Replacing the Transmission Belt

    1. Park the machine on a level surface, disengage the blade, and engage the parking brake.

    2. Turn the ignition key to the OFF position, remove the key, and disconnect the spark plug wire from the spark plug.

    3. Use lifting equipment to raise the machine and support it with jack stands.

    4. Remove the extension spring from the tension arm (Figure 31).
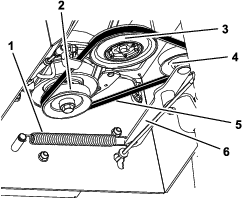
      g188917
    5. Remove the transmission belt from the pulleys.

    6. Wrap the new transmission belt around the clutch, transmission, and tension pulleys (Figure 31).

    7. Install the extension spring onto the tension arm.

    Replacing the Mower Belt

    1. Park the machine on a level surface, disengage the blade, and engage the parking brake.

    2. Turn the ignition key to the OFF position, remove the key, and disconnect the spark plug wire from the spark plug.

    3. Use lifting equipment to raise the machine and support it with jack stands.

    4. Remove the transmission belt; refer to Replacing the Transmission Belt.

    5. Loosen the left and right side bolts a few turns and loosen the front bolt until the cover is loose (Figure 32).

      Note: Do not remove the bolts.
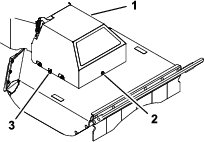
      g188928
    6. Lift the cover upward to remove it.

    7. Detach the extension spring (Figure 33).

      Caution

      The spring is under tension when installed and can cause personal injury.

      Wear safety glasses and be careful when removing the spring.
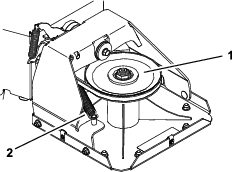
      g188940
    8. Remove the mower belt from the clutch pulley.

    9. Route the new belt around the clutch pulley, through the belt guide, along the idler pulley, and around the deck pulley (Figure 33 and Figure 34).

      Note: Ensure that the belt is seated correctly on both pulleys, with no twists. The belt needs to be in this position until you install the extension spring.
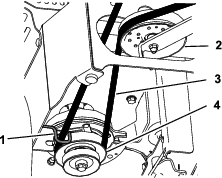
      g189063
    10. Install the extension spring (Figure 33).

    11. Lower the belt cover onto the deck, aligning the slots in the cover with the side bolts. Tighten the front bolt, then tighten both side bolts (Figure 32).

    12. Install the transmission belt; refer to Replacing the Transmission Belt.

    Mower Maintenance

    To ensure a superior quality of cut, keep the blade sharp. For convenient sharpening and replacement, you may want to keep extra blades on hand.

    Blade Safety

    A worn or damaged blade can break, and a piece of the blade could be thrown at you or bystanders, resulting in serious personal injury or death. Trying to repair a damaged blade may result in discontinued safety certification of the product.

    • Inspect the blade periodically for wear or damage.

    • Use care when checking the blade. Wrap the blade or wear gloves, and use caution when servicing the blade. Only replace or sharpen the blade; never straighten or weld them.

    Before Inspecting or Servicing the Blade

    1. Park the machine on a level surface, disengage the blade, and engage the parking brake.

    2. Turn the ignition key to the OFF position, remove the key, and disconnect the spark plug wires from the spark plugs.

    3. Tilt the machine so that the deck is off the ground and place wood blocks under the deck to hold it up.

    Inspecting the Blade

    Maintenance Service IntervalMaintenance Procedure
    Before each use or daily
  • Inspect the blade.
    1. Inspect the cutting edges (Figure 35).

    2. If the edges are not sharp or have nicks, remove and sharpen the blade; refer to Sharpening the Blade.

    3. Inspect the blade.

    4. If you notice any crack or wear, immediately install a new blade (Figure 35).

      g248312

    Checking for a Bent Blade

    Straight Blade Only

    Warning

    A blade that is bent or damaged could break apart and could seriously injure or kill you or bystanders.

    • Always replace a bent or damaged blade with a new blade.

    • Do not file or create sharp notches in the edges or surfaces of the blade.

    1. Rotate the blade until the ends face forward and backward.

    2. From a level surface, measure the distance to the cutting edge at position A of the blade (Figure 36).
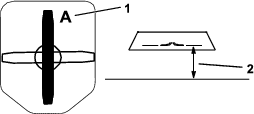
      g189024
    3. Rotate the blade 180°.

    4. From a level surface, measure the distance to the cutting edge of the blade at the same position as in step 2.

      Note: The difference between the dimensions obtained in steps 2 and 4 must not exceed 3 mm (1/8 inch).

      Note: If this dimension exceeds 3 mm (1/8 inch), the blade is bent and must be replaced.

    Removing the Blade

    Replace the blade if it hits a solid object, if the blade is out of balance, or if a blade is bent. To ensure optimum performance and continued safety conformance of the machine, use genuine Toro replacement blades. Replacement blades made by other manufacturers may result in nonconformance with safety standards.

    Note: Flail blades are sharpened on 2 sides, so you can turn over a blade when you remove it for a new sharp edge

    Flail Blade Only

    1. Hold the blade end using a rag or a thickly padded glove.

    2. Remove the blade bolt, the curved washer, and blade from the blade mount on the bottom of the spindle-cup assembly (Figure 37).
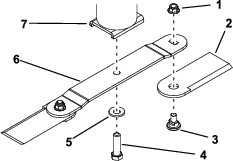
      g187214
    3. To remove only the flail blades, remove the flails from the blade by removing the flail bolt and nut from each flail.

    Straight Blade Only

    1. Hold the blade end using a rag or thickly-padded glove.

    2. Remove the blade bolt, curved washer, and blade from the spindle cup assembly (Figure 38).
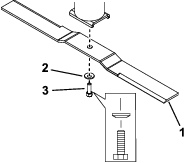
      g189023

    Sharpening the Blade

    1. Use a file to sharpen the cutting edge at both ends of the blade (Figure 39).

      Note: Maintain the original angle.

      Note: The blade retains balance if the same amount of material is removed from both cutting edges.

      g192119
    2. For straight blades only, check the balance of the blade by putting it on a blade balancer (Figure 40).

      If the blade is not balanced, file some metal off the back side of the blade (opposite of the cutting edge) only (Figure 37).

      Repeat this procedure until the blade is balanced.

      Note: If the blade stays in a horizontal position, the blade is balanced.

      g192120

    Installing the Blade

    Flail Blade Only

    1. Attach the blade to the spindle cup assembly using the blade bolt and curved washer (Figure 37).

      Note: Ensure that cupped side of the washer faces the blade, and the convex side of the blade faces the spindle cup.

    2. Torque the bolt to 136 to 149 N∙m (100 to 110 ft-lb).

    3. To install only the flail blades, secure the flails to the end of the blade using the flail bolt and a new nut for each flail (Figure 37). Torque the nut to 103 to 127 N∙m (76 to 94 ft-lb).

      Note: Always replace a removed flail nut with a new nut.

      Note: Secure the flails to the bottom of the blade, not the top.

    Straight Blade Only

    1. Install the blade onto the spindle shaft (Figure 38).

      Note: Ensure that the convex side of the blade faces the spindle cup.

    2. Install the curved washer (cupped side toward the blade) and blade bolt (Figure 38).

    3. Torque the blade bolt to 136 to 149 N∙m (100 to 110 ft-lb).

    Cleaning

    Removing Debris from the Machine

    Maintenance Service IntervalMaintenance Procedure
    Before each use or daily
  • Remove debris from the machine.
  • Regular cleaning and washing increases the lifespan of the machine. Clean the machine directly after use.

    Check before cleaning that the fuel tank cap is properly in place to avoid getting water in the tank.

    Use care when using a high-pressure sprayer, because it can damage warning decals, instruction signs, and the engine.
    Storage

    Storing the Machine

    For storage over 30 days, prepare the machine as follows:

    1. Park the machine on a level surface, disengage the blade, and engage the parking brake.

    2. Turn the ignition key to the OFF position, remove the key, and disconnect the spark plug wire from the spark plug.

    3. Remove debris, dirt, and grime from the external parts of the entire machine, especially the engine.

      Important: You can wash the machine with mild detergent and water.

    4. Add a petroleum-based stabilizer/conditioner to fuel in the tank. Follow the mixing instructions from the stabilizer manufacturer. (7.8 ml per L or 1 fl oz per US gallon).

      Note: Fuel stabilizer/conditioner is most effective when mixed with fresh fuel and used at all times.

      Important: Do not use an alcohol-based stabilizer (ethanol or methanol). Do not store stabilizer/conditioned fuel over 90 days.

    5. Run the engine to distribute conditioned fuel through the fuel system (5 minutes).

    6. Shut off the engine, allow it to cool, and drain the fuel tank using a pump type siphon. Dispose of fuel properly; recycle as per local codes.

    7. Start the engine and run it until it shuts off.

    8. Start and run the engine until it does not start again.

    9. Service the air cleaner; refer to Servicing the Air Cleaner.

    10. Change the engine crankcase oil; refer to Changing the Engine Oil and Oil Filter.

    11. Remove and charge the battery; refer to Charging the Battery.

    12. Remove the spark plug and check the condition; refer to Servicing the Spark Plug.

    13. With the spark plug removed from the engine, pour 2 tablespoons of engine oil into the spark plug hole. Now use the starter to crank the engine and distribute the oil inside the cylinder. Install the spark plug(s). Do not install the wire on the spark plug(s).

    14. Check and tighten all bolts, nuts, and screws. Repair or replace any part that is damaged.

    15. Paint all scratched or bare metal surfaces. Paint is available from your Authorized Service Dealer.

    16. Store the machine in a clean, dry garage or storage area.

    17. Cover the machine to protect it and keep it clean.

    Troubleshooting

    ProblemPossible CauseCorrective Action
    The engine overheats.
    1. The engine load is excessive.
    2. The oil level in the crankcase is low.
    3. The cooling fins and air passages under the engine blower housing are plugged.
    4. The air cleaner is dirty.
    5. Dirt, water, or stale fuel is in fuel system.
    1. Reduce the ground speed.
    2. Add oil to the crankcase.
    3. Remove the obstruction from the cooling fins and air passages.
    4. Clean or replace the air cleaner element.
    5. Contact an Authorized Service Dealer
    The starter does not crank.
    1. The blade control switch is engaged.
    2. The battery is dead.
    3. The electrical connections are corroded or loose.
    4. A fuse is blown.
    5. A relay or switch is damaged.
    1. Disengage the blade-control switch.
    2. Charge the battery. Turn the ignition switch to Off and remove the key when the machine is not in use to avoid draining the battery.
    3. Check the electrical connections for good contact.
    4. Replace the fuse.
    5. Contact an Authorized Service Dealer.
    The engine does not start, starts hard, or fails to keep running.
    1. The fuel tank is empty.
    2. The air cleaner is dirty.
    3. The spark plug wire(s) is loose or disconnected.
    4. The spark plug(s) is pitted, fouled, or the gap is incorrect.
    5. There is dirt in fuel filter.
    6. Dirt, water, or stale fuel is in fuel system.
    7. There is incorrect fuel in the fuel tank.
    8. The oil level in the crankcase is low.
    1. Fill the fuel tank.
    2. Clean or replace the air cleaner element.
    3. Install the wire(s) on the spark plug.
    4. Install a new, correctly gapped spark plug(s).
    5. Replace the fuel filter.
    6. Contact an Authorized Service Dealer.
    7. Drain the tank and replace the fuel with the proper type.
    8. Add oil to the crankcase.
    The engine loses power.
    1. The engine load is excessive.
    2. The air cleaner is dirty.
    3. The oil level in the crankcase is low.
    4. The cooling fins and air passages under the engine blower housing are plugged.
    5. The spark plug(s) is pitted, fouled, or the gap is incorrect.
    6. The fuel tank vent is blocked.
    7. There is dirt in the fuel filter.
    8. Dirt, water, or stale fuel is in the fuel system.
    9. There is incorrect fuel in the fuel tank.
    1. Reduce ground speed.
    2. Clean the air cleaner element.
    3. Add oil to the crankcase.
    4. Remove the obstruction from the cooling fins and air passages.
    5. Install a new, correctly gapped spark plug(s).
    6. Contact an Authorized Service Dealer.
    7. Replace the fuel filter.
    8. Contact an Authorized Service Dealer.
    9. Drain the tank and replace the fuel with the proper type.
    There is abnormal vibration.
    1. The engine mounting bolts are loose.
    2. The engine pulley, idler pulley, or blade pulley is loose.
    3. The engine pulley is damaged.
    4. The cutting blade(s) is/are bent or unbalanced.
    5. A blade mounting bolt is loose.
    6. A blade spindle is bent.
    1. Tighten the engine mounting bolts.
    2. Tighten the appropriate pulley.
    3. Contact an Authorized Service Dealer.
    4. Install a new cutting blade(s).
    5. Tighten the blade mounting bolt.
    6. Contact an Authorized Service Dealer.
    The cutting height is uneven.
    1. The blade(s) is not sharp.
    2. The cutting blade is bent.
    3. The underside of the mower is dirty.
    4. A blade spindle is bent.
    1. Sharpen the blade(s).
    2. Install a new cutting blade.
    3. Clean the underside of the mower.
    4. Contact an Authorized Service Dealer.
    The blade does not rotate.
    1. The mower belt is off the pulley.
    2. The blade-control clutch is faulty.
    3. The mower belt is worn, loose, or broken.
    1. Install the mower belt.
    2. Contact an Authorized Service Dealer.
    3. Install a new mower belt.
    The brush cutter does not move when the traction drive is engaged.
    1. The transmission belt is off the pulleys.
    2. The transmission belt is worn, loose, or broken.
    3. The transmission bypass is engaged.
    4. The parking brake is engaged.
    5. The shaft key that drives the wheel is missing or sheared at one or both wheels.
    6. The transmission is faulty.
    1. Install the transmission belt.
    2. Replace the transmission belt.
    3. Disengage the transmission bypass.
    4. Disengage the parking brake.
    5. Replace the shaft key.
    6. Contact your Authorized Service Dealer.
    The cutting performance is poor.
    1. The forward traction speed is too fast.
    2. The blade is dull.
    3. The underside of the mower deck is clogged with debris.
    1. Reduce the forward speed.
    2. Sharpen or replace the blade.
    3. Clean the debris from beneath the deck.