


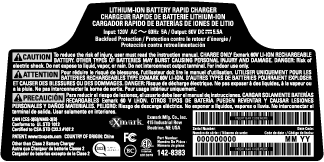
 5.5A MAX
Maintenance
Note: Determine the left and right sides of the machine from the normal operating position.
Recommended Maintenance Schedule(s)
| Maintenance Service Interval | Maintenance Procedure |
|---|---|
| After the first 5 hours |
|
| After the first 25 hours |
|
| Before each use or daily |
|
| Every 40 hours |
|
| Every 50 hours |
|
| Every 100 hours |
|
| Every 250 hours |
|
Periodic Maintenance
Note: Always remove the battery from the machine when troubleshooting, inspecting, maintaining, adjusting, or cleaning the machine.
Checking the Mower Blade
| Maintenance Service Interval | Maintenance Procedure |
|---|---|
| Before each use or daily |
|
Always mow with a sharp blade. A sharp blade cuts cleanly and without tearing or shredding the grass blade.
-
Shut off the machine, wait for all moving parts to stop, and allow the machine to cool.
-
Remove the electric-start button and the battery pack from the machine.
-
Tip the lawn mower onto its left side.
Warning
When servicing the blade, the blade can still move even though the power source is off. The blade is sharp; contacting the blade can result in serious personal injury.
-
Keep your hands and feet away from a moving blade.
-
Wear gloves when servicing the blade.
-
-
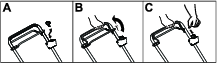
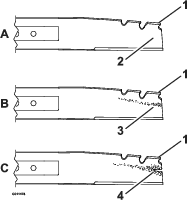
Inspect the blades for sharpness and wear, especially where the flat and the curved parts meet (see Figure 19). Because sand and abrasive material can wear away the metal that connects the flat and curved parts of the blade, check the blade before using the lawn mower. If you notice a slot or wear (Figure 19B and Figure 19C), replace the blade.
Danger
A worn or damaged blade can break. A piece of the blade could be thrown into the operator’s or bystander’s area, resulting in serious personal injury or death.
-
Inspect the blade periodically for wear or damage.
-
Replace a worn or damaged blade.
Warning
If you allow a blade to wear, a slot will form between the sail and flat part of the blade. Eventually a piece of the blade may break off and be thrown from under the housing, possibly resulting in serious injury to you or bystanders.
-
Inspect the blade periodically for wear or damage.
-
Never try to straighten a blade that is bent or weld a broken or cracked blade.
-
Replace a worn or damaged blade.
Note: Maintain sharp blades throughout the cutting season, because sharp blades cut cleanly without tearing or shredding the grass blades. Tearing and shredding turns grass brown at the edges, which slows growth and increases the chance of disease.
-
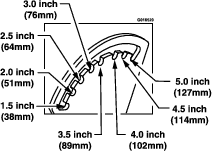
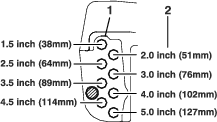
Checking for Bent Blades:
-
Rotate the blades until they are positioned as shown in
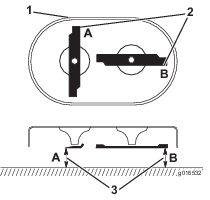
-
Measure from a level surface to the cutting edges at locations A and B, (Figure 20), and record both dimensions.
-
Rotate the blades so that their opposite ends are at locations A and B.
-
Repeat the measurements in step 2 and record them.
Note: If the difference between dimensions A and B obtained in steps 2 and 4 exceeds 1/8 inch, replace the blades.
Warning
A blade that is bent or damaged could break apart and could seriously injure or kill you or bystanders.
-
Always replace a bent or damaged blade with a new blade.
-
Never file or create sharp notches in the edges or surfaces of a blade.
-
-
-
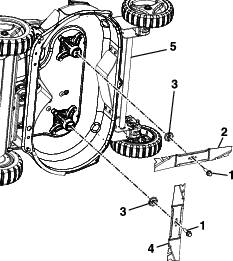
Removing Mower Blades:
Replace the blades when they strike a solid object, are out of balance, bent, or worn. Use only genuine Exmark replacement blades.
-
To remove the blade, use a block of wood to hold the blade steady. Make sure to grasp the end of the blade using a rag or thickly padded glove.
-
Remove the blade bolt, blade driver, and blade.
-
Inspect blades and sharpen or replace as required.
-
Inspect the pins on the blade driver for wear and damage or replace as required.
-
-
Installing Mower Blades:
Important: You will need a torque wrench to install the blades properly. If you do not have a torque wrench or are uncomfortable performing this procedure, contact an Authorized Service Dealer.
Warning
Incorrectly installing the blades could damage the machine or cause an injury to you or bystanders.
Install the blades according to the instructions.
-
Install the blade driver by inserting the raised area into the recess on the cutter housing.
-
Make sure to grasp the end of the blade using a rag or a thickly padded glove. Align the two holes on the blade with the two holes on the blade driver and install a sharp, balanced Exmark blade and blade bolt as shown in Figure 21. The sail of the blade must point toward the top of the lawn mower housing for proper installation.
Important: Position the curved ends of the blades to point toward the machine housing. Be sure to nest the raised areas on each blade driver with the recesses in the head of its corresponding spindle, and the pins on the other side of each blade driver with the holes in its corresponding blade.
-
Torque the blade bolt to 60 ft-lb (82 N-m).
-
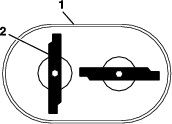
Referencing the front of the machine, make sure the installed blade is vertical before installing the second blade. The second blade must be installed perpendicular to the first, using steps 1 through 3. The two blades will form a sideways “T” as shown in Figure 22.
-
Rotate the blades by hand a full 360 degree turn to ensure they Do Not touch.
-
If they touch, the blades are not mounted correctly. Repeat steps 1 through 5. If the blades still touch after repeating the steps, contact an Authorized Service Dealer.
-
-
-
Return the lawn mower to its upright position.
Check for Loose Hardware
| Maintenance Service Interval | Maintenance Procedure |
|---|---|
| Before each use or daily |
|
-
Shut off the machine, wait for all moving parts to stop, and allow the machine to cool.
-
Visually inspect machine for any loose hardware or any other possible problem. Tighten hardware or correct the problem before operating.
Check Condition Of Belt
| Maintenance Service Interval | Maintenance Procedure |
|---|---|
| Every 40 hours |
|
-
Shut off the machine, wait for all moving parts to stop, and allow the machine to cool.
-
Remove the electric-start button and the battery pack from the machine.
-
Remove the belt cover to the lawn mower housing.
-
Check the belt for cracks, frayed edges, burn marks or any other damage.
-
Replace the damaged belt.
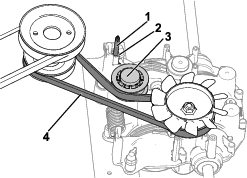
Check the Blade Drive System
| Maintenance Service Interval | Maintenance Procedure |
|---|---|
| After the first 5 hours |
|
| Every 50 hours |
|
-
Shut off the machine, wait for all moving parts to stop, and allow the machine to cool.
-
Remove the electric-start button and the battery pack from the machine.
-
Remove and retain the belt access panel by rotating the screws a quarter-turn.
-
Brush out all the debris around the belt area.
-
Use a feeler gauge, a piece of paper, or a note card against the frame and slide it down behind the belt tension spring.
The gap between the gauge and the spring should be .005-.030 inch (.13-.76 mm), tighten the adjusting bolt and nut until the paper barely slides freely in and out of the gap.
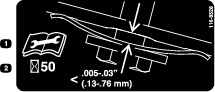
Important: Do Not overtighten the adjusting bolt. This could damage the blade drive belt.
-
Reinstall the belt access panel and rotate the screws a quarter-turn to lock into place.
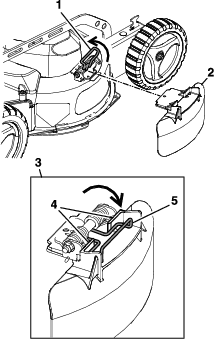
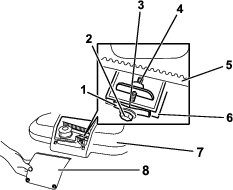
Change Blade Drive Belt
-
Shut off the machine, wait for all moving parts to stop, and allow the machine to cool.
-
Remove the electric-start button and the battery pack from the machine.
-
Remove and retain the front belt cover and its four bolts. Remove any debris under the cover.
-
Loosen the adjusting bolt.
-
Remove the blade drive belt.
-
Align the holes in the right and left sprockets with the holes in the deck as shown in Figure 25.
Note: Hold the sprockets in place with a rod or a screwdriver.
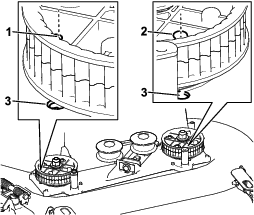
-
When you have locked the sprockets in place, install the blade-drive belt.
Note: Ensure that the teeth are engaged in the sprockets.
-
Tighten the belt tension to the recommended settings; refer to Check the Blade Drive System.
-
Remove the rod or screwdrivers from the sprockets.
-
Ensure that the blades under the housing are properly aligned; refer to Check the Mower Blade section.
-
Reinstall the belt cover using the four retained bolts.
-
Check the operation of the blade control lever.
Change Transmission Belt
| Maintenance Service Interval | Maintenance Procedure |
|---|---|
| Every 250 hours |
|
-
Shut off the machine, wait for all moving parts to stop, and allow the machine to cool.
-
Remove the electric-start button and the battery pack from the machine.
-
Remove the four bolts that hold the belt cover to the machine housing.
Note: Save the bolts for installing the belt cover to the machine housing.
-
Remove the belt cover.
-
Remove any debris from under the belt cover.
-
If the grass bag is on the machine, remove and retain it.
-
Raise and hold up the rear door.
-
Remove and retain the rear panel and its mounting hardware.
-
Remove and retain the dust shield and its mounting hardware.
-
Remove the transmission belt.
-
Rotate the idler pulley over the access hole on the transmission by using a socket wrench to turn the idler pulley nut.
-
While you are holding the idler pulley over the access hole on the transmission, insert a screwdriver through the access hole to catch a rib on the idler pulley.
-
Use the screwdriver to hold the idler pulley out of the way until you are done installing the new transmission belt.
-
From the front of the machine, remove the belt from the motor pulley and then remove from the transmission pulley.
-
While the idler pulley is pulled out of the way, install the new transmission belt placing the belt over the transmission pulley first and then over the motor pulley.
-
Using a socket wrench to hold the idler pulley in position, remove the screwdriver from the access hole in the transmission and return the idler pulley to its tensioned position.
-
-
Ensure that the new transmission belt is positioned correctly.
-
Reinstall the rear panel and secure with its mounting hardware retained in step 8.
Adjustments
Note: Wait for all moving parts to stop and remove the battery pack before servicing, cleaning, or making any adjustments to the machine.
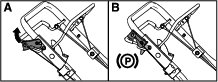
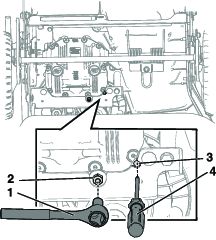
Adjusting the Self-Propel Drive
If the lawn mower does not self-propel or has a tendency to creep forward when the control bail is released, adjust the self-propel drive.
-
Shut off the machine, wait for all moving parts to stop, and allow the machine to cool.
-
Remove the electric start button and the battery pack from the machine.
-
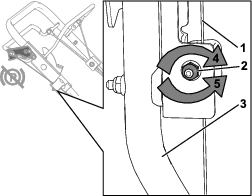
Turn the adjustment nut counterclockwise to loosen the cable adjustment.
-
Adjust the tension on the cable by pulling it back or pushing it forward and holding that position.
Note: Push the cable toward the motor to increase the traction; pull the cable away from the motor to decrease the traction.
-
Turn the adjustment nut clockwise to tighten the cable adjustment.
Note: Tighten the nut firmly with a socket or wrench.
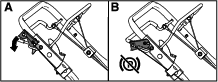
Adjusting the Parking-Brake Cable
| Maintenance Service Interval | Maintenance Procedure |
|---|---|
| Before each use or daily |
|
Whenever you install a new parking-brake cable or if the parking brake is out of adjustment, adjust the parking-brake cable.
-
Disengage the parking brake.
-
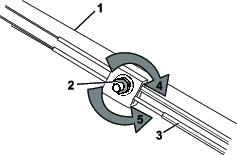
Turn the adjustment nut counterclockwise to loosen the cable adjustment (Figure 30).
-
Adjust the tension on the cable (Figure 30) by pulling or pushing the cable jacket and holding that position.
Note: Pull the cable jacket toward the motor to increase tension (also increases brake clamp load); push the cable jacket away from the motor to decrease tension (also decreases brake clamp load).
Important: Adjust the cable jacket in small increments to avoid over tensioning. Over tensioning may cause the machine to not roll free even when the parking brake is disengaged. Correct tensioning allows the machine to roll free when the parking brake is disengaged and to hold position when the parking brake is engaged.
-
Turn the adjustment nut clockwise to tighten the cable adjustment.
Note: Tighten the nut firmly with a socket or wrench.
Cleaning
Warning
The machine may dislodge material from under the machine.
-
Wear eye protection.
-
Stay in the operating position (behind the handle) when the motor is running.
-
Do not allow bystanders in the area.
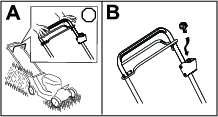
Clean Grass Build-Up Under Deck
| Maintenance Service Interval | Maintenance Procedure |
|---|---|
| Before each use or daily |
|
For optimal cutting performance, keep the underside of the machine housing clean. Scrape the clippings away from under the machine housing.
-
Shut off the machine, wait for all moving parts to stop, and allow the machine to cool.
-
Remove the electric start button and the battery pack from the machine.
-
Tip the lawn mower onto its left side.
-
Remove the dirt and grass clippings with a scraper. Avoid contacting any burrs or sharp edges.
-
Return the machine to the operating position.
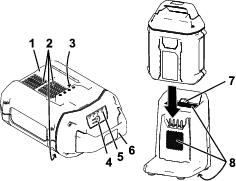
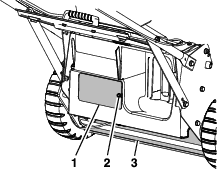
Cleaning the Discharge Tunnel and Plug
| Maintenance Service Interval | Maintenance Procedure |
|---|---|
| Before each use or daily |
|
Always be sure that the discharge tunnel door closes securely when you release the handle. If the debris prevents the discharge door from closing securely, clean the inside of the discharge tunnel and the door thoroughly.
Do not operate the machine unless one of the following is true:
-
Mulch Mode:
-
The discharge tunnel plug is locked securely in the discharge tunnel.
-
The side discharge cover is locked in place.
-
The discharge tunnel door is closed against frame.
-
-
Bag Mode:
-
The discharge tunnel plug is removed.
-
The grass bag is locked in place.
-
The discharge tunnel door is closed against bag.
-
The side discharge cover is locked in place.
-
-
Side Discharge Mode:
-
The discharge tunnel plug is locked securely in the discharge tunnel.
-
The discharge tunnel door is closed against frame.
-
The side discharge deflector is locked in place.
-
Cleaning Under the Belt Cover
| Maintenance Service Interval | Maintenance Procedure |
|---|---|
| Every 50 hours |
|
-
Shut off the machine, wait for all moving parts to stop, and allow the machine to cool.
-
Remove the electric-start button and battery pack from the machine.
-
Pull upward on the back of the cover to unsnap the front and back cover tabs.
-
Lift off the cover and brush out all the debris around the belt area.
-
Install the belt cover by pushing down on the rear first and then snapping the front onto the mower housing.
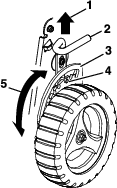
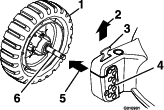
Cleaning the Wheels
| Maintenance Service Interval | Maintenance Procedure |
|---|---|
| Every 40 hours |
|
-
Shut off the machine, wait for all moving parts to stop, and allow the machine to cool.
-
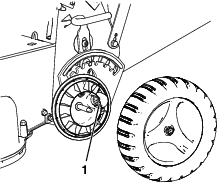
Remove the rear wheels and clean any debris from the wheel gear area.
-
After cleaning, apply a small amount of anti-seize to the gears.
Note: If you are operating the machine in extreme conditions, cleaning the wheels more frequently than recommended will result in increased gear life.
Note: To prevent damage to the bearing seals, do not use a high-pressure water sprayer on the bearings.
