Installation
Warning
While maintenance or adjustments are being made, someone could start the engine. Accidental starting of the engine could seriously injure you or bystanders.
Remove the key from the ignition switch and engage parking brake before you do any maintenance.
Note: Determine the left and right sides of the machine from the normal operating position.
Note: Park the machine on a level surface. Make sure all moving parts have stopped, parking brake is engaged, and the key has been removed. Allow the machine to cool before starting these instructions.
Preparing the Machine
-
Park the machine on a level surface.
-
Disengage the drives and engage the parking brake.
-
Shut off the engine and remove the ignition key.
-
Wait for all moving parts to stop.
-
Allow machine components to cool before performing maintenance.
-
Disconnect the negative battery cable.
-
If applicable, lower the platform.
-
Lift and lock the thigh pad into place.
Installing the Strobe Lights to the Side Panels
Parts needed for this procedure:
| Strobe light | 2 |
| Screw (#6 x 3/4 inch) | 4 |
| Hex nut (#6) | 4 |
-
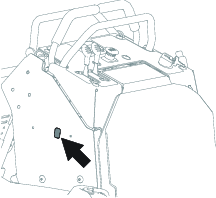
Remove the knockout holes from the left and right side panels on the machine.
-
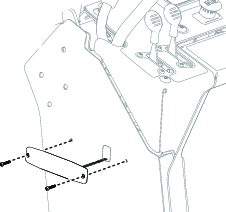
On the left side of the machine, insert the strobe-light pigtail through the knockout hole and secure the light with the 2 screws (#6 x 3/4 inch) and 2 hex nuts (#6). Repeat on the right side of the machine.
Connecting the Strobe-Light Harnesses to the Machine Harnesses
Parts needed for this procedure:
| Strobe harness | 1 |
| Accessory-relay harness | 1 |
| Cable tie | 3 |
-
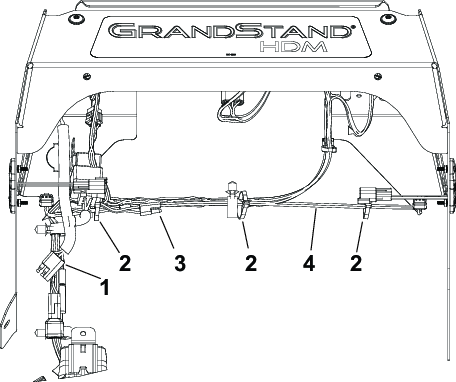
Connect the two pigtails to the light harness and route it as shown in Figure 3. Secure the harness to the frame using the cable ties.
-
The strobe-light harness plugs into one of the following:
-
Accessory-Relay Harness
-
Connect the strobe-light harness to the accessory-relay harness.
-
Connect the accessory-relay harness to the main harness and secure to the frame with cable ties.
-
-
Work Light Kit Harness Kit
-
The work light kit has a strobe-light connector. Remove the cap from the strobe-light connector on the work light kit.
-
Connect the strobe-light harness to the work light kit.
-
-
-
Ensure that the connectors are fully inserted onto the terminals. Use cable ties to loosely secure the light harness to the main harness.
-
Coil any excess wire as necessary and use the remaining cable ties to secure the light harness to the mower.
-
Connect the negative battery cable.
-
Lower the thigh pad.