Safety

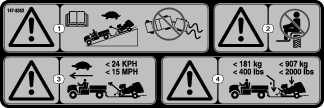
  • This trailer is intended for use with ProCore 648 and 648s machines only. Towing incompatible products can result in damage to the trailer and/or injury to the operator and bystanders. Refer to Compatible Machines for a complete list of compatible machines.

  • Use only a vehicle with the proper tow rating; the TransPro 648 trailer and a ProCore aerator with attachments has an approximate combined weight of 1089 kg (2,400 lb). Ensure that the tow vehicle has adequate braking and handling capacity by checking the recommendations of the vehicle manufacturer.

  • Ensure that the trailer is properly connected to the tow vehicle before loading or unloading the aerator to prevent sudden unintended tongue movement or flip-up. The trailer tongue should be parallel to the ground when you align it with the tow vehicle hitch.

  • The trailer adds extra towing weight to the vehicle. Drive the vehicle safely.

    • Do not drive the machine on highways or public roads.

    • Always slow the tow vehicle when approaching and while making a turn.

    • Always slow the tow vehicle when driving in unfamiliar areas or over rough terrain.

    • Always slow the tow vehicle when changing the direction of travel or preparing to stop.

    • Always slow the tow vehicle when turning or driving on slopes.

    • Do not make sudden or sharp turns. Do not suddenly change direction of travel on an incline, ramp, grade, slope, or similar surface.

    • The maximum towing speed is 15 mph (24 km/h). Always adjust the tow-vehicle speed to allow for existing ground conditions, such as wet slick surfaces, loose sand or gravel and/or low visibility conditions, such as dim or bright lighting, fog, mist, or rain.

    • Be especially careful when driving a heavily loaded vehicle down an incline or slope. Drive the vehicle up and down the face of the slopes, inclines, or grades whenever possible. Do not drive across the face of a slope if at all possible. There is a risk of upsetting the vehicle, which can result in serious injury or death.

  • Do not operate the tow vehicle or use the trailer when tired, ill, or under the influence of alcohol or drugs.

  • Use the trailer only in good visibility and appropriate weather conditions. Do not operate the tow vehicle or use the trailer when there is the risk of lightning.

  • Before backing up, look behind you and ensure that it is clear of people and objects. Back up slowly and watch the trailer movement closely.

  • Use extreme caution and slow speed when backing up the trailer and tow vehicle.

  • Watch out for traffic when near or crossing roads. Always yield the right of way to pedestrians and other vehicles.

  • If the trailer begins to vibrate abnormally, stop the tow vehicle immediately. Shut off the tow-vehicle engine. Repair all damage before towing.

  • Before servicing or making any adjustments to the trailer, do the following:

    • Stop the tow vehicle and engage the parking brake.

    • Shut off the tow-vehicle engine and remove the key.

  • While the trailer is disconnected from tow vehicle:

    • Store the trailer on level ground.

    • Chock the wheels to prevent the trailer from moving.

  • Keep all fasteners tightened securely. Replace any parts removed when servicing or making adjustments.

Safety and Instructional Decals

Graphic

Safety decals and instructions are easily visible to the operator and are located near any area of potential danger. Replace any decal that is damaged or missing.

decal147-8352
decal147-8350
decal147-8351
decal147-8353
decal133-8061
decal140-5281

Installation

Removing the Crate

Parts needed for this procedure:

Trailer1
Wheel2
  1. Position the crate under a hoist that can reach both ends of the trailer, or where a forklift can lift each end of the trailer.

  2. Cut the bands and remove the top, sides, and ends of the crate.

  3. Remove the storage pins from the top of the trailer that secure the trailer to the crate.

    Important: Retain the storage pins for later installation.

  4. Lift the ramp out of the crate and set aside for later installation.

  5. Remove the screws securing the shipping bracket to the crate.

    g190827
  6. Remove the remaining hardware connecting the trailer to the pallet.

  7. Using the hoist or forklift, lift the trailer.

  8. Remove the pallet from beneath the machine.

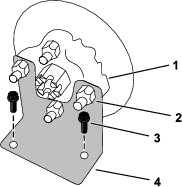
  9. Remove the 4 lug nuts from each of the wheel hubs (Figure 1).

    Important: Retain the lug nuts for later installation. You may discard the shipping brackets.

  10. Install the 2 wheels using the lug nuts removed in step 9; refer to Checking the Torque of the Wheel Lug Nuts.

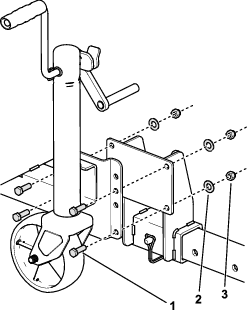
  11. Install the jack to the bracket on the trailer frame tube as shown in Figure 2.

    Note: Install the jack using the lowest set of holes to maximize ground clearance.

    g490407
  12. Lower the trailer to the ground, remove the hoist or forklift, and secure the trailer from movement.

Assembling the Trailer

Parts needed for this procedure:

Hitch tube1
Clevis pins3
Ramp1
Flange bushing4
Ramp pin2
Cotter pin2
Jack1
Bolt (3/8 x 1-1/8 inches)4
Washer (7/16 inch)4
Locknut (3/8 inch)4
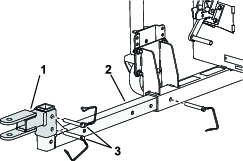
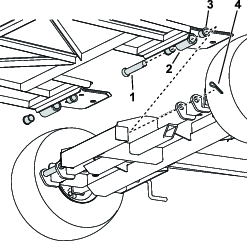
  1. Insert the hitch tube to the frame as shown in Figure 3.

  2. Install the hitch adapter to the hitch tube with the clevis pins (Figure 3).

    g453999
  3. Install the flange bushings to the pivot hub at the bottom of the ramp.

  4. Install the ramp to the frame using the ramp pins and cotter pins as shown in Figure 4.

    g490924
  5. Install the storage pins removed in Removing the Crate through the top of the ramp and wheel plate to hold the ramp in the raised position.

Operation

Compatible Machines

This trailer is designed to be configured for the following ProCore aerator machines without the need for additional kits:

MachineModel
ProCore 648 aerator09200
ProCore 648s aerator09960

Contact your authorized Toro distributor for more information.

Adjusting the Trailer Tongue

  1. Align the trailer tongue with the tow-vehicle hitch.

    Important: The trailer tongue must be parallel to the ground when it is aligned with the tow-vehicle hitch.

  2. Remove the clevis pins from the hitch adapter and adjust the position up or down (Figure 3) as necessary.

    Note: The hitch adapter can be rotated for further adjustment to the alignment.

  3. Remove the clevis pins from the hitch tube and adjust the length as necessary.

    Important: Ensure that there is enough clearance between the aerator handle and the rear of the tow vehicle when towing.

    Note: When storing the trailer, you can push the hitch tube back into the trailer frame tube to shorten the overall length.

Loading the Trailer

Warning

Stepping on the ramp may lead to loss of footing.

Walk on the ground while guiding the machine up or down the ramp.

Preparing to Load the Trailer

  1. Connect the trailer to your traction unit; refer to your traction unit Operator’s Manual.

    Important: Ensure that the trailer tongue is parallel to the ground when it is aligned with the tow vehicle hitch; if it is not, refer to Adjusting the Trailer Tongue.

  2. Remove the pins from the top of the ramp and wheel plate to lower the ramps.

  3. Install the pins to the front of the wheel plates.

Loading a Machine on the Trailer

  1. Remove the storage pins from the top of the ramp and wheel plate to lower the ramps.

  2. Install the pins to the front of the wheel plates.

  3. Park the trailer on a level surface and move the line marker on the machine to the storage position; refer to your machine Operator’s Manual.

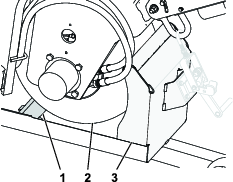
  4. Walk on the ground while slowly guiding the machine up the ramp and onto the trailer until the front wheel rolls over the integrated chock and rests against the front trailer guard (Figure 5).

    g454000
  5. Shut off the machine and engage the parking brake.

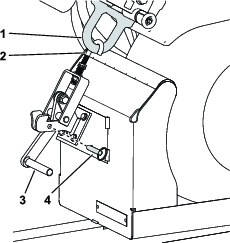
  6. Remove the quick-release pin, pull up on the lock lever, and attach the J-hook from the front tie-down point.

  7. Push down on the lock lever and secure it using the quick-release pin (Figure 6).

    g454001

    Important: To ensure that the machine does not shift on the trailer, adjust the 2 nuts on the J-hook so the machine is tight to the trailer when the lever is latched.

Unloading a Machine from the Trailer

  1. Park the trailer on a level surface and move the line marker on the machine to the storage position if they are in the extended position; refer to your machine Operator’s Manual.

  2. Remove the quick-release pin, pull up on the lock lever, and remove the J-hook from the front tie-down point.

  3. Turn on the machine and disengage the parking brake.

  4. Walk on the ground while slowly guiding the machine down the ramp and off of the trailer until the front wheel is on the ground.

    Important: Ensure that the front wheel stays in the channel while backing the machine straight off of the trailer.

  5. Shut off the machine and engage the parking brake.

  6. Remove the storage pins from the front of the wheel plates.

  7. Install the pins to the top of the ramp and wheel plate to secure the ramps in the raised position prior to moving the unloaded trailer.

Maintenance

Recommended Maintenance Schedule(s)

Maintenance Service IntervalMaintenance Procedure
After the first 10 hours
  • Check the torque of the wheel lug nuts.
  • Before each use or daily
  • Check the tire air pressure.
  • Yearly
  • Check the wheel bearings for endplay.
  • Check the torque of the wheel lug nuts.
  • Checking the Tire Air Pressure

    Maintenance Service IntervalMaintenance Procedure
    Before each use or daily
  • Check the tire air pressure.
  • Tire air pressure specification: 96.5 kPa (14 psi)

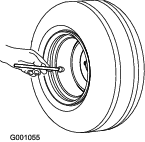
    Check the air pressure in the tires (Figure 7). Add or remove air as needed to set the air pressure in the tires to the tire air-pressure specification.
    g001055

    Checking the Wheel Bearings for Freeplay

    Maintenance Service IntervalMaintenance Procedure
    Yearly
  • Check the wheel bearings for endplay.
    1. Remove any machines that may be stored on the trailer.

    2. Use a jack to raise the trailer and place jack stands under the trailer.

    3. Check each wheel for excessive freeplay (i.e., free movement of the tire and hub assembly).

      If you detect excessive freeplay, contact to your authorized Toro distributor.

    Checking the Torque of the Wheel Lug Nuts

    Maintenance Service IntervalMaintenance Procedure
    After the first 10 hours
  • Check the torque of the wheel lug nuts.
  • Yearly
  • Check the torque of the wheel lug nuts.
  • Torque specification: 108 N⋅m (80 ft-lb)

    Check the torque of the wheel lug nuts each time you install the wheels and after the first 10 hours of operation.

    Torque the wheel lug nuts in the pattern as shown in Figure 8 to the specified torque.

    Warning

    Failure to maintain proper torque could result in failure or loss of wheel and could result in personal injury.

    Torque the wheel lug nuts to the specified torque.

    g274650