Installation

Preparing the Machine

  1. Park the machine on a level surface.

  2. Engage the parking brake.

  3. Lower the cutting units.

  4. Shut off the machine and remove the key.

  5. Disconnect the main-power connectors; refer to your machine Operator’s Manual.

Raising the Machine

Raise the machine; refer to the pre-maintenance section of your machine Operator’s Manual.

Remove the Rear Wheel

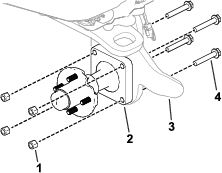
  1. Remove the 4 lugnuts that secure the wheel to the wheel-hub assembly (Figure 1).

    g293906
  2. Remove the wheel from the machine (Figure 1).

Removing the Existing Wheel-Hub Assembly

Remove the existing wheel-hub assembly by removing the bolts and nuts that secure the assembly to the castor fork (Figure 2).

g293905

Installing the Gearbox

Parts needed for this procedure:

Gearbox assembly1
Dust cap1
Snap ring1
Bolt (M12)4
Fitting1
Vent hose1
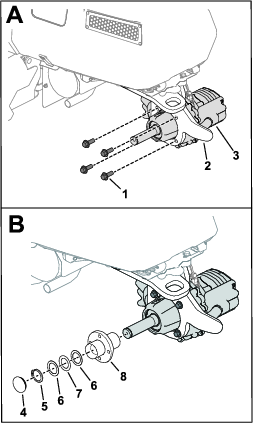
  1. Remove the snap ring (shown in Figure 3) from the axle.

  2. Remove the hub assembly (shown in Figure 3) from the gearbox.

  3. Slide the gearbox into the caster fork.

    Note: Observe the correct orientation of the gearbox as shown in Figure 3. The axle shaft should point toward the left side of the machine.

    g311730
  4. Use 4 bolts (M12) to secure the gearbox to the castor fork (A in Figure 3).

  5. Torque the bolts (M12) to 81 to 95 N∙m (60 to 70 ft-lb).

  6. Install the hub assembly, snap ring, and dust cap with O-ring on the axle shaft (B in Figure 3).

    When you install the snap ring, compress the wave washer in the hub assembly.

    Note: If the thrust washers and bearing are removed from the hub assembly, assemble them as shown in Figure 3.

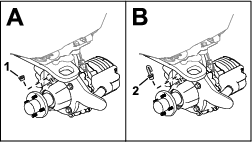
  7. Remove the plug from the top of the gearbox (A of Figure 4).

    g301398
  8. Secure the vent hose and fitting to the gearbox (B of Figure 4).

Connecting the Gearbox Wire Harness

Parts needed for this procedure:

R-clamp1
Bolt (5/16 x 1-1/2 inches)1
Locknut (5/16 inch)1
Push-mount fastener1
  1. Raise the hood; refer to your machine Operator’s Manual.

  2. Route the gearbox wire harness toward the hood and secure it with the R-clamp as shown in Figure 5.

    g455177
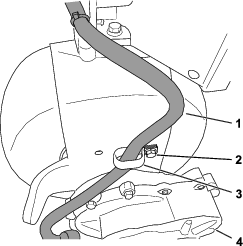
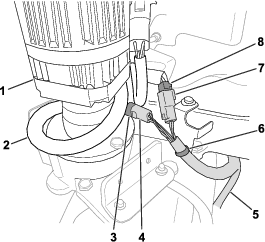
  3. Route the remaining gearbox-wire-harness connectors toward the steering motor (Figure 6)

    g344561
  4. Cut the tie wrap that secures the machine harness to the bracket, leaving the push-mount in place (Figure 6). Discard the tie wrap.

  5. Connect the gearbox connectors to the machine wire-harness connectors (Figure 6):

    • 2-pin connector of the gearbox to the 2-socket connector of the machine wire harness

    • 4-pin connector of the gearbox to the 4-socket connector of the machine wire harness

  6. Wrap the extra machine wire harness slack around the steering motor as shown in Figure 6.

  7. Using the tie wrap supplied in the kit, secure the gearbox harness to the push-mount as shown in Figure 6.

  8. Close the hood.

Greasing the Hub Assembly

Grease the hub assembly; refer to Greasing the Hub Assembly.

Installing the Rear Wheel

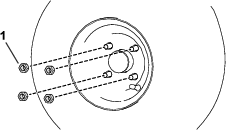
  1. Use the previously removed lugnuts to secure the wheel to the hub (Figure 7).

    g300939
  2. Torque the lugnuts (in a crossing pattern as shown in Figure 8) to 108 to 122 N∙m (80 to 90 ft-lb).

    g274650

Installing the Fuse

Parts needed for this procedure:

Fuse1

Install the fuse to the designated 3-wheel-drive slot on the reel-drive-circuit fuse block; refer to the electrical system maintenance section in your machine Operator’s Manual.

Installing the Serial-Plate Decal

Parts needed for this procedure:

Serial-plate decal1

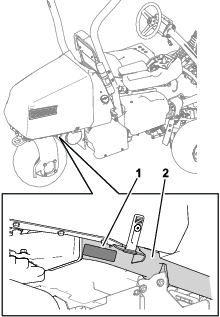
Install the serial-plate decal on the frame tube as shown in Figure 9.

g492071

Engaging 3-Wheel-Drive Mode

The 3-wheel-drive mode should automatically enable when you install the gearbox-wire-harness connections to the machine wire harness.

To ensure that the 3-wheel-drive mode is activated, navigate to the 3WD KIT option in the SETTINGS menu of your InfoCenter. The item selected/active icon Graphicindicates that 3-wheel-drive mode is activated.

Completing the Installation

  1. Lower the machine to the ground.

  2. Connect the main-power connectors; refer to your machine Operator’s Manual.

Maintenance

Greasing the Hub Assembly

Maintenance Service IntervalMaintenance Procedure
Every 100 hours
  • Lubricate the hub assembly.
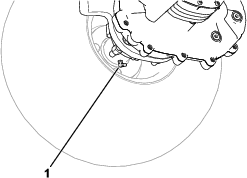
  • Use No. 2 lithium grease to lubricate the hub assembly. Refer to Figure 10 for the location of the hub-assembly grease fitting.
    g300937

    Changing the Gearbox Fluid

    Maintenance Service IntervalMaintenance Procedure
    After the first 8 hours
  • Change the gearbox fluid.
  • Every 800 hours
  • Change the gearbox fluid.
  • Fluid specification: SAE 80W-90

    Gearbox fluid capacity: approximately 1.2 L (40 fl oz)

    Preparing the Machine

    1. Park the machine on a level surface.

    2. Engage the parking brake.

    3. Lower the cutting units.

    4. Shut off the machine and remove the key.

    5. Disconnect the main-power connectors; refer to your machine Operator’s Manual.

    Draining the Gearbox Fluid

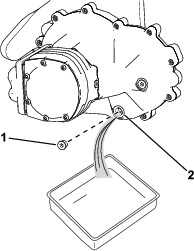
    1. Place a drain pan under the wheel-motor assembly (Figure 11).
      g300938
    2. Remove the plug from the drain port (Figure 11).

      Note: The drain port is located on the bottom of the gearbox.

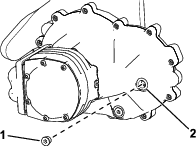
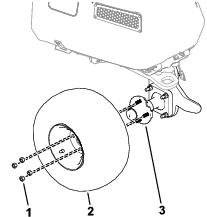
      Note: You can loosen the fill-port fitting (as shown in Figure 12) to ensure that it can be removed after you drain the fluid.

    3. Allow the fluid to drain completely from the gearbox.

    4. Clean the plug.

    5. Install the drain plug into the drain port (Figure 11).
    Adding Fluid to the Gearbox

    1. Remove the fill-port fitting shown in Figure 12.

      g321851
    2. Add the specified fluid to the gearbox until the fluid level reaches the bottom of the fill port.

      The gearbox fluid capacity is approximately 1.2 L (40 fl oz).

    3. Install the fitting into the fill port (Figure 12).