Installation
Preparing the Machine
-
Park the machine on a level surface.
-
Engage the parking brake.
-
Shut off the engine and remove the key.
-
Remove the positive (+) battery cable from the battery.
-
Remove the hood; refer to the Operator’s Manual for the machine.

Installing the Instrument Cluster
Parts needed for this procedure:
| Instrument cluster | 1 |
-
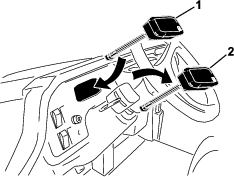
Unplug the wire-harness connector from the instrument cluster.
-
To remove the instrument cluster from the dash, squeeze the cluster mounting tabs and push it out through the dash opening.
-
Snap the new instrument cluster into the dash opening and plug the harness connectors together.
Installing the Speed Sensor
Parts needed for this procedure:
| Speed sensor | 1 |
-
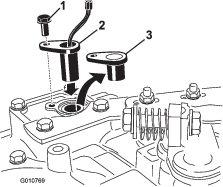
Remove the bolt securing the plug to the top of the transmission. Remove and discard the plug but retain the bolt for reuse.
-
Insert the speed sensor into the top of the transmission and secure it in place with the previously removed bolt.
-
On the main vehicle harness, locate the connector for the speed sensor and plug it into the sensor.
Installing the Magnetic Pickup
Parts needed for this procedure:
| Magnetic-pickup wheel | 1 |
| Magnetic-pickup mount | 1 |
| Hex-head bolt (3/8 x 3/4 inch) | 1 |
| Nut (3/8 inch) | 1 |
| Magnetic sensor | 1 |
| Jam nut | 1 |
-
Remove the washer and nut from the engine crankshaft.
Note: Do not remove the pulley.
-
Apply blue Loctite to the crankshaft threads.
-
Thread the existing washer and magnetic pickup wheel onto the crankshaft and tighten to 101 N∙m (75 ft-lb).
-
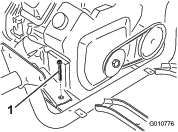
Remove the right front engine-mount bolt. Retain the bolt for reuse.
-
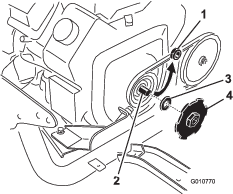
Install the magnetic-pickup mount to the engine mount with a new hex-head bolt and the previously removed bolt.
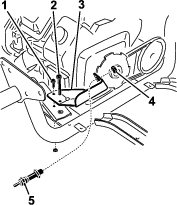
-
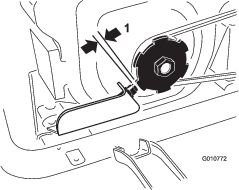
Loosely install the magnetic sensor to the magnetic-pickup mount with the jam nut.
-
Adjust the sensor in or out until the clearance between the end of the sensor and the magnetic-pickup wheel is 1.5 to 3 mm (0.06 to 0.12 inch). Tighten the jam nuts after you attain the adjustment.
-
On the main vehicle harness, locate the connector for the magnetic sensor and plug it into the sensor.
Completing the Installation
-
Connect the positive (+) battery cable to the battery.
-
Check operation and adjust as required.