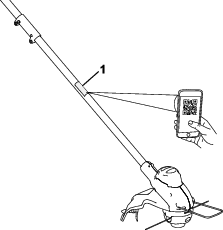
Introduction

This trimmer is intended to be used by residential homeowners to trim grass as needed outdoors. It is designed to use Flex-Force™ 60V lithium-ion battery packs. These battery packs are designed to be charged only by Flex-Force 60V lithium-ion battery chargers. Using these products for purposes other than their intended use could prove dangerous to you and bystanders.

Model 51834T does not include a battery or a charger.

Read this information carefully to learn how to operate and maintain your product properly and to avoid injury and product damage. You are responsible for operating the product properly and safely.

Visit www.Toro.com for product safety and operation training materials, accessory information, help finding a dealer, or to register your product.

Whenever you need service, genuine manufacturer parts, or additional information, contact an Authorized Service Dealer or the manufacturer Customer Service and have the model and serial numbers of your product ready. Figure 1 identifies the location of the model and serial numbers on the product. Write the numbers in the space provided.

Important: With your mobile device, you can scan the QR code on the serial number decal (if equipped) to access warranty, parts, and other product information.

g425035

Safety-Alert Symbol

The safety-alert symbol (Figure 2) shown in this manual and on the machine identifies important safety messages that you must follow to prevent accidents.

g000502

The safety-alert symbol appears above information that alerts you to unsafe actions or situations and is followed by the word DANGER, WARNING, or CAUTION.

DANGER indicates an imminently hazardous situation which, if not avoided, will result in death or serious injury.

WARNING indicates a potentially hazardous situation which, if not avoided, could result in death or serious injury.

CAUTION indicates a potentially hazardous situation which, if not avoided, may result in minor or moderate injury.

This manual uses two other words to highlight information. Important calls attention to special mechanical information and Note emphasizes general information worthy of special attention.

Graphic

For assistance, please see www.Toro.com/support for instructional resources or contact your Authorized Service Dealer before returning this product.

Warning

CALIFORNIA

Proposition 65 Warning

The power cord on this product contains lead, a chemical known to the State of California to cause birth defects or other reproductive harm. Wash hands after handling.

Use of this product may cause exposure to chemicals known to the State of California to cause cancer, birth defects, or other reproductive harm.

Safety

Warning

Read all safety warnings, instructions, illustrations and specifications provided with this machine.

Failure to follow all instructions listed below may result in electric shock, fire and/or serious injury.

Save all warnings and instructions for future reference.

The term “machine” in all the warnings refers to your mains-operated (corded) machine or battery-operated (cordless) machine.

I. Work area safety

  1. Keep work area clean and well lit.Cluttered or dark areas invite accidents.

  2. Do not operate machines in explosive atmospheres, such as in the presence of flammable liquids, gases, or dust.Machines create sparks which may ignite the dust or fumes.

  3. Keep children and bystanders away while operating a machine.Distractions can cause you to lose control.

II. Electrical safety

  1. Machine plugs must match the outlet. Never modify the plug in any way. Do not use any adapter plugs with earthed (grounded) machines.Unmodified plugs and matching outlets will reduce risk of electric shock.

  2. Avoid body contact with earthed or grounded surfaces, such as pipes, radiators, ranges and refrigerators.There is an increased risk of electric shock if your body is earthed or grounded.

  3. Do not expose machines to rain or wet conditions.Water entering a machine will increase the risk of electric shock.

  4. Do not abuse the cord. Never use the cord for carrying, pulling or unplugging the machine. Keep cord away from heat, oil, sharp edges or moving parts.Damaged or entangled cords increase the risk of electric shock.

  5. When operating a machine outdoors, use an extension cord suitable for outdoor use.Use of a cord suitable for outdoor use reduces the risk of electric shock.

  6. If operating a machine in a damp location is unavoidable, use a residual current device (RCD) protected supply.Use of an RCD reduces the risk of electric shock.

III. Personal safety

  1. Stay alert, watch what you are doing and use common sense when operating a machine. Do not use a machine while you are tired or under the influence of drugs, alcohol, or medication.A moment of inattention while operating machines may result in serious personal injury.

  2. Use personal protective equipment. Always wear eye protection.Protective equipment such as a dust mask, non-skid safety shoes, hard hat, or hearing protection used for appropriate conditions reduces personal injuries.

  3. Prevent unintentional starting. Ensure the switch is in the OFF-position before connecting to power source and/or battery pack, picking up or carrying the tool.Carrying machines with your finger on the switch or energizing machines that have the switch on invites accidents.

  4. Remove any adjusting key or wrench before turning the machine on.A wrench or a key left attached to a rotating part of the machine may result in personal injury.

  5. Do not overreach. Keep proper footing and balance at all times.This enables better control of the machine in unexpected situations.

  6. Dress properly. Do not wear loose clothing or jewelry. Keep your hair and clothing away from moving parts.Loose clothes, jewelry, or long hair can be caught in moving parts.

  7. If devices are provided for the connection of dust extraction and collection facilities, ensure these are connected and properly used.Use of dust collection can reduce dust-related hazards.

  8. Do not let familiarity gained from frequent use of tools allow you to become complacent and ignore tool safety principles.A careless action can cause severe injury within a fraction of a second.

IV. Machine use and care

  1. Do not force the machine. Use the correct machine for your application.The correct machine will do the job better and safer at the rate for which it was designed.

  2. Do not use the machine if the switch does not turn it on and off.Any machine that cannot be controlled with the switch is dangerous and must be repaired.

  3. Disconnect the plug from the power source and/or remove the battery pack, if detachable, from the machine before making any adjustments, changing accessories, or storing machines.Such preventive safety measures reduce the risk of starting the machine accidentally.

  4. Store idle machines out of the reach of children and do not allow persons unfamiliar with the machine or these instructions to operate the machine. Machines are dangerous in the hands of untrained users.

  5. Maintain machines and accessories. Check for misalignment or binding of moving parts, breakage of parts, and any other condition that may affect the machine’s operation. If damaged, have the machine repaired before use.Many accidents are caused by poorly maintained machines.

  6. Keep cutting tools sharp and clean.Properly maintained cutting tools with sharp cutting edges are less likely to bind and are easier to control.

  7. Use the machine, accessories, and tool bits etc. in accordance with these instructions, taking into account the working conditions and the work to be performed.Use of the machine for operations different from those intended could result in a hazardous situation.

  8. Keep handles and grasping surfaces dry, clean and free from oil and grease.Slippery handles and grasping surfaces do not allow for safe handling and control of the tool in unexpected situations.

V. Battery tool use and care

  1. Recharge only with the charger specified by the manufacturer.A charger that is suitable for one type of battery pack may create a risk of fire when used with another battery pack.

  2. Use machines only with specifically designated battery packs.Use of any other battery packs may create a risk of injury and fire.

  3. When battery pack is not in use, keep it away from other metal objects, like paper clips, coins, keys, nails, screws or other small metal objects, that can make a connection from one terminal to another.Shorting the battery terminals together may cause burns or a fire.

  4. Under abusive conditions, liquid may be ejected from the battery; avoid contact. If contact accidentally occurs, flush with water. If liquid contacts eyes, additionally seek medical help.Liquid ejected from the battery may cause irritation or burns.

  5. Do not use a battery pack or tool that is damaged or modified.Damaged or modified batteries may exhibit unpredictable behavior resulting in fire, explosion or risk of injury.

  6. Do not expose a battery pack or tool to fire or excessive temperature.Exposure to fire or temperature above 130 °C (265 °F) may cause explosion.

  7. Follow all charging instructions and do not charge the battery pack or tool outside the temperature range specified in the instructions.Charging improperly or at temperatures outside the specified range may damage the battery and increase the risk of fire.

VI. Service

  1. Have your machine serviced by a qualified repair person using only identical replacement parts.This will ensure that the safety of the machine is maintained.

  2. Never service damaged battery packs.Service of battery packs should only be performed by the manufacturer or authorized service providers.

VII. String Trimmer safety

  1. Do not use the machine in bad weather conditions, especially when there is a risk of lightning.This decreases the risk of being struck by lightning.

  2. Thoroughly inspect the area for wildlife where the machine is to be used.Wildlife may be injured by the machine during operation.

  3. Thoroughly inspect the area where the machine is to be used and remove all stones, sticks, wires, bones, and other foreign objects.Thrown objects can cause personal injury.

  4. Before using the machine, always visually inspect to see that the cutter and the cutter assembly are not damaged.Damaged parts increase the risk of injury.

  5. Keep guards in place. Guards must be in working order and be properly mounted.A guard that is loose, damaged, or is not functioning correctly may result in personal injury.

  6. Keep all cooling air inlets clear of debris.Blocked air inlets and debris may result in overheating or risk of fire.

  7. Wear eye protection and ear protection.Adequate protective equipment will reduce personal injury..

  8. While operating the machine, always wear non-slip and protective footwear. Do not operate the machine when barefoot or wearing open sandals.This reduces the chance of injury to the feet from contact with the moving cutter.

  9. Always wear clothing such as trousers that covers the operator's legs while operating the machine.Contact with the moving cutter or line may cause injury.

  10. Keep bystanders away while operating the machine.Thrown debris can result in serious personal injury.

  11. Do not operate the machine above waist height.This helps prevent unintended cutter contact and enables better control of the machine in unexpected situations.

  12. Exercise caution when operating the machine in wet grass. Walk, never run.This reduces the risk of slipping and falling which may result in personal injury.

  13. Do not operate the machine on excessively steep slopes.This reduces the risk of loss of control, slipping and falling which may result in personal injury.

  14. When working on slopes, always be sure of your footing, always work across the face of slopes, never up or down and exercise extreme caution when changing direction.This reduces the risk of loss of control, slipping and falling which may result in personal injury.

  15. Keep all power cords and cables away from cutting area.Power cords or cables may be hidden in hedges or bushes and can be accidentally cut or damaged by the line or cutter.

  16. Keep all parts of the body away from the moving trimmer cutter or line. Do not clear material from the machine until it has been disconnected from the power source.The moving trimmer cutter or line may result in serious personal injury.

  17. Carry the machine with the machine switched off and away from your body.Proper handling of the machine will reduce the likelihood of accidental contact with a moving trimmer cutter or line.

  18. Only use replacement cutting heads and trimmer cutters or lines specified by the manufacturer. Do not replace the trimmer cutters or lines with metal wires or blades.Incorrect replacement parts may cause loss of control, breakage and injury.

  19. When clearing jammed material or servicing the machine, make sure the switch is off and the battery pack is removed.Unexpected starting of the machine while clearing jammed material or servicing may result in serious personal injury.

SAVE THESE

INSTRUCTIONS

Decal Symbols

Graphic

Safety decals and instructions are easily visible to the operator and are located near any area of potential danger. Replace any decal that is damaged or missing.

The following tables describe the safety and instructional symbols that appear on the decals.

String Trimmer Decal Symbol

Explanation

Graphic

Warning

GraphicGraphic

Read the Operator’s Manual.

Graphic

Stay away from moving parts.

Graphic

Keep all guards in place.

Graphic

Wear eye protection.

Setup

Important: The battery pack is not fully charged when you purchase it. Before using the tool for the first time, refer to Charging the Battery Pack.

Unfolding the Handle

Parts needed for this procedure:

Allen wrench1
  1. Unfold the handle (A of Figure 3).

  2. Align the locking button on the lower shaft with the slotted hole on the upper shaft and slide the 2 shafts together (B and C of Figure 3).

    Note: The locking button clicks into the slotted hole when the shafts are secured (D of Figure 3).

  3. Using the provided Allen wrench, tighten the screw on the shaft connector until it is secure (E of Figure 3).

g537837

Installing the Auxiliary Handle

Parts needed for this procedure:

Auxiliary handle assembly1
Screwdriver (not included)
  1. Using a Phillips head screwdriver, separate the auxiliary handle from the handle plate by removing the 2 screws (A of Figure 4).

  2. Line up the auxiliary handle with auxiliary handle plate on the trimmer handle (B of Figure 4).

  3. Secure the auxiliary handle to the handle plate with the 2 previously removed screws (C of Figure 4).

g537838

Installing the Guard

Parts needed for this procedure:

Guard1
Screwdriver (not included)
  1. Remove the 2 socket head screws, 2 washers, and 2 spacers from the trimmer base (A of Figure 5).

  2. Align the guard onto the trimmer base (B of Figure 5).

  3. Secure the guard onto the base of the trimmer with the 2 socket head screws, 2 washers, and 2 spacers previously removed (C of Figure 4).

g537840

Installing the Edge Guard

Parts needed for this procedure:

Wire edge guard1

Slightly spread the ends of the wire edge guard apart and then insert the ends into the holes in the trimmer housing as shown in Figure 6.

g333376

Product Overview

g426728
g535905
Model51834, 51834T
Rated Voltage60V DC maximum, 54 VDC nominal usage
Charger TypeFlex-Force 60V lithium-ion chargers
Battery TypeFlex-Force 60V lithum-ion batteries

Appropriate Temperature Ranges

Charge/store the battery pack at5°C (41°F) to 40°C (104°F)*
Use the battery pack at -30°C (-22°F) to 49°C (120°F)
Use the trimmer at0°C (32°F) to 49°C (120°F)
Store the trimmer at0°C (32°F) to 49°C (120°F)*

*Charging time will increase if you do not charge the battery within this range.

Store the tool, battery pack, and battery charger in an enclosed clean, dry area.

Attachments/Accessories

A selection of Toro approved attachments and accessories is available for use with the machine to enhance and expand its capabilities. Contact your Authorized Service Dealer or authorized Toro distributor or go to www.Toro.com for a list of all approved attachments and accessories.

To ensure optimum performance and continued safety certification of the machine, use only genuine Toro replacement parts and accessories. Replacement parts and accessories made by other manufacturers could be dangerous.

Operation

Starting the Trimmer

  1. Make sure that the vents on the trimmer are clear of any dust and debris.

    g333378
  2. Align the cavity in the battery pack with the tongue on the handle housing (Figure 10).

  3. Push the battery pack into the handle until the battery locks into the latch (Figure 10).

    g339792
  4. To start the trimmer, squeeze the lockout trigger, then squeeze the run trigger (Figure 11).

    g339793

Shutting Off the Trimmer

To shut off the trimmer, release both triggers.

Whenever you are not using the trimmer or are transporting the trimmer to or from the work area, remove the battery pack.

Removing the Battery Pack from the Trimmer

Press the battery latch on the machine to release the battery pack and slide the battery pack out of the machine (Figure 12).

g339794

Charging the Battery Pack

Important: The battery pack is not fully charged when you purchase it. Before using the tool for the first time, place the battery pack in the charger and charge it until the LED display indicates the battery pack is fully charged. Read all safety precautions.

Important: Charge the battery pack only in temperatures that are within the appropriate range; refer to Specifications.

Note: At any time, press the battery-charge-indicator button on the battery pack to display the current charge (LED indicators).

  1. Ensure that the vents and charging terminals on the battery and charger are clear of any dust and debris.

    g536593
  2. Line up the charger with the cavity on the back of the battery pack.

  3. Slide the charger into the battery pack until it is fully seated.

  4. To remove the charger, slide the charger backward out of the battery.

  5. Refer to the following table to interpret the LED indicator light on the battery charger.

    Charger SymbolIndicator LightIndicates
    GraphicGreen blinkingBattery pack is charging
    GraphicGreenBattery pack is charged
    GraphicRedBattery pack and/or battery charger is over or under the appropriate temperature range
    GraphicRed blinkingBattery pack charging fault*
     OffNo battery pack inserted

*Refer to for more information.

Important: The battery can be left on the charger for short periods between uses.If the battery will not be used for longer periods, remove the battery from the charger; refer to Before storage.

Advancing the Line Using the Bump Feed

  1. Run the tool at full throttle.

  2. Tap the bump button on the ground to advance the line. The line advances each time the bump button is tapped. Do not hold the bump button on the ground.

    Note: The line trimming cut-off blade on the grass deflector cuts the line to the correct length.

    Note: If the line is worn too short, you may not be able to advance the line by tapping it on the ground. If so, release both triggers and refer to Advancing the Line Manually.

g333389

Advancing the Line Manually

Remove the battery pack from the trimmer, then push the bump button at the base of the spool retainer while pulling on the trimmer line to manually advance the line.

Adjusting the Cutting Swath

The trimmer comes from the factory with a cutting swath of 28 cm (11 inches) as shown in A of Figure 15. Refer to the following instructions to adjust the swath to 33 cm (13 inches) as shown in D of Figure 15.

  1. Remove the swath blade from the guard by removing the 2 screws and 2 lock washers holding it in place (B of Figure 15) and rotate the swath blade 180°.

  2. Once the swath blade is rotated, install it onto the guard using the 2 screws and 2 lock washers previously removed (C of Figure 15).

g537841

Operating Tips

  • Keep the trimmer tilted toward the area being cut; this is the best cutting area.

  • The string trimmer cuts when you move it from left to right. This prevents the trimmer from throwing debris at you.

  • Use the tip of the string to do the cutting; do not force the string head into uncut grass.

  • Wire and picket fences can cause the string to wear rapidly and even break. Stone and brick walls, curbs, and wood can also cause the string to wear rapidly.

  • Avoid trees and shrubs. The string can easily damage tree bark, wood moldings, siding, and fence posts.

g333402

Maintenance

After each use of the trimmer, complete the following:

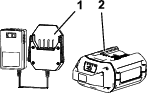
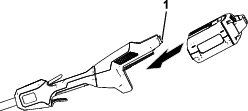
  1. Remove the battery from the trimmer.

  2. Wipe the trimmer clean with a damp cloth. Do not hose the trimmer down or submerge it in water.

    Caution

    The line cutoff blade on the deflector is sharp and can cut you.

    Do not use your hands to clean the deflector shield and blade.

  3. Wipe or scrape clean the cutting head area any time there is an accumulation of debris.

  4. Check and tighten all fasteners. If any part is damaged or lost, repair or replace it.

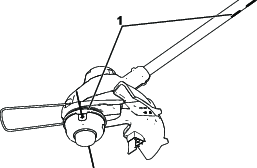
  5. Brush debris away from air intake vents and exhaust on motor housing to prevent the motor from overheating.

Replacing the String

Important: Use only 2 mm (0.080 inch) monofilament string (the manufacturer Part No. 88201).

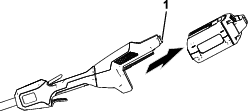
  1. Remove the battery pack and clean any debris from the trimmer head.

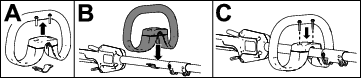
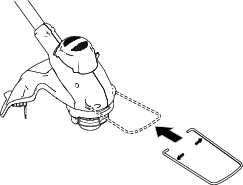
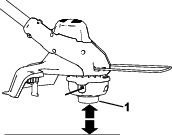
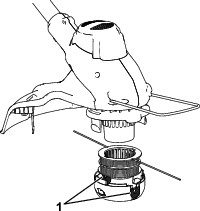
  2. Press the tabs simultaneously on the side of the trimmer head and remove cover and spool (Figure 17).

    g333516
  3. Remove the spool from the cover and remove any remaining string from the spool.

  4. Cut 1 piece of 2 mm (0.080 inch) string to approximately 3 m (10 ft).

    Important: Do not use any other gauge or type of string, as this could damage the trimmer.

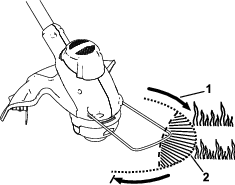
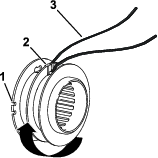
  5. Bend the new string at the midpoint and insert the bend into the starter slot in the center rim of the spool (Figure 18).

    Note: Ensure that the line snaps into position in the slot.

  6. Wrap the 2 halves of the string evenly and firmly around the spool as shown in Figure 18.

    Note: Ensure that the string is wrapped counterclockwise around the spool when looking at the bottom of the spool.

    g330440
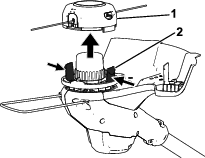
  7. Wind the string, leaving just enough extending from the spool to contact the swath blade, and snap the ends into the guide slots on the spool (Figure 18).

  8. Install the spool into the cover and route the ends of the string through the holes in the cover as shown in Figure 19.

    g333517
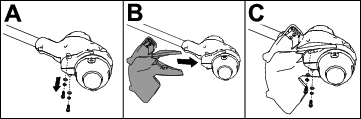
  9. Install the spool and cover assembly to the trimmer head. Push until the cover tabs snap into place.

Storage

Important: Store the machine, battery pack, and charger only in temperatures that are within the appropriate range; refer to Specifications.

Important: If you are storing the machine for a year or longer, remove the battery pack from the machine and charge the battery pack until 1 or 2 LED indicators turn green on the battery. Do not store a fully charged or fully depleted battery. When you are ready to use the machine again, charge the battery pack until the left indicator light turns green on the charger or all 4 LED indicators turn green on the battery.

  • Disconnect the machine from the power supply (i.e., remove the battery pack) and check for damage after use.

  • Clean all foreign material from the machine.

  • Do not store the machine or charger with the battery pack installed.

  • When not in use, store the machine, battery pack, and battery charger out of the reach of children.

  • Keep the machine, battery pack, and battery charger away from corrosive agents such as garden chemicals and de-icing salts.

  • To reduce the risk of serious personal injury, do not store the battery pack outside or in vehicles.

  • Store the machine, battery pack, and battery charger in an enclosed clean, dry area.

Preparing the Battery Pack for Recycling

Important: Upon removal, cover the terminals of the battery pack with heavy-duty adhesive tape. Do not attempt to destroy or disassemble the battery pack or remove any of its components.

GraphicGraphic Contact your local municipality or your authorized Authorized Service Dealer or distributor for more information on how to responsibly recycle the battery.

Graphic

Lithium-ion battery packs labeled with the Call2Recycle seal can be recycled at any participating retailer or battery recycling facility in the Call2Recycle program (US and Canada only). To locate a participating retailer or facility closest to you, please call 1-800-822-8837 or visit www.call2recycle.org.

Graphic

Lithium-ion battery packs labeled with the High Energy Battery (HEB) seal shown here, and any 60V Flex-Force batteries 6.0 Ah or greater, can be recycled at any participating dealer or retailer in the Call2Recycle HEB program. To locate a participating dealer or retailer closest to you, please visit www.hebattery.org.

If you cannot locate a participating retailer or facility nearby, or have questions about which recycling program your battery pack may qualify for, please visit the customer support site listed in the operator’s manual for your tool/equipment for more information on how to responsibly recycle the battery pack.

If you are located outside of the US and Canada, please contact your Authorized Service Dealer or distributor for more information on how to responsibly recycle the battery pack.

Troubleshooting

Perform only the steps described in these instructions. All further inspection, maintenance, and repair work must be performed by an r Authorized Service Dealer or a similarly qualified specialist if you cannot solve the problem yourself.

Always remove the battery from the tool when troubleshooting, inspecting, maintaining, or cleaning the tool.

ProblemPossible CauseCorrective Action
The tool does not run or does not run continuously.
  1. The battery is not fully installed in the tool.
  2. The battery pack is not charged.
  3. The battery pack is over or under the appropriate temperature range.
  4. There is moisture on the leads of the battery pack.
  5. The battery pack is damaged.
  6. There is another electrical problem with the tool.
  1. Remove and then replace the battery into the tool, making sure that it is fully installed and latched.
  2. Remove the battery pack from the tool and charge it.
  3. Move the battery pack to a place where it is dry and the temperature is between 5°C (41°F) and 40°C (104°F).
  4. Allow the battery pack to dry or wipe it dry.
  5. Replace the battery pack.
  6. Contact an Authorized Service Dealer.
The tool does not reach full power or the motor housing is getting hot.
  1. The battery pack charge capacity is too low.
  2. The air vents are blocked.
  1. Remove the battery pack from the tool and fully charge the battery pack.
  2. Clean the air vents.
The tool is producing excessive vibration or noise.
  1. There is debris under the grass shield or in the bump head housing on the trimmer.
  2. The spool is not properly wound.
  1. Clean any debris from under the grass shield or in the bump head housing.
  2. Advance the line using the bump head and/or remove the line on the spool and wind the spool again.
The bump head does not advance the line.
  1. The trimmer is out of line.
  2. The line is tangled in the bump head housing.
  3. There is debris under the grass shield or in the bump head housing on the trimmer.
  1. Add more line to the bump head.
  2. Remove the bump head cover and untangle the line.
  3. Clean any debris from under the grass shield or in the bump head housing.
The battery pack loses charge quickly.
  1. The battery pack is over or under the appropriate temperature range.
  2. The trimmer is overloaded.
  1. Move the battery pack to a place where it is dry and the temperature is between 5°C (41°F) and 40°C (104°F).
  2. Trim at a slower pace.
The battery charger is not working.
  1. The battery charger is over or under the appropriate temperature range.
  2. The outlet that the battery charger is plugged into does not have power.
  1. Unplug the battery charger and move it to a place where it is dry and the temperature is between 5°C (41°F) and 40°C (104°F).
  2. Contact your licensed electrician to repair the outlet.
The LED indicator light on the battery charger is red.
  1. The battery charger and/or battery pack is over or under the appropriate temperature range.
  1. Unplug the battery charger and move the battery charger and battery pack to a place where it is dry and the temperature is between 5°C (41°F) and 40°C (104°F).
The LED indicator light on the battery charger is blinking red.
  1. There is an error in the communication between the battery pack and the charger.
  2. The battery pack is weak.
  1. Remove the battery pack from the battery charger, unplug the battery charger from the outlet, and wait 10 seconds. Plug the battery charger into the outlet again and place the battery pack on the battery charger. If the LED indicator light on the battery charger is still blinking red, repeat this procedure again. If the LED indicator light on the battery charger is still blinking red after 2 attempts, properly dispose of the battery pack at a battery recycling facility.
  2. Properly dispose of the battery pack at a battery recycling facility.