Installation
Preparing the Machine
-
Raise the bed until the lift cylinders are fully extended.
-
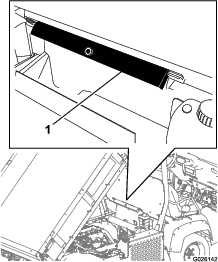
Remove the bed support from the storage brackets on the back of the ROPS panel (Figure 1).
-
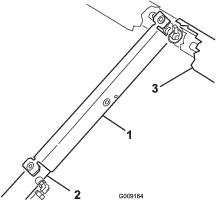
Push the bed support onto the cylinder rod, and ensure that the support-end tabs rest on the end of the cylinder barrel and cylinder-rod end (Figure 2).
-
Park the machine on a level surface.
-
Engage the parking brake.
-
Shut off the machine and remove the key.
-
Disconnect the battery; refer to your machine Operator's Manual.
Installing the Trailer-Light Wire Harness
Parts needed for this procedure:
| Trailer wire harness | 1 |
| Cable tie | 7 |
Installing the Wire Harness for HDX Models
-
Route the wire harness in from the trailer hitch to the rear frame tube.
-
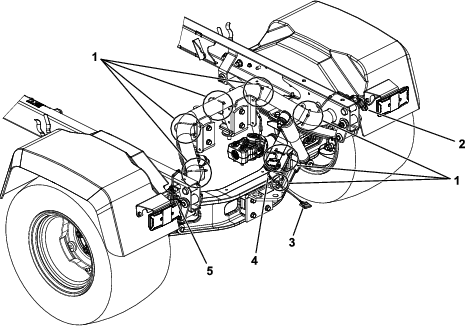
Separate the two sides of the harness, routing each along the bottom of the rear frame tube to the openings in the side frame rails as shown in Figure 3.
-
Ensure that you route the side of the harness labeled Left to the left machine side rail and the side labeled Right to the right machine side rail.
-
Locate the connectors in the side rails that connect the brake lights to the main machine wire harness and disconnect them.
-
Connect the connectors on the trailer-light wire harness on each side to the main wire harness and brake light connectors that you disconnected in step 4.
-
Using the 7 cable ties, secure the trailer-light wire harness to the rear tube in the locations shown in Figure 3.
Installing the Wire Harness for UTX Models
-
Route the wire harness in from the trailer hitch to the rear frame tube.
-
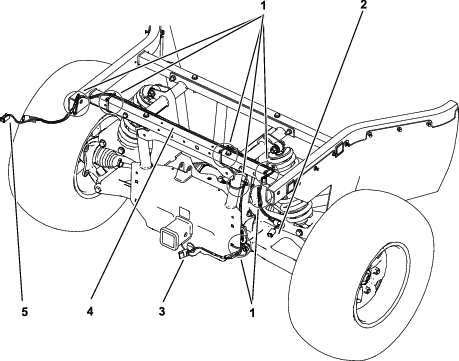
Separate the two sides of the harness, routing each along the bottom of the rear frame tube to the openings in the side frame rails as shown in Figure 4
-
Ensure that you route the side of the harness labeled Left to the left machine side rail and the side labeled Right to the right machine side rail.
-
Locate the connectors in the side rails that connect the brake lights to the main machine wire harness and disconnect them.
-
Connect the connectors on the trailer-light wire harness on each side to the main wire harness and brake light connectors that you disconnected in step 4.
-
Using the 7 cable ties, secure the trailer-light wire harness to the rear tube and the main wiring harness in the locations shown in Figure 4.
Completing the Installation
-
Connect the battery; refer to your machine Operator’s Manual.
-
Start the machine and test the brake lights by pressing the brake pedal.
-
Connect a trailer to the machine and connect the trailer-light connector on the machine to the connector on the trailer.
-
Test the trailer lights by pressing the brake pedal.
-
Remove the bed support from the cylinder and insert it into the brackets on the back of the ROPS panel.
Important: Do not try to lower the bed with the bed safety support on the cylinder.
Checking the Function of the Lights
Checking the Function of the Brake Lights
Press your foot on the brake pedal; the brake lights should illuminate.
Checking the Function of the Signal Lights
Press the turn-signal switch to the left to illuminate the left signal lights.
Press the turn-signal switch to the right to illuminate the right signal lights.