Maintenance
Note: Determine the left and right sides of the machine from the normal operating position.
Recommended Maintenance Schedule(s)
| Maintenance Service Interval | Maintenance Procedure |
|---|---|
| After the first hour |
|
| After the first 2 hours |
|
| Before each use or daily |
|
| Every 100 hours |
|
| Yearly |
|
| Yearly or before storage |
|
Maintenance Safety
Read the following safety precautions before performing any maintenance on the machine:
-
Before performing any maintenance, service, or adjustment, shut off the engine and remove the key. If major repairs are ever needed, contact an Authorized Service Dealer.
-
Check all fasteners at frequent intervals for proper tightness to be sure that the machine is in safe working condition.
-
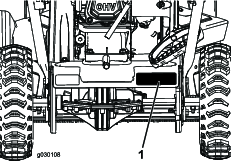
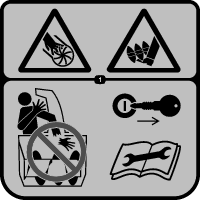
Maintain or replace safety and instruction labels, as necessary.
-
Do not change the governor settings on the engine.
-
Purchase only genuine Toro replacement parts and accessories.
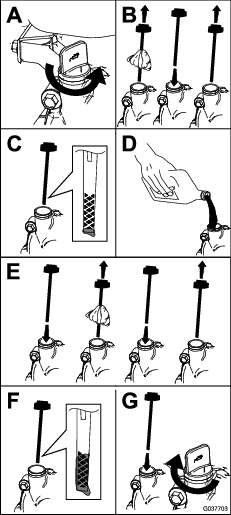
Checking the Engine-Oil Level
| Maintenance Service Interval | Maintenance Procedure |
|---|---|
| Before each use or daily |
|

Checking and Adjusting the Skids
| Maintenance Service Interval | Maintenance Procedure |
|---|---|
| Yearly |
|
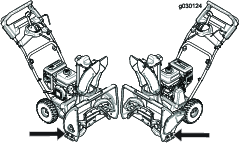
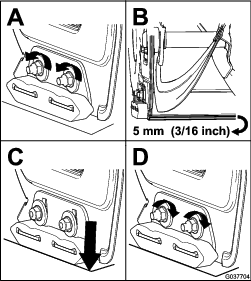
Check the skids to ensure that the auger does not contact the paved surface. Adjust the skids as needed to compensate for wear (Figure 16).
-
Loosen the skid bolts.
-
Slide a 5 mm (3/16 inch) board underneath the scraper.
Note: Using a thinner board will result in a more aggressive scraper. A thicker board will result in a less aggressive scraper.
-
Lower the skids to the ground.
Note: Ensure that the skids are flat on the ground.
-
Tighten the skid bolts.
Inspecting the Throwing Edges
| Maintenance Service Interval | Maintenance Procedure |
|---|---|
| Yearly |
|
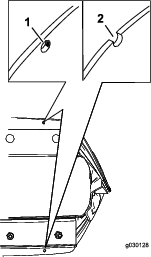
Before each session, inspect the throwing edges for wear. When a throwing edge has worn down to the wear-indicator hole, have an Authorized Service Dealer replace the throwing edges ().
Changing the Engine Oil
| Maintenance Service Interval | Maintenance Procedure |
|---|---|
| After the first 2 hours |
|
| Yearly |
|
If possible, run the engine for a few seconds before changing the oil because warm oil flows better and carries more contaminants.
Use automotive detergent oil with an API service classification of SJ, SL, or higher.
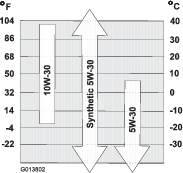
Use Figure 18 to select the best oil viscosity for the outdoor temperature range expected:
| Model | Max Fill |
| 36002 | 0.54 L (18 fl oz) |
| 36003 | 0.7 L (24 fl oz) |
-
Move the machine to a level surface.
-
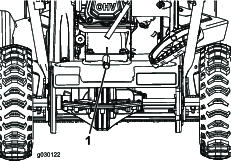
Place an oil-drain pan under the oil-drain plug, remove the oil-drain plug, and tip the machine backward and drain the used oil in the oil-drain pan (Figure 19).
-
After draining the used oil, return the machine to the operating position.
-
Install the oil-drain plug and tighten it securely.
-
Clean around the oil-fill cap.
-
Fill the crankcase with oil.
-
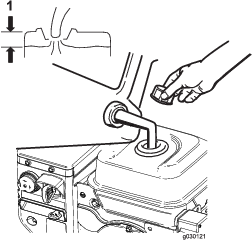
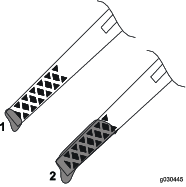
Remove the dipstick and slowly pour oil into the oil-fill tube to raise the oil level to the Full mark on the dipstick (Figure 20). Do not overfill.
-
Install the dipstick securely.
-
Replacing the Spark Plug
| Maintenance Service Interval | Maintenance Procedure |
|---|---|
| Every 100 hours |
|
Warning
Replacing the spark plug while the engine is hot can result in burns.
Wait until the engine is cool to replace the spark plug.
Use a Toro spark plug or equivalent (Champion® RN9YC or NGK BPR6ES).
Adjusting the Auger Cable
| Maintenance Service Interval | Maintenance Procedure |
|---|---|
| After the first 2 hours |
|
| Yearly |
|
If the drive belt slips or squeals under heavy load, adjust the auger cable.
-
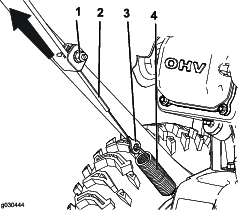
Loosen the nut on the lower cable clamp, but do not remove it (Figure 23).
-
Pull the cable up to remove some slack (Figure 23).
Important: Do not remove all the slack from the cable. Removing all the slack from the cable prevents the auger from stopping properly.
-
Hold the cable in place and tighten the nut (Figure 23).
Adjusting the Transmission Cable
| Maintenance Service Interval | Maintenance Procedure |
|---|---|
| After the first 2 hours |
|
| Yearly |
|
If the wheels easily stall out, or if the wheels drive without engaging the self-propel handle, adjust the transmission cable.
-
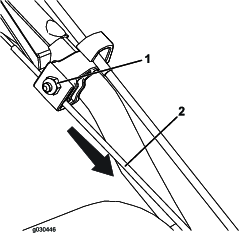
Loosen the nut on the upper cable clamp, but do not remove it (Figure 24).
-
Pull the cable down to remove most of the slack in the cable (Figure 24).
Important: Do not remove all the slack from the cable. Removing all the slack from the cable may cause the wheels to engage without engaging the self-propel handle.
-
Tighten the nut (Figure 24).
Checking the Tire Pressure
| Maintenance Service Interval | Maintenance Procedure |
|---|---|
| Yearly |
|
Check the air pressure in the tires and inflate them to 103 to 137 kPa (15 to 20 psi).
