Installation
Preparing the Machine
-
Press the STOP button and wait for all moving parts to stop.
-
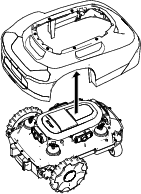
Turn the mower on its side.
-
Turn the power switch to the OFF position.
Removing the Shroud
-
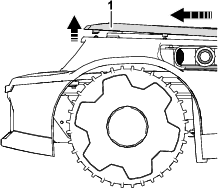
Lift up the rear of the shroud ring and work around the ring to release the 6 clips that secure the ring to the shroud. Slide the shroud ring backwards to remove it.
-
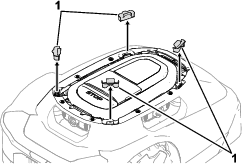
Remove the rubber boots covering the shroud mounts.
Retain for later installation.
-
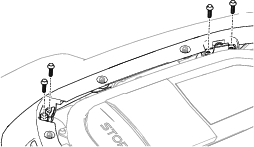
Remove the 8 bolts securing the shroud mounts to the shroud.
Retain for later installation.
-
Push the shroud mount tabs gently inward and down out of the way to release the shroud. Repeat for every shroud mount.
-
Lift the shroud up and away from the chassis. Set aside.
Removing the Existing Bearings
-
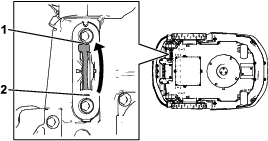
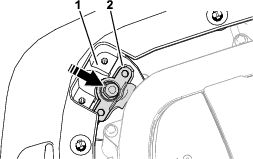
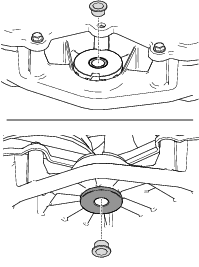
Remove the bolt and cover located over the caster fork.
-
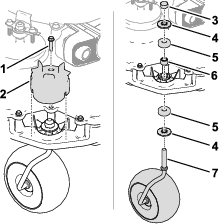
Remove the locknut securing the caster fork to the chassis, as well as the washers, bearings, and spacer secured to the chassis.
The caster fork should slide out.
-
Clear excess debris in the caster cavity.
Installing the Kit
Parts needed for this procedure:
| Upper bearing support | 2 |
| Lower bearing support | 2 |
| Bolt (5/16 x 2 inches) | 1 |
| Nut | 1 |
| Bushing | 2 |
| Washer | 4 |
| Caster wheel assembly | 2 |
| Cotter pin | 2 |
-
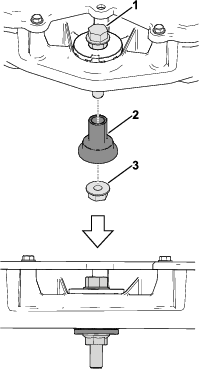
Install the replacement upper bearing support by aligning the chassis ribs and the support cutouts in the bearing support. Press in by hand.

-
Insert the replacement lower bearing support from below.
-
Using the provided bolt (5/16 x 2 inches) and nut, tighten the lower bearing support into the upper bearing support and chassis until snug.
Top of the lower bearing support should be flush with the upper bearing support surface.
-
Remove the nut and bolt.
-
Press 2 plastic bushings into the bearing supports using your hand or with the nut and bolt combo until they are fully seated.
Important: Be careful not to damage the flange or the internal diameter of the bearing supports.
-
Add a washer to the caster fork shoulder.
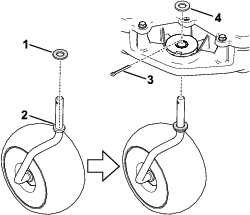
-
Slide the caster fork into the bearing supports from underneath the chassis.
-
Add an additional washer over the fork and install the cotter pin, bending the legs around the fork using pliers.
-
Verify that the caster pivots freely.
-
Repeat the procedure for the other caster wheel.
Installing the Shroud
-
Install the shroud over the chassis.
-
Pull the shroud mount tabs inward and up over the shroud mount surface.
-
Install and torque the 8 bolts that you previously removed in Step 3 of Removing the Shroud.
-
Install the 4 rubber boots that you previously removed in Step 2 of Removing the Shroud.
-
Reassemble the shroud ring by sliding the clip heads under the front shroud lip and then press down along the perimeter of the shroud ring to secure the surrounding clips to the shroud.
-
Turn the power switch to the ON position. Return to normal operation.