Installation
Note: Determine the left and right sides of the machine from the normal operating position.
Preparing the Machine
-
Park the machine on a level surface, engage the parking brake, and disengage the PTO.
-
Lower the cutting units to the ground.
-
Shut off the engine, remove the key, wait for all parts to stop moving, and allow the engine to cool.
Installing the Horn
Parts needed for this procedure:
| Horn | 1 |
| Horn switch | 1 |
| Horn button (rubber) | 1 |
| Bolt (5/16 x 3/4 inch) | 1 |
| Flange nut (5/16 inch) | 1 |
| Relay | 1 |
| Fuse | 1 |
-
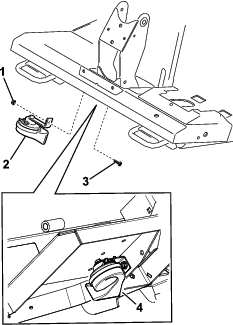
Install the horn bracket to the tab, under the platform, with a bolt (5/16 x 3/4 inch) and flange nut (5/16 inch) as shown in Figure 1.
Note: Rotate the horn so it faces toward the back of the machine.
-
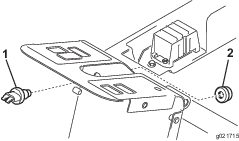
Insert the horn switch through the hole in the steering-column tower (Figure 2).
-
Secure the horn switch to the tower by threading on the rubber horn button (Figure 2).
-
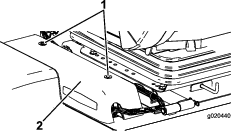
Remove the 2 screws securing the power-center cover to the frame and remove the cover (Figure 3).
-
Install the fuse and relay as shown in Figure 4.

-
Install the power-center cover and secure it with the screws (Figure 3).
-
Locate the wire-harness connectors inside the steering column tower.
-
Plug the wire-harness connectors labeled HORN into the horn and switch.
-
Secure the wire harness.
Note: When routing the wires, ensure that the operation of the tilt steering does not damage the harness or pull on the wires.
-
Connect the battery; refer to your Operator’s Manual.
Testing the Horn Function
Confirm that the horn sounds when you press the horn button and stops when you release it.
Note: If the horn does not sound, ensure that the wire-harness connectors are secure.