Maintenance
Recommended Maintenance Schedule
| Monthly |
|
| |
| Every 2 to 4 weeks |
|
| Every 3 months
|
|
| Yearly |
|
| |
Maintenance Safety
- Before servicing the machine,
turn the power switch underneath the machine to the Off position.
- Do not allow children to clean
and maintain the machine.
- Keep your hands and feet away
from moving parts on and under the machine.
- The blades are sharp; contacting
the blades can result in serious personal injury.
- Shut off the machine.
- Wear cut-resistant gloves when
servicing the blades.
- Do not repair or alter the blades.
- Inspect the machine often to ensure
that the blades are not worn or damaged.
- Maintain or replace safety and
instruction labels as needed.
- Disconnect the power supply from
the electrical outlet before performing maintenance on or cleaning
it to reduce the risk of electric shock.
- Do not attempt to repair, open,
or disassemble the charging station or power supply.
- Take the charging station to an
Authorized Service Dealer for service or repair. Do not disassemble
the charging station.
- For best performance, use only
genuine Toro replacement parts and accessories. Other replacement
parts and accessories could be dangerous,
and could void the product warranty.
Battery and Charging Station Safety
- Clean the charging port on the
mower and/or charging station using a nonconductive tool (cloth or
soft brush); otherwise, damage may occur.
- Wipe the charging terminals on
the charging station and mower using a clean, dry cloth if they are
dirty.
- When servicing the battery, do
not wear jewelry and tie back long hair.
- Do not dismantle or open the battery.
- Keep the battery clean and dry.
- Do not use or charge the mower
if it is unusually hot or emits smoke or an unusual smell.
- Leaking battery fluid can cause
skin and eye irritation or chemical burns.
- If the battery leaks, do not allow
the liquid inside the battery to contact skin or eyes. If there is
contact, wash the affected area with a
large amount of water and seek medical advice.
- Use an inert absorbent such as
sand to clean up spilled battery fluid.
- Dispose of a used battery properly.
- Do not dispose of the battery
in a fire. The cell may explode. Check with local codes for possible
special disposal instructions.
- CAUTION—A mistreated battery may present
a risk of fire, explosion, or chemical burn.
- Do not disassemble the battery.
- Replace the battery with an approved
battery only; using another type of battery may cause a fire or risk
of injury.
- Keep battery out of the reach
of children.
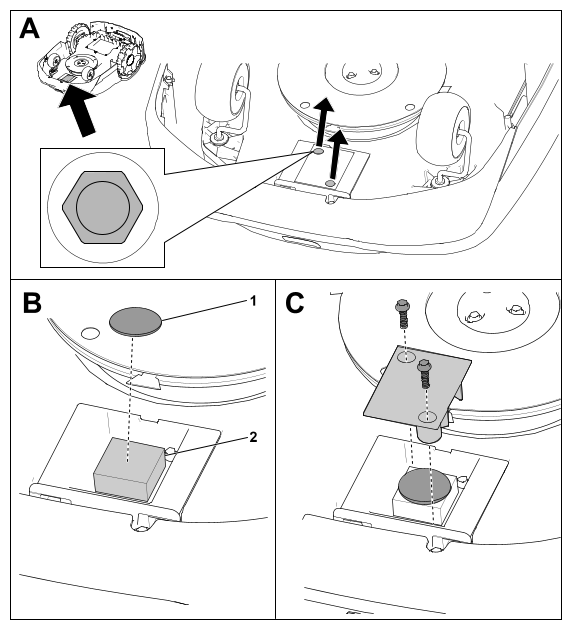
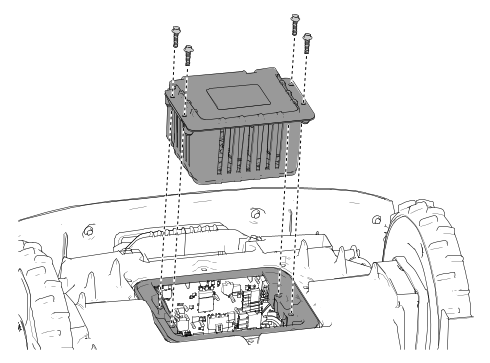
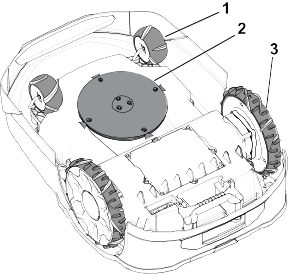
Servicing the Battery
Disconnecting the Battery
-
Turn the
power switch to the Off position.
-
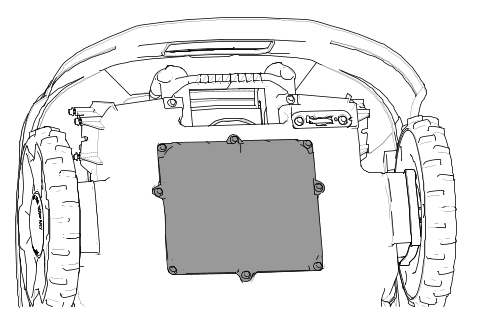
Use a 7 mm
socket to remove the 8 screws and the battery cover.
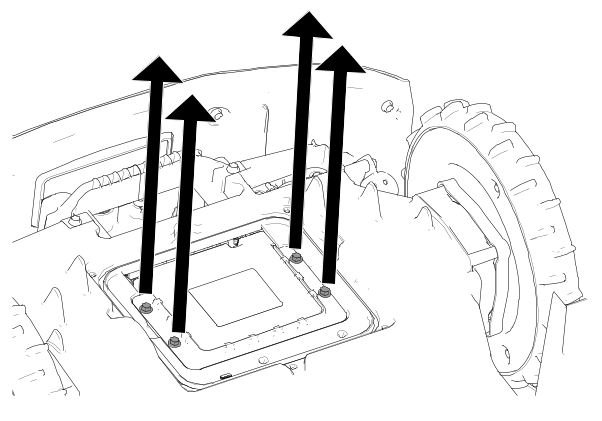
-
Remove the
screws securing the battery.
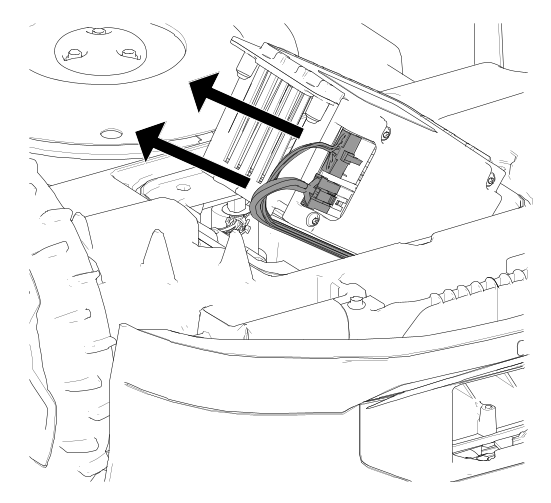
-
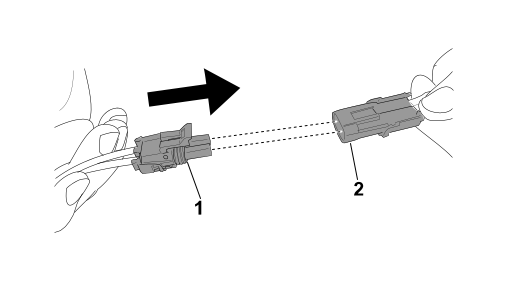
Disconnect
the 2 wire-harness connectors from the battery.
Connecting the Battery
-
Connect the
2 wire-harness connectors to the battery.
-
Secure the
battery using the previously removed screws.
-
Install the
battery cover.
-
Turn the
power switch to the On position.
-
Place the
mower in the charging station to charge.
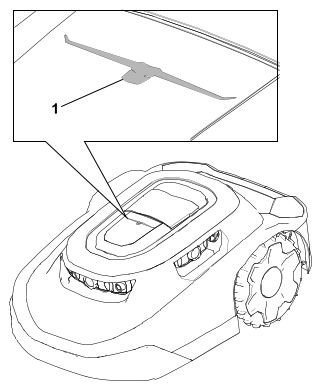
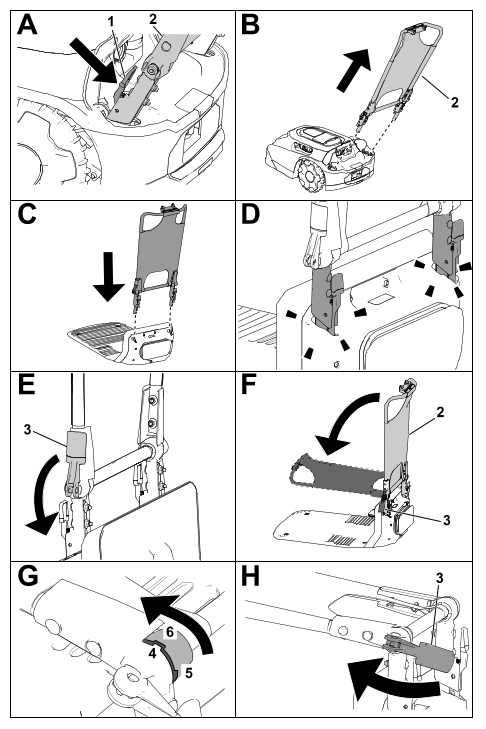
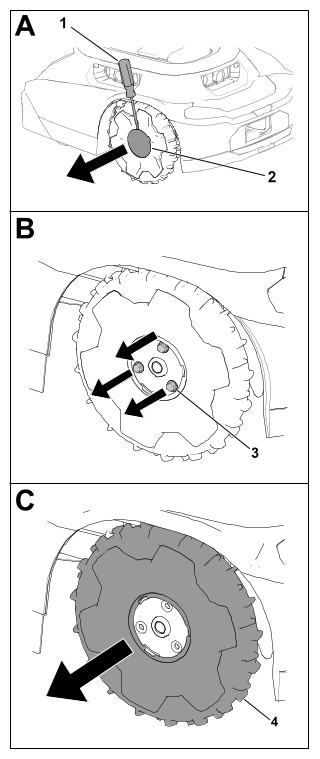
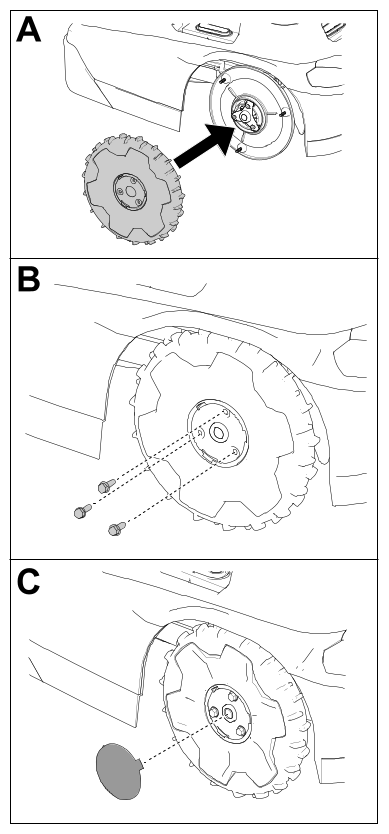
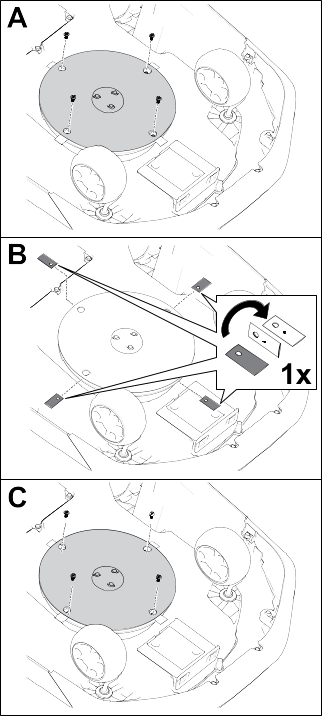
Replacing the Blades
Always mow
with sharp blades. Sharp blades cut cleanly without tearing or shredding
the grass.
 |
Warning |
|
The blades are sharp; contacting
the blades could result in serious personal injury.
Wear cut-resistant
gloves and use care when replacing or cleaning the blades.
-
Turn the
power switch to the Off position.
-
Tip the mower
over.
-
Rotate the
blade disc until the holes on the blade disc align with the screws.
-
Using a Phillips-head
screwdriver, remove the blade screws and blades.
-
Clean any
debris from cutting system.
-
If the service
interval is reached for a set of blades for the first time, you may
flip the blades over and install them to the
mower again using the existing screws.
Note: Both sides of the blades have sharp edges that can be used for mowing.
One set of blades should only be flipped over once.
-
If installing
new blades or both sides of the blades have been used, install the
blades using the provided screws.
Note: Discard the existing blades and screws after using both sides of
the blades, or if the blades are damaged.
-
Turn the
mower over.
-
Turn the
power switch to the On position.
-
Press the
play (resume operation) button on the control panel.
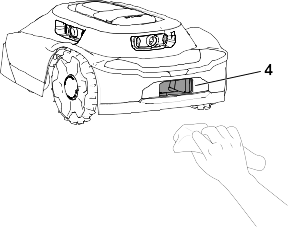
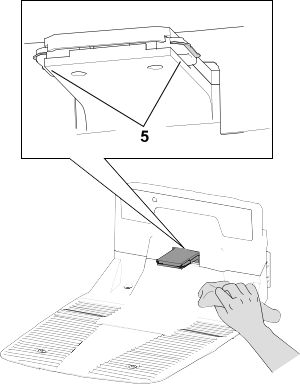
Cleaning
Cleaning the Mower and Charging
Station
Do not pressure-wash the mower;
the water can damage the electronics.
Use compressed air when
cleaning the mower.
Clean the charging port on the
mower and/or charging station using a non-conductive tool (cloth or
soft brush); otherwise, damage may occur.
|
Caution |
|
If metal objects contact the positive
and negative posts at the same time, this could short out the battery
pack. The battery pack or conductor could
overheat and burn you, resulting in minor or moderate injury.
Do
not use metal objects to clean around the battery.
-
Turn the
mower power switch to the Off position
and wait for all moving parts to stop.
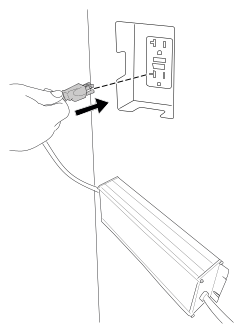
-
Unplug the
power supply for the charging station.
-
Turn the
mower over.
-
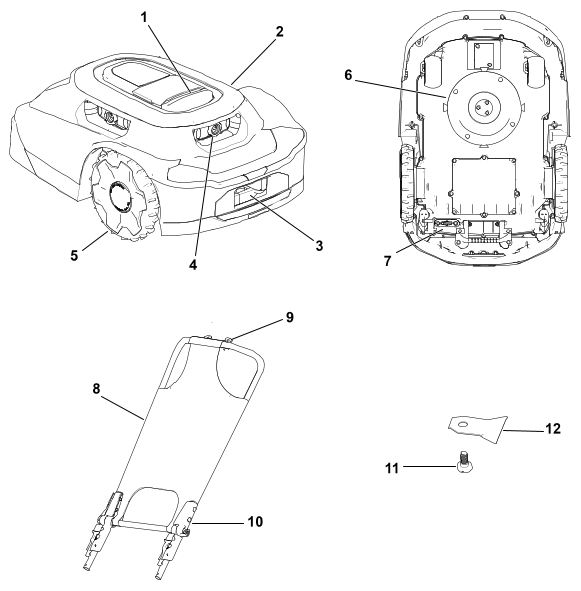
Clean any
debris or grass build-up on the caster wheels  and drive wheels
  .
.
-
Use a wet
cloth or a soft brush to remove grass clippings and debris from the
mower housing  .
.
Ensure that there are not any
obstructions in the top side of the mower (e.g., a stick that got
stuck or debris buildup).
-
Use a dry
cloth or non-conductive soft brush to clean the mower charging port  .
.
-
Use a dry
cloth or non-conductive soft brush to clean the charging station terminals  .
.
-
Turn the
mower over.
-
Turn the
mower power switch to the On position.
-
Plug in the
power supply for the charging station.
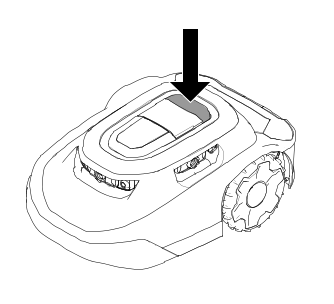
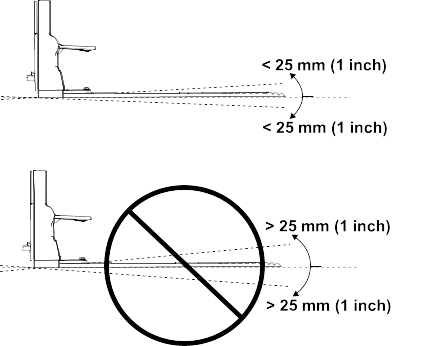
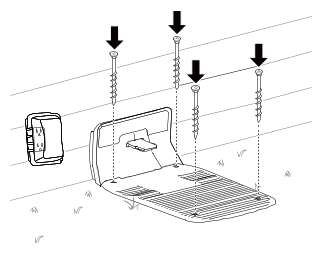
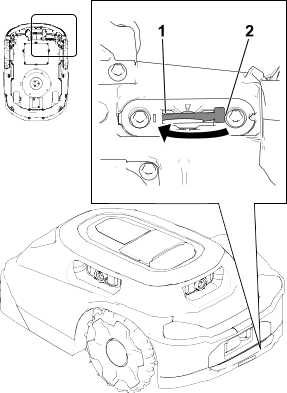
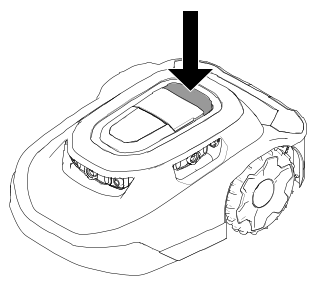
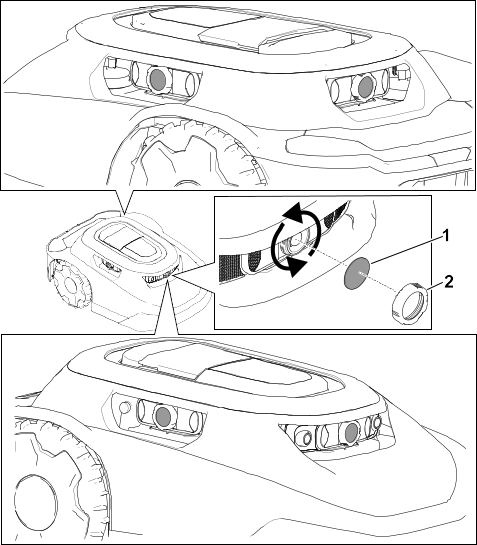
Cleaning or Replacing the Lens
Protectors
Clean the lens protectors using
a dry soft-bristle brush and/or a clean microfiber cloth.
Refer to the
figure below for the lens locations and how to replace the lens protectors.
-
Replace the
lens protectors by unscrewing the lens
caps and removing the lens protectors.
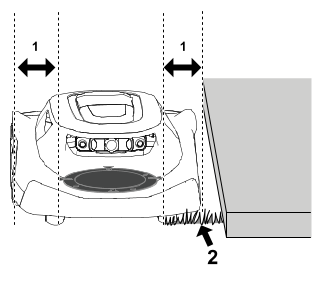
Disposing of Waste
-
Batteries
are pollutants to the environment. Dispose of these according to your
state and local regulations.
Troubleshooting
The mower does not start a mowing
cycle.
| Possible Cause |
Corrective Action |
| The on/off switch underneath
the mower is in the Off position. |
-
Push the
on/off switch to the On position.
|
| The handle is still installed
in the mower. |
-
Remove the
handle from the mower and stow the handle in the charging station.
|
| The mower is stuck on an
object. |
-
Move the
mower away from the object.
|
| The mower is pushed up
against an object. |
-
Move the
mower away from the object.
|
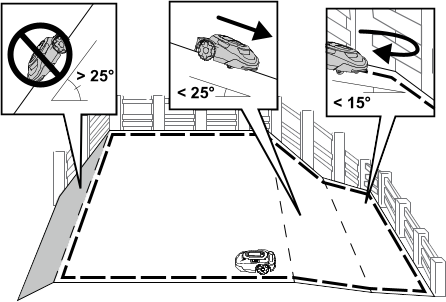
| The mower is on too steep
of an incline. |
-
Place the
mower on an incline of 25° or less.
|
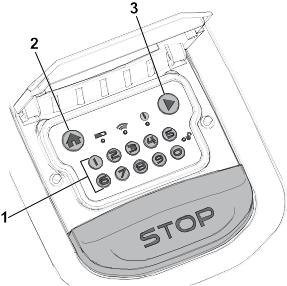
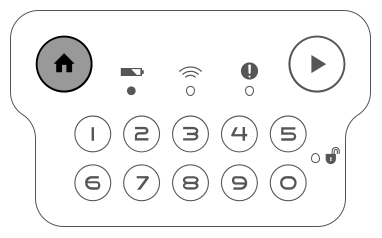
| The mower is locked. |
-
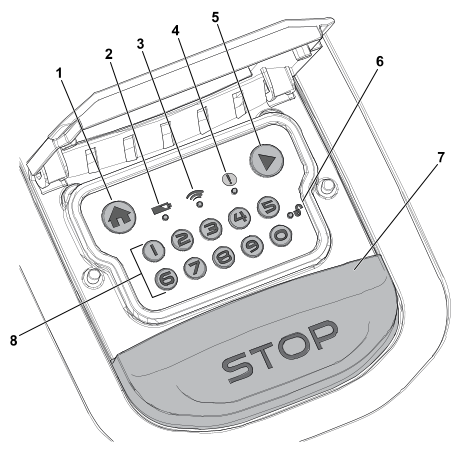
If the lock/unlock
indicator light is illuminated on the control panel, enter your PIN
on the keypad, then press the play
(resume operation) button or the home button.
|
Mower impacts object, will not
change direction.
| Possible Cause |
Corrective Action |
| There is an obstruction
between the shroud and the chassis.
|
-
Remove the
obstruction between the shroud and the chassis.
|
The mower will not move.
| Possible Cause |
Corrective Action |
| There is mud or grass built
up on the drive wheels. |
-
Clear the
mud or grass from the drive wheels until the tread on the drive wheels
are exposed.
|
The charging station has no power.
| Possible Cause |
Corrective Action |
| There is no power at the
house outlet. |
-
Reset the
house breaker. The LED light on the charging station will illuminate
when power is restored.
|
| The power supply is not
plugged into the house outlet.
|
-
Plug the
power supply into the house outlet. The LED light on the charging
station will illuminate when power is restored.
|
| The connection between
the power supply and the charging station is not connected. |
-
Connect the
power supply to the charging station. The LED light on the charging
station will illuminate when power is restored.
|
A caster wheel is not functioning
properly.
| Possible Cause |
Corrective Action |
| The caster wheel is not
pivoting or rolling. |
-
Clean the
caster wheel and metal pivot.
|
| The caster wheel bearing
is damaged. |
-
Inspect the
bearings for wear and ensure that they rotate freely. Replace the
bearing, if needed.
|
The mower is not cutting evenly.
| Possible Cause |
Corrective Action |
| The cutting blades are
dull. |
-
Replace the
4 cutting blades.
|
There is no Bluetooth® connection between
the mower and phone.
| Possible Cause |
Corrective Action |
| The Bluetooth function
on your phone is turned off. |
-
Turn on the
Bluetooth function on your phone.
|
| Your phone is not connected
to the mower. |
-
Open the
settings on your phone.
-
Refresh the connected devices list on your phone and ensure that
your phone is connected to the hub/mower.
-
If your phone is not connected to the hub/mower, pair your phone
with the hub/mower.
|
There is no wireless connection
between mower and hub.
| Possible Cause |
Corrective Action |
| There is no wireless signal
from the Wi-Fi router. |
-
Restart your
Wi-Fi router by disconnecting the power cord from the router and reconnecting
the power cord.
Wait 30 to 60 seconds before
reconnecting the power cord.
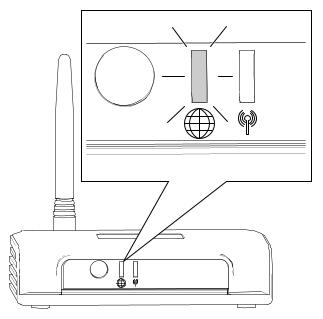
|
| There is no wireless signal
from the hub and the globe symbol on the hub is not illuminated. |
-
Restart your
hub by disconnecting the power cord from the hub and reconnecting
the power cord.
Wait 30 to 60 seconds before
reconnecting the power cord.
|
| The mower is outside the
property line. |
-
Return the
mower to your property.
|
The mower is not charging.
| Possible Cause |
Corrective Action |
| There is an obstruction
in the charging station. |
-
Check the
charging station for obstructions. Clear any obstructions.
|
| There is an obstruction
in the mower charging port. |
-
Check the
mower charging port for obstructions. Clear any obstructions.
|
| The charging terminals
on the charging station are dirty.
|
-
Clean the
charging terminals.
|
| The power switch on the
mower is in the Off position. |
-
Turn the
power switch to the On position.
-
Ensure that the indicator light on the charging station is green.
-
If the mower is docked in the charging station and the indicator
light is red, the magnet could be missing from the mower
shroud. Contact an Authorized Service
Dealer.
|
When manually pushing the mower,
the handle feels loose.
| Possible Cause |
Corrective Action |
| The cam lever on the handle
is loose. |
-
Tighten the
cam lever.
|
Glossary
Advisory
A message that informs
the user of an operator error or anything that may cause a job to
pause or halt and may require the user to intervene.
App
An abbreviation for software application.
A computer program on a mobile device that performs one or more tasks.
Also called application or mobile app.
Autonomous
Automated machine functions
that operate in autonomous mode during all the operating cycles of
the machine.
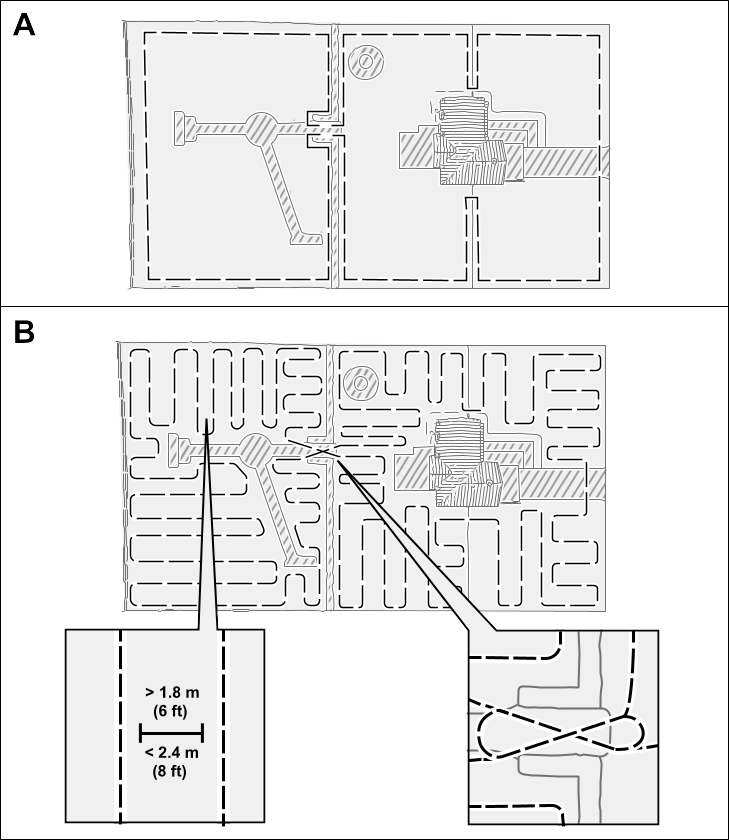
Boundary
Something that indicates
or fixes a limit or extent. For a robot, it is the outside, no-cross
line of an operating area, transit path or zone,
or exclusion area. Also called perimeter.
Bump Sensor
An electronic sensor used
in detecting and recording physical touch. Also called tactile sensor or touch sensor.
Charging Station
An automatic
battery-charging facility located on or within the working area.
Computer Vision
The way a robot “sees” the world around it, putting together
the sensor data and the pictures it creates to respond to its environment.
Exclusion Zone
An area recorded
by the operator that the robot shall not enter.
Fault
The result of a mechanical,
sensor, or software error, which requires service or correction of
the machine, sensor, or software code.
Job
The work being performed by a
robot at one time inside an operating area.
Localization
The process of determining
where a mobile robot is with respect to its environment. Localization
is a most fundamental competency required by a robot
as the knowledge of its location is necessary for making decisions
about future actions.
Mowing Zone
An area in which the robot
can run autonomously. The area inside a boundary. Operating may be
interchangeable with adjectives that describe the
work, such as mowing, clearing, and trenching.
Navigation
The ability of a robot
to determine its own position in its frame of reference and then to
plan a path toward some goal location.
Obstacle
An object or ground condition
which can cause harm, or is harmed, if it comes into contact or collision
with the machinery.
Obstacle Avoidance
The process
of avoiding a collision with an obstacle in the path of a robot by
maneuvering around the obstacle.
Obstacle Detection
The process
of detecting objects or terrain types that impede the motion of a
robot. A robot may use obstacle avoidance to maneuver
around an obstacle.
Obstacle Sensor
A device that
senses when the machine contacts a person or an obstruction.
Path
A route that a robot is programmed
to travel. As part of a job, a path can connect multiple fields or
paths.
Robot
A machine designed to execute
one or more tasks automatically. For example, a robot can sense, compute,
and act. It must be able to have sensors that provide
it with input and insights about the physical space around them. It
must be able to compute to make decisions based
on its programming and inputs. To be defined as a robot, it must be
able to move in or change the physical world in
some manner.
Sensing
The feedback from the environment
of the robot, which enables the robot to react to its environment.
Sensory inputs may come from a variety of sensor
types.
Sensor
A device that responds
to physical stimuli (including, but not limited to, heat, light, sound,
pressure, magnetism, and motion) and transmits the
resulting signal or data providing a measurement, operating a control,
or both. For example, a sensor can estimate the
condition of a robot and its environment. This information is sent
to a controller to enable the appropriate behavior.
A robot requires extensive information about its environment to function
effectively.
Transit Path
A non-mowing autonomous
lane used only for the robot to travel from one mowing zone to another.
An autonomous, exact path that passes through, across,
or connects to another transit path, transit area, or operating area.
Working Area
Any defined area in which
the machine can function automatically.