Installation
Preparing the Machine
-
Park the machine on a level surface.
-
Engage the parking brake.
-
Lower the cutting unit.
-
Shut off the engine and remove the key.
Installing the Kit
Parts needed for this procedure:
| Driveshaft | 1 |
| Washer | 2 |
| Hex-socket head bolt (M8-1.25 x 30 mm) | 6 |
| Hex-socket head bolt (3/8 x 2-1/4 inch) | 2 |
| Flange nut (3/8 inch) | 2 |
-
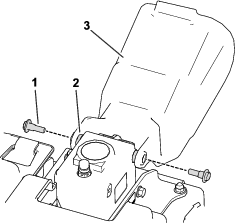
Remove the PTO cover connected to the front attachment (Figure 1).
-
Remove the bolts and nuts from the PTO shaft (Figure 4) and slide the yoke off of the front attachment shaft. Discard the hardware.
-
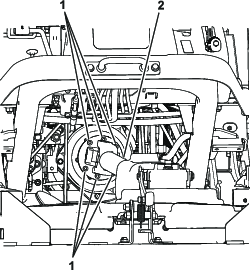
Remove the 6 bolts holding the driveshaft to the clutch (Figure 2). Discard the hardware.
-
Remove the driveshaft from the machine.
-
Install the new driveshaft to the clutch with 6 hex-socket head bolts (M8-1.25 x 30 mm); refer to Figure 2.
Note: The bolt hole orientation to the clutch flange is not important.
-
In a star pattern, torque the 6 hex-socket head bolts to 23 to 29 N∙m (17 to 21 ft-lb).
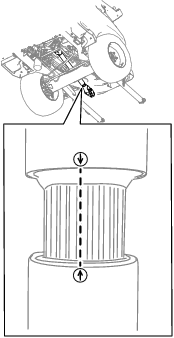
Important: If you separate the PTO-driveshaft telescoping end from the clutch end, ensure that the arrows align when you install the telescoping end (Figure 3).
Important: : If the arrows on the driveshaft are not aligned, severe imbalance may occur in the driveline system.
-
Slide the PTO-shaft yoke onto the front attachment shaft and secure the shafts together with 2 hex-socket head bolt (3/8 x 2-1/4 inch), washers, and flange nuts (3/8 inch) in opposite directions and tighten in an alternating pattern (Figure 4).

-
Torque the nuts to 61 N∙m (45 ft-lb).
-
Install the PTO cover to the front attachment (Figure 1).