Safety
Safety and Instructional Decals
 |
Safety decals and instructions are easily visible to the operator and are located near any area of potential danger. Replace any decal that is damaged or missing. |


Installation
Preparing a Machine
-
Park a machine on a level surface.
-
Engage the parking brake.
-
Shut off the engine and remove the key.
-
Disconnect the battery; refer to the Operator’s Manual.
-
Remove the hood; refer to the Operator’s Manual.
Installing the Wiring
Parts needed for this procedure:
| Wire harness | 1 |
| Switch | 1 |
| Work light decal (107-8008) | 1 |
| Fuse (15 A) | 1 |
| Fuse decal (107-8011) | 1 |
-
From the front of the machine, route the end of the wire harness with the large rectangular plug, black eye-ring connector, and spade connector on a yellow wire under the dash.
Route the wire with the spade connector behind the fuse blocks and route the large rectangular plug behind the dash to the left.
-
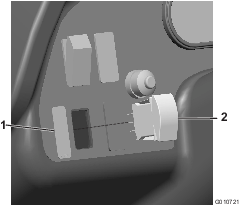
Plug the spade connector on the yellow wire into an open wire connector on the back of a fuse block (Figure 1).
Note: If there are no open spots on the back of either fuse block, install a new fuse block (Toro Part No. 92-2641) next to the current blocks, and connect the spade connector to a slot in the new fuse block.
-
Insert the fuse (15 A) into the fuse block location to which you connected the spade connector (Figure 1).
-
Connect the ring terminal on the black wire to the grounding block (Figure 1).
-
Apply the work light fuse decal (107-8011) in the corresponding open spot on the existing fuse decal (Figure 1).

-
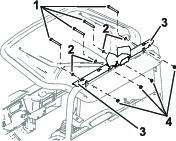
Remove 1 of the plugs from the switch-mounting holes on the left side of the dash (Figure 2).
Note: You can use any unused position.
-
Insert the work light switch into the hole in the dash until is snaps into place (Figure 2).
-
Apply the work light decal (107-8008) to the control panel next to the switch (Figure 2).
-
Connect the large rectangular plug on the wire harness to the back of the switch.
-
Route the remainder of the wire harness along the path of the main wire harness, under the floor and back to the left side of the roll bar.
Installing the Work Lights
Parts needed for this procedure:
| Work light assembly | 1 |
| Bolt (5/16 x 3/4 inch) | 4 |
| Locknut (5/16 inch) | 4 |
| Light channel | 2 |
| Channel-mounting bracket | 4 |
| Bolt (1/4 x 2-3/4 inches) | 4 |
| Washer | 4 |
| Flange nut (1/4 inch) | 4 |
| Cable tie | 8 |
-
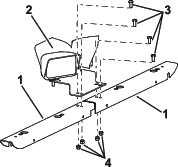
Mount the work light assembly to the end holes of the light channels using 4 bolts (5/16 x 3/4 inch) and 4 locknuts (5/16 inch).
-
Plug the work-light harness connectors into the appropriate connectors on the lights.
The 2 connectors with red and black wires go to the front lights and the remaining connector is for the rear light.
-
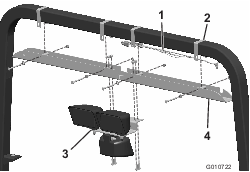
Mount the light channels to the roll bar using 4 channel-mounting brackets, 4 bolts (1/4 x 2-3/4 inches), 4 washers, and 4 flange nuts (1/4 inch).
Important: Ensure that you route the wire harness through the left channel bracket to the left, rear side of the roll bar.
Note: If the machine is equipped with a cab, mount the light channels to the top of the roll bar and install a channel cap (available through your authorized Toro distributor) onto the curved end of each channel.
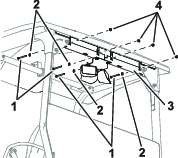
-
Secure the wire harness to the machine frame and to the rear of the roll bar using 8 cable ties evenly spaced along the route of the cable.
Do not route the cable over any sharp edges.
-
Connect the battery; refer to the machine’s Operator’s Manual.
-
Test the work lights by moving the work light switch to the front and rear positions. The appropriate lights should illuminate.