Installation
Installing the Kit
Parts needed for this procedure:
| Tongue plate | 2 |
| Hitch spacer | 2 |
| Trailer clevis | 1 |
| Hitch template | 1 |
| Bolt | 4 |
| Locknut | 4 |
| Adjustable hitch plate | 2 |
-
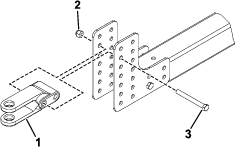
Remove the bolts and nuts that secure the existing hitch straps to the trailer tongue (Figure 1). Remove the hitch straps.
-
Position the template onto the trailer tongue so it rests on the top and is aligned with the end (Figure 2).
-
Use the template to locate and mark the 2 hole locations (Figure 2) on each side of the trailer tongue.
-
Drill 2 holes (0.406 inch) at the locations marked.
-
Decide which tongue-plate hole sets to use.
-
Perform the following step per your specific trailer tongue:
-
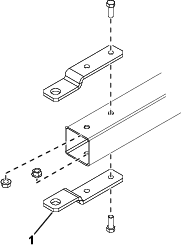
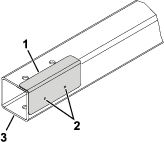
For trailer tongues with 5.1 cm (2 inches) tubing: Use 2 bolts, a hitch spacer, and 2 locknuts to secure the tongue plates to the trailer tongue. Position the spacer inside the trailer tongue (Figure 3).
-
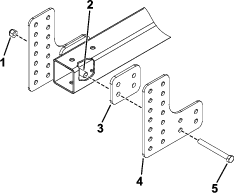
For trailer tongues with 6.35 cm (2-1/2 inches) tubing: Use 2 bolts, 2 adjustable hitch plates, a hitch spacer, and 2 locknuts to secure the tongue plates to the trailer tongue (Figure 3).
-
-
Mount the trailer clevis to the tongue plates with 2 bolts and 2 locknuts (Figure 4).
Important: The trailer tongue must be parallel to the ground when it is aligned with the tow vehicle hitch.