Installation
Important: This kit can be installed to Groundsmaster e3200 machines only with a serial number of 417500000 and up.
Preparing the Machine
-
Park the machine on a level surface.
-
Ensure that the parking brake is engaged.
-
Shut off the machine and remove the key.
-
Turn the battery-disconnect switch to the OFF position.
Installing the Backup Alarm
Parts needed for this procedure:
| Backup alarm | 1 |
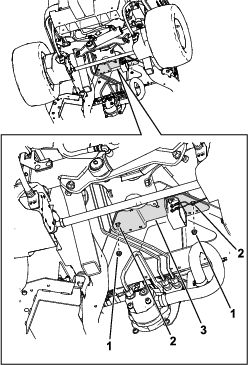
| Carriage bolt (5/16 x 3/4 inch) | 2 |
| Flange nut (5/16 inch) | 2 |
| Push fastener | 1 |
| Cable tie | 1 |
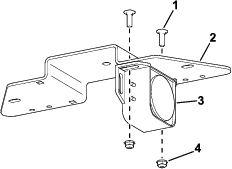
| Mount bracket | 1 |
| Carriage bolt (1/4 x 3/4 inch) | 2 |
| Flange nut (1/4 inch) | 2 |
| Wire harness | 1 |
-
Use 2 carriage bolts (1/4 x 3/4 inch) and 2 flange nuts (1/4 inch) to secure the alarm to the mount bracket (Figure 1).
-
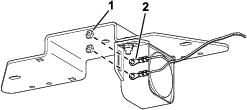
Use the existing nuts on the alarm to secure the wire-harness ring terminals to the alarm (Figure 2).
-
Use 2 carriage bolts (5/16 x 3/4 inch) and 2 flange nuts (5/16 inch) to secure the mount bracket to the traction-unit frame (Figure 3).
-
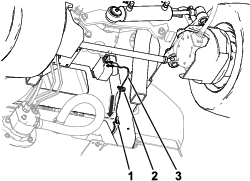
Use a cable tie and a push fastener to secure the wire harness to the machine frame (Figure 4).
-
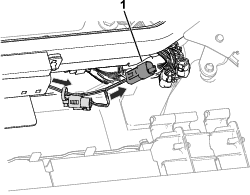
Raise the hood and route the wire-harness leg (Figure 5) toward the connectors above the hydraulic-tank cap and connect it to the machine wire-harness connector labeled DRIVING LIGHT KIT POWER.
Checking the Backup Alarm
Perform the following steps to ensure that the backup alarm is working.
-
Turn the battery-disconnect switch to the ON position.
-
Sit in the operator’s seat, fasten the seat belt, turn on the machine, and press the bottom of the traction pedal to move the traction unit in reverse.
-
Listen for the alarm sound.