| Maintenance Service Interval | Maintenance Procedure |
|---|---|
| Before each use or daily |
|
Introduction
This machine is a ride-on greens roller intended for use by professional, hired operators in commercial applications. It is primarily designed for rolling greens, tennis courts, and other fine turf surfaces in parks, golf courses, sports fields, and on commercial grounds. Using this product for purposes other than its intended use could prove dangerous to you and bystanders.
Read this information carefully to learn how to operate and maintain your product properly and to avoid injury and product damage. You are responsible for operating the product properly and safely.
Visit www.Toro.com for product safety and operation training materials, accessory information, help finding a dealer, or to register your product.
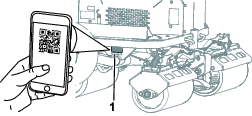
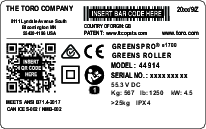
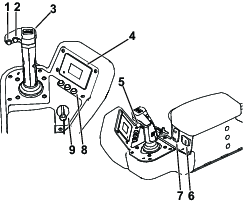
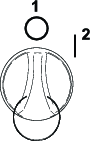
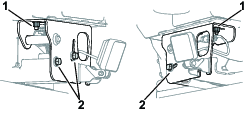
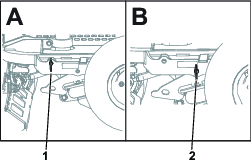
Whenever you need service, genuine Toro parts, or additional information, contact an Authorized Service Dealer or Toro Customer Service and have the model and serial numbers of your product ready. Figure 1 identifies the location of the model and serial numbers on the product. Write the numbers in the space provided.
Important: With your mobile device, you can scan the QR code on the serial number decal (if equipped) to access warranty, parts, and other product information.
Safety-Alert Symbol
The safety-alert symbol (Figure 2) shown in this manual and on the machine identifies important safety messages that you must follow to prevent accidents.

The safety-alert symbol appears above information that alerts you to unsafe actions or situations and is followed by the word DANGER, WARNING, or CAUTION.
DANGER indicates an imminently hazardous situation which, if not avoided, will result in death or serious injury.
WARNING indicates a potentially hazardous situation which, if not avoided, could result in death or serious injury.
CAUTION indicates a potentially hazardous situation which, if not avoided, may result in minor or moderate injury.
This manual uses two other words to highlight information. Important calls attention to special mechanical information and Note emphasizes general information worthy of special attention.
This product complies with all relevant European directives; for details, please see the separate product specific Declaration of Conformity (DOC) sheet.
If this machine is equipped with a telematics device, refer to your authorized Toro distributor for instructions to activate the device
Warning
CALIFORNIA
Proposition 65 Warning
The power cord on this product contains lead, a chemical known to the State of California to cause birth defects or other reproductive harm. Wash hands after handling.
Battery posts, terminals, and related accessories contain lead and lead compounds, chemicals known to the State of California to cause cancer and reproductive harm. Wash hands after handling.
Use of this product may cause exposure to chemicals known to the State of California to cause cancer, birth defects, or other reproductive harm.
Safety
General Machine Safety Warnings
WARNING—Read all safety warnings, instructions, illustrations
and specifications provided with this machine.
Failure to follow the warnings and instructions may result in electric shock, fire and/or serious injury.
The term “machine” in all of the warnings listed below refers to your mains-operated (corded) machine or battery-operated (cordless) machine.
-
Work area safety
-
Keep work area clean and well lit.Cluttered or dark areas invite accidents.
-
Do not operate the machine in explosive atmospheres, such as in the presence of flammable liquids, gasses, or dust.
-
Keep children and bystanders away while operating the machine.Distractions can cause you to lose control.
-
-
Electrical safety
-
Machine plugs must match the outlet. Never modify the plug in any way. Do not use any adapter plugs with an earthed (grounded) machine.Unmodified plugs and matching outlets will reduce risk of electric shock.
-
Avoid body contact with earthed or grounded surfaces, such as pipes, radiators, ranges, and refrigerators.There is an increased risk of electric shock if your body is earthed or grounded.
-
Do not expose the machine to rain or wet conditions.Water entering a machine will increase the risk of electric shock.
-
Do not abuse the cord. Never use the cord for carrying, pulling or unplugging the machine. Keep cord away from heat, oil, sharp edges, or moving parts.Damaged or entangled cords increase the risk of electric shock.
-
When operating the machine outdoors, use an extension cord suitable for outdoor use.Use of a cord suitable for outdoor use reduces the risk of electric shock.
-
If operating the machine in a damp location is unavoidable, use a residual current device (RCD) protected supply.Use of an RCD reduces the risk of electric shock.
-
-
Personal safety
-
Stay alert, watch what you are doing, and use common sense when operating the machine. Do not use the machine while you are tired or under the influence of drugs, alcohol, or medication.A moment of inattention while operating the machine may result in serious personal injury.
-
Use personal protective equipment. Always wear eye protection.Protective equipment such as a dust mask, non-skid safety shoes, or hearing protection used for appropriate conditions will reduce personal injuries.
-
Prevent unintentional starting. Ensure the switch is in the off-position before connecting to power source and/or battery pack.Energising a machine that has the switch on invites accidents.
-
Remove any adjusting key or wrench before turning the machine on.A wrench or a key left attached to a rotating part of the machine may result in personal injury.
-
Do not overreach. Keep proper footing and balance at all times.This enables better control of the machine in unexpected situations.
-
Dress properly. Do not wear loose clothing or jewelry. Keep your hair and clothing away from moving parts.Loose clothes, jewelry or long hair can be caught in moving parts.
-
If devices are provided for the connection of dust extraction and collection facilities, ensure these are connected and properly used.Use of dust collection can reduce dust-related hazards.
-
Do not let familiarity gained from frequent use of the machine allow you to become complacent and ignore machine safety principles.A careless action can cause severe injury within a fraction of a second.
-
-
Machine use and care
-
Do not force the machine. Use the correct machine for your application.The correct machine will do the job better and safer at the rate for which it was designed.
-
Do not use the machine if the switch does not turn it on and off.Any machine that cannot be controlled with the switch is dangerous and must be repaired.
-
Disconnect the plug from the power source and/or remove the battery pack, if detachable, from the machine before making any adjustments, changing accessories, or storing the machine.Such preventive safety measures reduce the risk of starting the machine accidentally.
-
Store an idle machine out of the reach of children and do not allow persons unfamiliar with the machine or these instructions to operate the machine.A machine is dangerous in the hands of untrained users.
-
Maintain the machine and accessories. Check for misalignment or binding of moving parts, breakage of parts and any other condition that may affect the operation of the machine. If damaged, have the machine repaired before use.Many accidents are caused by a poorly maintained machine.
-
Use the machine, accessories, and tool bits etc., in accordance with these instructions, taking into account the working conditions and the work to be performed.Use of the machine for operations different from those intended could result in a hazardous situation.
-
Keep handles and grasping surfaces dry, clean and free from oil and grease.Slippery handles and grasping surfaces do not allow for safe handling and control of the machine in unexpected situations.
-
-
Battery machine use and care
-
Recharge only with the charger specified by a manufacturer.A charger that is suitable for one type of battery pack may create a risk of fire when used with another battery pack.
-
Use the machine only with specifically designated batteries.Use of any other batteries may create a risk of injury and fire.
-
Do not use a battery pack or machine that is damaged or modified.Damaged or modified batteries may exhibit unpredictable behavior resulting in fire, explosion or risk or injury.
-
Do not expose a battery pack or machine to fire or excessive temperature.Exposure to fire temperature above 130°C may cause an explosion.
-
Follow all charging instructions and do not charge the battery pack or machine outside the temperature range specified in the instructions.Changing improperly or at temperatures outside the specified range may damage the battery and increase the risk of fire.
-
-
Service
-
Have your machine serviced by a qualified repair person using only identical replacement parts.This will ensure that the safety of the machine is maintained.
-
Never service damaged battery packs.Service of battery packs should be performed only by the manufacturer or authorized service providers.
-
Additional Safety Messages
General Safety
This product is capable of causing personal injury. Always follow all safety instructions to avoid serious personal injury.
-
Read and understand the contents of this Operator’s Manual before starting the machine.
-
Use your full attention while operating the machine. Do not engage in any activity that causes distractions; otherwise, injury or property damage may occur.
-
Do not put your hands or feet near moving components of the machine.
-
Do not operate the machine without all guards and other safety protective devices in place and working on the machine.
-
Ensure that the parking brake is engaged, shut off the machine, remove the key, and wait for all movement to stop before you leave the operator’s position. Allow the machine to cool before adjusting, servicing, cleaning, or storing it.
Operation Safety
-
Park the machine on level ground, ensure that the parking brake is engaged, shut off the machine, remove the key (if equipped), and wait for all movement to stop before you leave the operator’s position. Allow the machine to cool before adjusting, servicing, cleaning, or storing it.
-
Never allow children or untrained people to operate or service the machine. Local regulations may restrict the age of the operator. The owner is responsible for training all operators and mechanics.
-
Become familiar with the safe operation of the equipment, operator controls, and safety signs.
-
Know how to stop the machine quickly.
-
Check that operator-presence controls, safety switches, and shields are attached and functioning properly. Do not operate the machine unless they are functioning properly.
-
Before operating, always inspect the machine to ensure that the components and fasteners are in good working condition. Replace worn or damaged components and fasteners.
-
Inspect the area where you will use the machine and remove all objects that the machine could throw.
-
The owner/operator can prevent and is responsible for accidents that may cause personal injury or property damage.
-
Wear appropriate clothing, including eye protection; long pants; and substantial, slip-resistant footwear. Tie back long hair and do not wear loose clothing or loose jewelry.
-
Do not operate the machine while ill, tired, or under the influence of alcohol or drugs.
-
Use your full attention while operating the machine. Do not engage in any activity that causes distractions; otherwise, injury or property damage may occur.
-
Keep bystanders and pets out of the operating area.
-
Never carry passengers on the machine.
-
Operate the machine only in good visibility to avoid holes or hidden hazards.
-
Avoid operating on wet grass. Reduced traction could cause the machine to slide.
-
Before you start the machine, ensure that all drives are in neutral and you are in the operating position.
-
Look behind and down before backing up to be sure of a clear path.
-
Use care when approaching blind corners, shrubs, trees, or other objects that may obscure your vision.
-
Do not operate near drop-offs, ditches, or embankments. The machine could suddenly roll over if an edge gives way.
-
Stop the machine, shut off the power, and inspect the attachment after striking an object or if there is an abnormal vibration in the machine. Make all necessary repairs before resuming operation.
-
Slow down and use caution when making turns and crossing roads and sidewalks with the machine. Always yield the right-of-way.
-
Never leave a running machine unattended.
-
Do not operate the machine when there is the risk of lightning.
-
Do not use the machine as a towing vehicle.
-
Use accessories, attachments, and replacement parts approved by The Toro® Company only.
-
Keep hands and feet away from the rollers.
-
Use care when connecting and disconnecting the machine to and from the tow vehicle.
-
Use full-width ramps for loading the machine into a trailer or truck.
-
The seat switch needs to be activated in order for the traction system to be activated.
-
Clean grass and debris from the machine to help prevent fires.
-
Allow the machine to cool before storing the machine in any enclosure.
-
Turn the battery-disconnect switch to the OFF position before storing or transporting the machine.
-
Never store the machine where there is an open flame, spark, or pilot light, such as on a water heater or on other appliances.
-
Keep all parts of the machine in good working condition and all hardware tightened.
-
Replace all worn, damaged, or missing decals.
Slope Safety
-
Establish your own procedures and rules for operating on slopes. These procedures must include surveying the site to determine which slopes are safe for machine operation. Always use common sense and good judgment when performing this survey.
-
Slopes are a major factor related to loss of control and rollover accidents, which can result in severe injury or death. You are responsible for safe slope operation. Operating the machine on any slope requires extra caution.
-
Operate the machine at a lower speed when you are on a slope.
-
If you feel uneasy operating the machine on a slope, do not do it.
-
Watch for holes, ruts, bumps, rocks, or other hidden objects. Uneven terrain could overturn the machine. Tall grass can hide obstacles.
-
Choose a low ground speed so that you do not need to stop or shift while on a slope.
-
A rollover can occur if the rollers lose traction.
-
Avoid operating the machine on wet grass. Rollers may lose traction, regardless of whether the brakes are available and functioning.
-
Avoid starting, stopping, or turning the machine on a slope.
-
Keep all movement on slopes slow and gradual. Do not suddenly change the speed or direction of the machine.
Battery and Charger Safety
General
WARNING: Risk of fire and electric shock—The batteries have no user-serviceable parts.
-
Confirm the voltage that is available in your country before using the charger.
-
Do not charge the machine in a wet environment; keep it protected from rain and snow.
-
A risk of fire, electric shock, or injury may result from using an accessory not recommended or sold by Toro.
-
To reduce risk of a battery explosion, follow these instructions and the instructions for any equipment that you intend to use near the charger.
-
Batteries could emit explosive gasses if they are significantly overcharged.
-
Refer to an authorized Toro distributor to service or replace a battery.
Training
-
Never allow children or untrained people to operate or service the charger. Local regulations may restrict the age of the operator. The owner is responsible for training all operators and mechanics.
-
Read, understand, and follow all instructions on the charger and in the manual before operating the charger. Be familiar with the proper use of the charger.
Preparation
-
Keep bystanders and children away while charging.
-
Shut off the machine and wait until the machine has completely powered down before charging. Failure to do this may cause arcing.
-
Use the charger only within the voltage range specified in this Operator's Manual, and use only a power cord approved by Toro.
-
Contact your authorized Toro distributor for the proper charger and power cord.
Operation
-
Do not charge a frozen battery.
-
Do not abuse the cord. Do not pull on the power supply cord to disconnect the charger from the receptacle. Store the cord away from heat, oil, and sharp edges.
-
Connect the charger directly to a grounding receptacle. Do not use the charger on an ungrounded outlet, even with a grounding adapter.
-
Do not alter the provided power cord or plug.
-
Remove metal items such as rings, bracelets, necklaces, and watches when working with a lithium-ion battery. A lithium-ion battery can produce enough current to cause a severe burn.
-
Use an extension cord that can handle the charging amperage specified in this Operator's Manual. If you are charging outdoors, use an extension cord rated for outdoor use.
-
If the power supply cord is damaged while it is plugged in, disconnect the cord from the wall receptacle and contact an authorized Toro distributor for a replacement.
-
Unplug the charger from the electrical outlet when not in use, before moving it to another location, or prior to servicing it.
Maintenance and Storage
-
Do not disassemble the charger.
-
Take the charger to an authorized Toro distributor when service or repair is required.
-
Unplug the power cord from the outlet before starting any maintenance or cleaning to reduce risk of electric shock.
-
Maintain or replace safety and instruction labels as needed.
-
Do not operate the charger with a damaged cord or plug. Contact an authorized Toro distributor to obtain a replacement cord.
-
If the charger is damaged, do not use it; take it to an authorized Toro distributor.
Maintenance Safety
-
Before you leave the operator’s position, do the following:
-
Ensure that the parking brake is engaged.
-
Park the machine on a level surface.
-
Shut off the machine and remove the key.
-
Wait for all movement to stop.
-
-
Allow machine components to cool before performing maintenance.
-
Only allow a qualified repair person to service the machine.
-
If possible, do not perform maintenance while the machine is running. Keep away from moving parts.
-
Support the machine with jack stands whenever you work under the machine.
-
Carefully release pressure from components with stored energy.
-
Keep all parts of the machine in good working condition and all hardware tightened.
-
Replace all worn or damaged decals.
-
To ensure safe, optimal performance of the machine, use only genuine Toro replacement parts. Replacement parts made by other manufacturers could be dangerous, and such use could void the product warranty.
Storage Safety
-
Ensure that the parking brake is engaged, shut off the machine, remove the key, and wait for all movement to stop before you leave the operator’s position. Allow the machine to cool before adjusting, servicing, cleaning, or storing it.
-
Never store the machine where there is an open flame, spark, or pilot light.
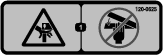
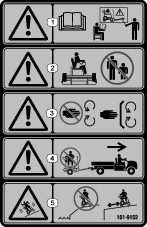
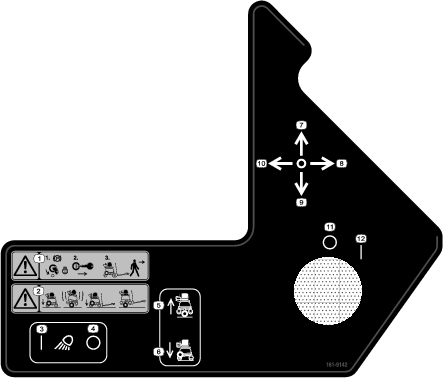
Safety and Instructional Decals
 |
Safety decals and instructions are easily visible to the operator and are located near any area of potential danger. Replace any decal that is damaged or missing. |


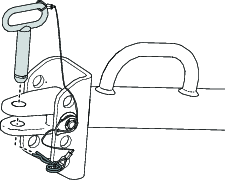
Setup
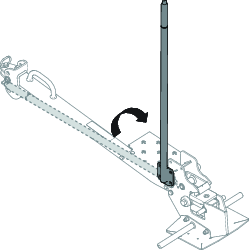
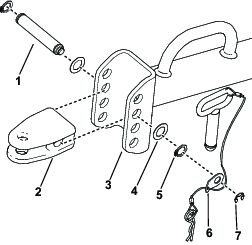
Assembling the Drawbar
Parts needed for this procedure:
| Drawbar assembly | 1 |
| Bolt (M10) | 2 |
| Nut | 2 |
-
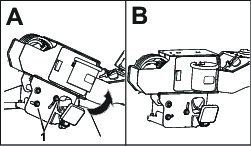
Remove the cable tie securing the latch handle to the base of the drawbar.
-
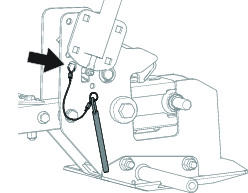
Remove and retain the bolt (M10) and nut securing the latch handle to the capture plate.
-
Remove the trailer safety pin from the capture plate.
-
Move the handle to the upright position.
-
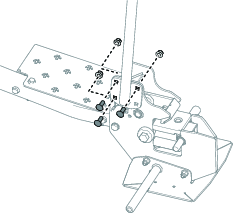
Install the loop of the drawbar safety pin lanyard to the capture plate as shown in the following figure.
-
Install the 3 bolts (M10) and 3 nuts as shown in the following figure. Torque the fasteners to 46 to 57 N∙m (34 to 41 ft-lb).
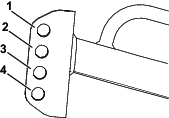
Installing the Seat Back to the Machine
Parts needed for this procedure:
| Seat back | 1 |
| Screw (5/16 x 2 inches) | 4 |
Use the 4 screws (5/16 x 2 inches) to secure seat back to the bottom of the seat. Torque the screws to 19.7 N∙m (175 in-lb).
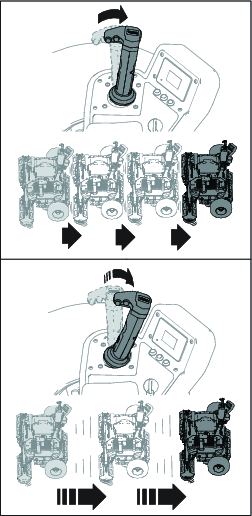
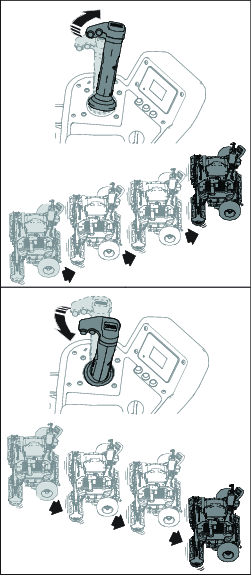
Adjusting the Console Position
-
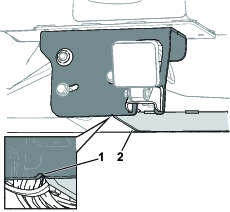
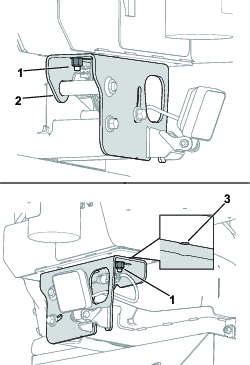
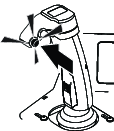
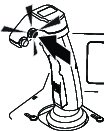
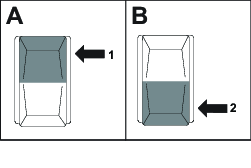
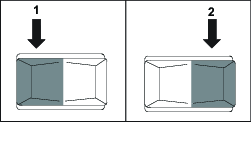
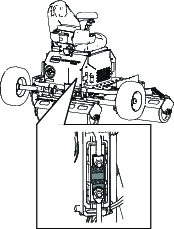
Loosen the 2 screws (M8) on the console pivot plate and rotate the console upwards (Figure 10) until the alignment mark lines up with the harness shield (Figure 11).
-
Tighten the previously loosened 2 screws.
-
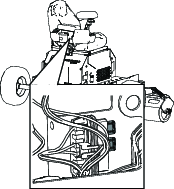
Loosen the 2 nuts underneath the console pivot plate and move the pivot plate outwards until it lines up with the alignment mark on the base plate.
-
Tighten the previously loosened nuts.
Installing the Arm Pad
Parts needed for this procedure:
| Arm pad | 1 |
| Screw (5/16 x 1/4 inch) | 2 |
| Washer | 2 |
-
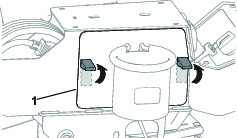
Flip up the 2 latches and remove the side cover.
-
Secure the arm pad to the console using 2 screws (5/16 x 1/4 inch) and 2 washers. Torque the screws to 18 to 22 N∙m (162 to 198 in-lb).
Note: The larger lip of the armrest should be positioned away from the operating position.
-
Install the side cover.
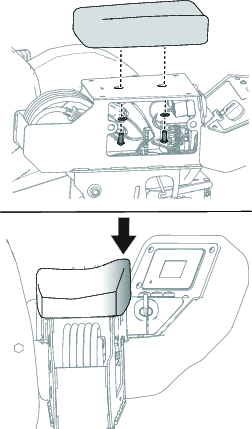
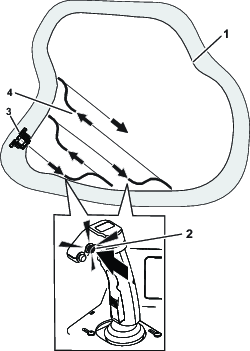
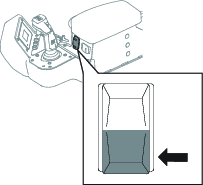
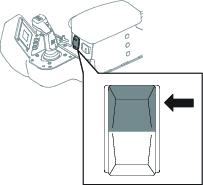
Stowing the Power Cord in the Console Compartment
Parts needed for this procedure:
| Power cord | 1 |
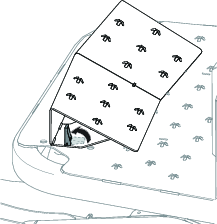
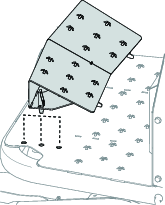
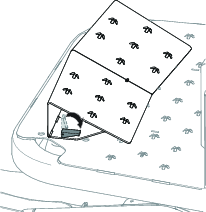
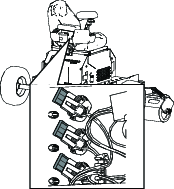
Stow the power cord in the console compartment as shown in the following figure.
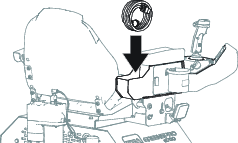
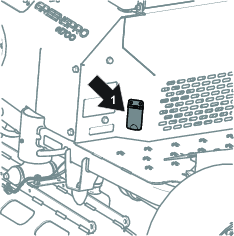
Turning On the Battery-Disconnect Switch
-
Remove the cable tie installed on the battery-disconnect switch.
-
Turn the battery disconnect switch to the ON position.
Installing the Drawbar to the Towing Vehicle
Install the drawbar to the towing vehicle; refer to Installing the Drawbar to the Towing Vehicle.
Charging the Batteries
Check the battery-system charge; charge it as needed. Refer to Charging the Lithium-Ion Batteries.
Adjusting the Machine Settings
Use the display to adjust the machine settings; refer to Understanding the Display-Screen Information.
Product Overview

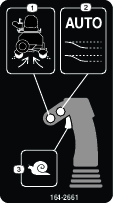
Joystick
Use the joystick to control both the speed and direction of the rollers.
Roller-Clean Button
Press the roller-clean button and move the joystick left or right to clean the rollers.
Automated-Offset Button
Press the automated-offset button while moving the joystick in the desired direction to initiate a pre-programmed steering sequence that repositions the machine near the end of a run.
Inch-Mode Trigger
Press and hold the inch-mode trigger to slowly move the machine in the desired direction.
Key Switch
Use the key switch to power the machine ON or OFF. Turn the key past the ON position to start the machine.
Transport-Wheel Switch
Use the transport-wheel switch to raise or lower the transport wheels.
Light Switch
Use the light switch to turn the lights on and off.
Note: Specifications and design are subject to change without notice.
| Width (Overall) | 188 cm (74 inches) |
| Width (Rolling) | 175 cm (69 inches) |
| Length (Operating) | 114 cm (45 inches) |
| Length (Transporting) | 229 cm (90 inches) |
| Height (Operating) | 137 cm (54 inches) |
| Height (Transporting) | 157 cm (62 inches) |
| Weight (Overall) | 567 kg (1,250 lb) |
| Maximum Ground Speed | 13 kph (8 mph) |
| Ground Clearance | 20 cm (8 inches) |
| Battery Quantity | 2 Toro HyperCell® batteries in the base configuration (expandable up to 4) |
| Rated Voltage | 61.5V max |
| Ampere-Hours | 81.7 Ah |
Attachments/Accessories
A selection of Toro approved attachments and accessories is available for use with the machine to enhance and expand its capabilities. Contact your Authorized Service Dealer or authorized Toro distributor or go to www.Toro.com for a list of all approved attachments and accessories.
To ensure optimum performance and continued safety certification of the machine, use only genuine Toro replacement parts and accessories. Replacement parts and accessories made by other manufacturers could be dangerous, and such use could void the product warranty.
Operation
Before Operation
Understanding the Display-Screen Information
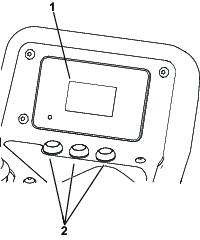
The display screen shows information about your machine, such as the operating status, various diagnostics, and other information about the machine.
-
Splash screen: Shows the battery voltage and machine hour meter for a few seconds after you turn on the machine.

-
Run screen: Shows the current speed of the machine and the battery charge level.

-
Charging screen: Shows the battery charge percentage and amperage.

-
Speed adjustment screen: Press the
 button
to access this screen and adjust the maximum speed.
button
to access this screen and adjust the maximum speed.
Understanding the Menu Items
To access the main menu, press the  button from any of
the main information screens.
button from any of
the main information screens.
Refer to the following tables for a description of the options available from the menus:
Note:  Protected
under Protected Menus—accessible only by entering PIN.
Protected
under Protected Menus—accessible only by entering PIN.
| Menu Item | Description |
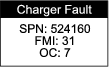
| FAULTS | Contains a list of the recent machine faults. Refer to the Service Manual or your authorized Toro distributor for more information on the FAULTS menu. |
| SERVICE | Contains information on the machine such as hours of use and counts. Refer to the Service table. |
| DIAGNOSTICS | Lists various states and data that the machine currently has. You can use this information to troubleshoot certain issues, as it quickly tells you which machine controls are on/off and lists control levels (e.g., sensor values). Refer to the Diagnostics table. |
| SETTINGS | Allows you to customize and modify configuration variables on the display. Refer to the Settings table. |
| ABOUT | Lists the model number, serial number, and software version of your machine. Refer to the About table. |
| Menu Item | Description |
| HOURS | List the total number of hours various components have been
used:
|
| COUNTS | Lists counts of various components:
|
| MACHINE CALIBRATION | Lists various calibration functions:
|
| MACHINE SERVICE | Lists various machine service functions:
|
| Menu Item | Description |
| BATTERY | Indicates the status of the battery system. |
| BATTERY PACKS | Indicates the status of individual batteries. |
| CAN | Indicates the status of the machine communication bus. |
| DISPLAY | Indicates the status of the display. |
| FRONT MOTOR | Indicates the status of the front motor. |
| CENTER MOTOR | Indicates the status of the center motor. |
| BACK MOTOR | Indicates the status of the back motor. |
| LIFT/LOWER | Indicates the status of the lift actuator. |
| STEERING | Indicates the status of the steering actuator. |
| Menu Item | Description |
| UNITS | Controls the units used on the display screen. The menu choices are English or Imperial. |
| LANGUAGE | Controls the language used on the display screen. |
| BACKLIGHT | Controls the brightness of the display screen. |
| CONTRAST | Controls the contrast of the display screen. |
| PROTECTED MENUS | Allows you to access protected menus by inputting a passcode. |
| PROTECT SETTINGS | Controls the protected menus. |
| MAX SPEED | Controls the maximum machine speed. |
| OVERLAP | Controls how far the machine will overlap when the auto offset is activated. |
| AUTOMATIC DIRECTION | Shows if the machine will auto turn forwards or backwards. |
| ROLLER SLIPPING | Turns on or off the slip detection. |
| AUTO OFFSET | Turns on or off the auto offset feature. |
| ROLLER CLEAN | Turns on or off the roller clean feature. |
| Menu Item | Description |
| MODEL | Lists the model number of the machine. |
| SN | Lists the serial number of the machine. |
| S/W REV | Lists the software part number and revision of the machine. |
| FRONT MOTOR SW | Lists the software part number and revision of the front motor. |
| CENTER MOTOR SW | Lists the software part number and revision of the center motor. |
| BACK MOTOR SW | Lists the software part number and revision of the back motor. |
| LIFT/LOWER SW | Lists the software part number and revision of the lift actuator. |
| STEERING | Lists the software part number and revision of the steering actuator. |
| BATTERY | Lists the software part number and revision for all of the batteries. |
Understanding the Display-Screen Icons
Refer to the following table for a description of each display-screen icon:
 | Next |
 | Scroll up |
 | Scroll down |
 | Increase |
 | Decrease |
| Access the menu. |
 | Exit the menu. |
 | Hour meter |
 | Operator is out of seat. |
 | Parking brake is engaged. The parking brake automatically engages when the machine is in neutral or if the machine experiences a power outage. |
 | Fast |
 | Slow |
 | Battery charge |
 | Menu item is locked. |
Accessing the Protected Menus
Note: The factory default PIN code for you machine is “1234”.
If you changed the PIN code and forgot the code, contact your authorized Toro distributor for assistance.
-
Select the SETTINGS option.
-
Select the PROTECTED MENUS option.
-
To enter the PIN code, press the middle button until the appropriate digit appears, then press the right button to move to the next digit.
-
After all four digits are entered, press the middle button to submit the PIN code.
If the PIN code has been entered correctly, the PIN icon will appear at the top right of all menu screens.
Activating the Automated-Offset Button
-
Select the
button. -
Scroll down to SETTINGS and press the
button. -
Scroll down to AUTO OFFSET and press the
button. -
Select ON.
Note: To adjust the amount of overlap while using automated offset feature, return to the SETTINGS menu, open the OVERLAP option, and select the desired percentage.
Activating the Roller-Clean Button
-
Select the
button. -
Scroll down to SETTINGS and press the
button. -
Scroll down to ROLLER CLEAN and press the
button. -
Select ON.
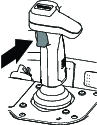
Adjusting the Console Position
You can adjust the console position by loosening the bolts shown below.
Adjusting the Footrest Position
-
Flip up the 2 latches on the footrest.
-
Remove the footrest from the original position and place it in the desired position.
-
Flip down the latches.
Adjusting the Work Light Positions
The work lights can be adjusted by manually tilting them upwards or downwards to the desired position.
Checking the Interlocks
Check the following components are functioning before operating the machine.
-
Check that the seat switch is functioning properly.
-
Verify that no rolling can be accomplished if the transport wheels are not fully raised.
-
Ensure there is a proper gap at the drawbar latch and the machine cannot be unlatched from the drawbar.
During Operation
Note: Determine the left and right sides of the machine from the seated operating position.
Starting the Machine
-
Sit on the operator seat.
-
Turn the key to the ON position.
Shutting Off the Machine
Caution
Children or bystanders may be injured if they move or attempt to operate the machine while it is unattended.
Always remove the key and engage the parking brake when leaving the machine unattended.
Turn the key switch to the OFF position and remove the key.
Operating the Machine
-
Sit on the operator seat.
-
Turn on the machine.
-
Hold onto the joystick and move the joystick toward the direction you would like to travel.
A green is typically rolled in a Z-pattern and therefore multiple direction changes will be required to roll the entire green surface.
Note: To slow down the machine quickly, move the joystick in the opposite direction of travel, instead of returning it to the neutral position.
-
To stop the machine, release the joystick so that it returns to the neutral position.
Important: The machine can be shut down by turning the key to the OFF position in an emergency.
-
At the end of rolling, park on a level surface and turn off the machine before leaving the operator seat.
Operating the Joystick
Use the joystick to control the speed and direction of the rollers. Moving the joystick to the right moves the machine to the right, and moving it to the left moves the machine to the left. The farther the joystick moves away from the original position, the faster the machine will travel.
Note: Activating the joystick in the opposite direction of machine travel will act as a brake and slow the machine quicker than returning the joystick to neutral position.
Moving the joystick forward, or away from the operator seat, will steer the machine forward. Moving the joystick rearward, or toward the operator seat, will steer the machine rearward.
Using the Automated-Offset Button
Note: If necessary, activate the automated-offset button; refer to Activating the Automated-Offset Button.
While the machine is moving near the end of the green, press the automated-offset button and move the joystick in the desired direction to activate the automated-offset feature. This will go through steerinf action to automatically offset the machine to the programmed overlap, and will come to a stop with the rollers perpendicular to the new direction of travel.
Note: To cancel the feature, move the joystick in the opposite direction of travel.
The distance traveled to achieve the offset will vary depending on vehicle speed and programmed overlap. Practice using the feature in an open space, free of slopes and obstructions, to familiarize yourself with performance.
Using the Inch-Mode Function
Press and hold the inch-mode trigger and move the joystick in the desired direction. Return the joystick to the neutral position and release the trigger to deactivate the function.
Note: The machine speed is limited to 0.8 kph (0.5 mph) when inch-mode is activated.
Cleaning the Rollers
Note: If necessary, activate the roller-clean button; refer to Activating the Roller-Clean Button.
-
Move to the machine to a flat surface.
Note: Only use the roller cleaning feature in rough grass, as turf scuffing can occur.
-
Press the roller-clean button and move the joystick left or right. Press the button again to exit roller cleaning mode.
Note: The rollers will spin in opposite directions and the debris will collect on the face of the rollers.
-
Wait for the rollers to stop, and then turn off and exit the machine.
-
Clean the debris from the roller faces.
Monitoring the Battery-System Charge Level
Refer to the main information screen in the display screen to determine the battery-system charge level.
-
When the battery level reaches a low percentage, a low-battery advisory appears on the display screen. When you are operating at this battery percentage, finish rolling, then transport the machine to a designated battery-charging area and charge the batteries; refer to Charging the Lithium-Ion Batteries.
-
If the battery level becomes too low while you are operating the machine, an advisory appears on the display screen. While you are operating at this battery percentage, the roller will reduce the overall speed of the machine. Drive the machine back to the tow vehicle and transport your machine to a designated battery-charging area and charge the batteries; refer to Charging the Lithium-Ion Batteries.
After Operation
Transporting the Machine
Installing the Drawbar to the Towing Vehicle
-
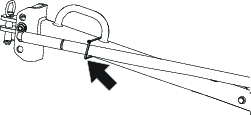
Bring the drawbar to the back of the towing vehicle.
-
Remove the pin from the drawbar as shown in the following figure.
-
If necessary, adjust the drawbar tongue position; refer to Adjusting the Drawbar Tongue Position.
-
Connect the drawbar to the vehicle drawbar and secure it with the hitch pin and hairpin cotter.
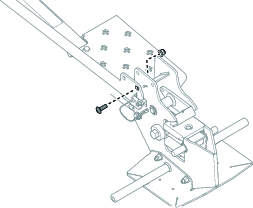
Adjusting the Drawbar Tongue Position
-
Remove the components shown above (Figure 41).
-
Move the drawbar clevis pin to the desired position.
Note: Select the hole that keeps the tongue of the roller as parallel to the ground as possible when the transport wheels are down.
-
Secure the drawbar clevis pin to the trailer tongue with the components shown in Figure 41.
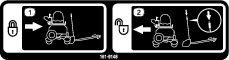
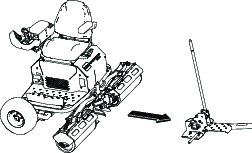
Disconnecting the Machine from the Drawbar
-
Park the machine on a level surface.
-
Use the transport-wheel switch to raise the transport wheels.
-
Press the latch-handle button and disengage the machine from the drawbar.
Note: Applying pressure to the latch-handle button while raising the transport wheels may aid in disengaging the machine from the drawbar.

Connecting the Machine to the Drawbar
-
Drive the machine onto the drawbar.
-
Verify the latch plate assembly on the drawbar is secured to the latch pin on the machine.
-
Use the transport-wheel switch to lower the transport wheels.
-
Turn off the machine and remove the key.
-
Insert the trailer safety pin into the capture plate.
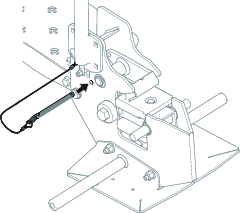
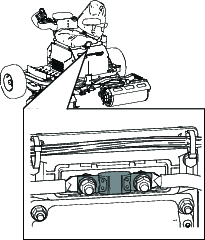
Moving a Non-Functioning Machine
-
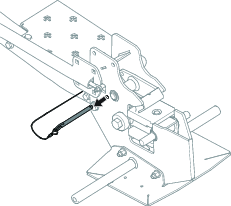
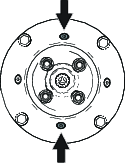
If you need to adjust the steering position of the machine, complete the steps below:
-
On the steering actuator, turn the center bolt clockwise 4 turns to disengage the steering actuator and enable manual steering inputs; refer to the following figure.
Important: The bolt head should not force the E-clip out of the groove, or damage could occur.
-
Use the double-roller head to manually steer the machine.
-
Turn the center bolt counter-clockwise 4 times to re-engage the steering actuator.
Note: Do not exceed more than 2.26 N∙m (20 in-lb) of force when re-engaging the steering actuator.
-
-
If power is still available, complete the following steps:
-
Hold the key in the START position for 5 seconds to unlock the roller parking brakes.
-
Push the machine onto the drawbar.
-
-
If power is not available, complete the following steps:
-
Remove the drawbar from the tow vehicle.
-
Hook the drawbar onto the roller.
-
Attach the drawbar to the tow vehicle.
-
-
Use the trailer safety pin to secure the drawbar to the machine.
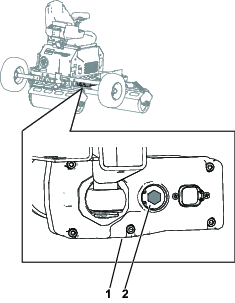
-
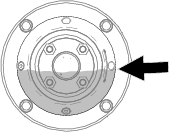
On the back of the machine, remove the electrical connector and the threaded hex plug on the lift actuator; refer to the following figure.
-
Insert a ratchet hand drill or cordless drill into the hex plug opening and turn it clockwise to lower the transport wheels.
Important: Do not use an impact drill, or damage could occur.
-
Install the plug and electrical connector on the lift actuator.
-
Lock the transport wheels to the lockout bracket with the pin as show in the following figure.
Important: Remove and place the pin in its storage position before raising or lowering the transport wheels. Failure to remove the pin from the lockout bracket before moving the transport wheels may cause damage to the machine.
Understanding the Lithium-Ion Battery Charger
Understanding Power Source Requirements
Danger
Contact with water while charging the machine could cause electric shock, causing injury or death.
-
Do not handle the plug or the charger with wet hands or while standing in water.
-
Do not charge the batteries in the rain or in wet conditions.
Warning
A damaged power-supply cord can cause an electrical shock or a fire.
Thoroughly inspect the power-supply cord before using the charger. If the cord is damaged, do not operate the charger until you obtain a replacement.
An appropriate power-supply cord (for use in your geographic region) is supplied with your machine. Use this cord to charge the machine.
If you need to use an extension cord with your power-supply cord, ensure that the extension cord has 12 AWG wires and is rated for 250 V.
Important: Check the power-supply cord periodically for holes or cracks in the insulation. Do not use a damaged cord. Do not run the cord through standing water or wet grass. Do not change the charger or the power-supply-cord plug in any way.
Charging the Lithium-Ion Batteries
Caution
Attempting to charge the batteries with a charger not provided by Toro can result in excessive heat and other related product malfunctions, which can lead to property damage and/or injury.
Use the Toro-provided chargers to charge the batteries.
Recommended temperature range for charging: 0° to 45°C (32° to 113°F)
For ideal charging performance, charge the batteries in temperatures that are within the recommended range. Charging the batteries in temperatures beyond the recommended range can result in reduced charging performance.
-
Park the machine in the designated location for charging.
-
Shut off the machine and remove the key.
-
Ensure that the battery-disconnect switch is in the ON position.
-
Ensure that the connectors are free of dust and debris.
-
Plug the power-supply cord into the machine charger port.
-
Insert the wall-plug end of the power-supply cord into a grounded electrical outlet.
For power source requirements, refer to Understanding Power Source Requirements.
-
Observe the display screen to ensure that the batteries are charging.
Note: The display screen shows the battery amperage, battery voltage, and charge status.

-
Disconnect the power-supply cord when the machine reaches a sufficient level; refer to Completing the Charging Process.
Completing the Charging Process
-
Remove the power-supply cord from the machine charger port.
-
Place the power-supply cord in a storage position that avoids damage.
-
Start the machine and verify the charge level using the display screen.
When charging is complete, the display screen shows 10 solid bars.
Maintenance
Recommended Maintenance Schedule(s)
| Maintenance Service Interval | Maintenance Procedure |
|---|---|
| After the first 8 hours |
|
| After the first 50 hours |
|
| Before each use or daily |
|
| Every 50 hours |
|
| Every 100 hours |
|
| Every 400 hours |
|
| Before storage |
|
Pre-Maintenance Procedures
Turn off the battery-disconnect switch when servicing the machine; refer to Using the Battery-Disconnect Switch.
Lubrication
Greasing the Drive-Roller Bearings and Lift Actuator
| Maintenance Service Interval | Maintenance Procedure |
|---|---|
| Every 50 hours |
|
Grease Type: No. 2 lithium grease
-
Park the machine on a level surface, shut off the machine, remove the key, and wait for all moving parts to stop before leaving the operating position.
-
Clean the grease fittings with a rag.
-
Connect a grease gun to each fitting.
-
Pump grease into the fittings until grease begins to ooze out of the bearings.
-
Wipe up any excess grease.
Important: After greasing, run the machine off the turf somewhere briefly to disperse any excess lubricant and avoid damaging the turf.
Electrical System Maintenance
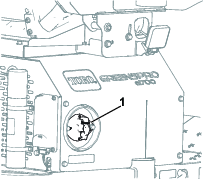
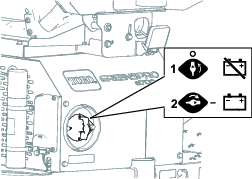
Using the Battery-Disconnect Switch
-
Park the machine on a level surface, shut off the machine, remove the key, and wait for all moving parts to stop before leaving the operating position.
-
Unplug the battery charger if it is connected.
-
Turn the battery-disconnect switch to the ON or OFF position.
Servicing the Batteries
Note: The machine is equipped with at least 2 lithium-ion batteries. Batteries can be added with the appropriate energy expansion kit for this machine.
A lithium-ion battery must be disposed of or recycled in accordance with local and federal regulations. If a battery requires service, contact your authorized Service distributor for assistance.
Maintaining the Lithium-Ion Batteries
Warning
The batteries contain high voltage, which could burn or shock you.
-
Do not attempt to open the batteries.
-
Use extreme care when handling a battery with a cracked case.
-
Use only the charger designed for the batteries.
The lithium-ion batteries hold a sufficient charge to perform intended work during its life span.
To achieve maximum life and use from your batteries, follow these guidelines:
-
Do not open the battery.
-
Store/park the machine in a clean, dry garage or storage area, away from direct sunlight, heat sources, rain, and wet conditions. Do not store it in a location where the temperature exceeds the range specified in Battery Storage Requirements. Temperatures outside of this range will damage your batteries. High temperatures during storage, especially at a high state of charge, reduces the life of the batteries.
-
When storing the machine for more than 10 days, ensure that the machine is in a cool and dry location, out of sunlight, rain, and wet conditions.
-
If you are rolling in hot conditions or in strong, direct sunlight, the battery may overheat. If this happens, a high-temperature alert will appear on the display and the machine will slow down.
Immediately drive the machine to a cool location out of the sun, turn off the machine, and allow the batteries to cool fully before resuming operation.
-
Use lights only when it is necessary.
Locating the Fuses
The electrical system is protected by fuses. It requires no maintenance. Refer to the machine Service Manual for information on testing and servicing the fuses.
Drive System Maintenance
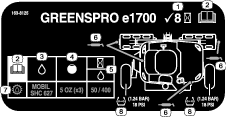
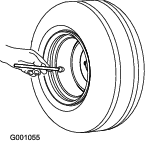
Checking the Transport Wheels Tire Pressure
| Maintenance Service Interval | Maintenance Procedure |
|---|---|
| Before each use or daily |
|
Maintain the air pressure in the transport wheels at 124 kPa (18 psi).
Checking the Wheel Lug Nuts
| Maintenance Service Interval | Maintenance Procedure |
|---|---|
| After the first 8 hours |
|
| Every 100 hours |
|
Check and torque the wheel lug nuts to 94 to 122 N∙m (70 to 90 ft-lb).
Changing the Roller Motor Oil
| Maintenance Service Interval | Maintenance Procedure |
|---|---|
| After the first 50 hours |
|
| Every 400 hours |
|
Important: Use only the specified gearbox oil. Other fluids could cause system damage.
Fluid type: Mobil synthetic SHC 627 oil or Toro HV synthetic electric motor oil
Capacity: 150 mL (5 fl oz)
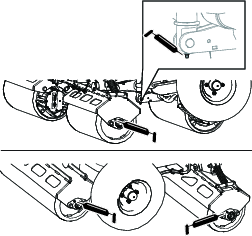
Preparing to Change the Roller Motor Oil
-
Transport the machine to a level surface and connect the machine to the drawbar; refer to Transporting the Machine
-
Turn the machine on.
-
Use the transport-wheel switch to raise the transport wheels.
-
Turn the machine off and exit the machine.
-
Install the drawbar pin through the skid assembly.
Removing the Roller Motors from the Roller Shells
-
Use the transport-wheel switch to slightly lower the transport wheels.
Note: This slightly raises the machine to allow the center roller motor to pivot downwards.
Danger
A machine on a jack may be unstable and slip off the jack, injuring anyone beneath it.
-
Do not start the machine while the machine is on a jack.
-
Block the tires when you are raising the machine with a jack.
-
Support the machine with jack stands.
-
-
Support the machine with jack stands.
-
Turn off the battery-disconnect switch.
-
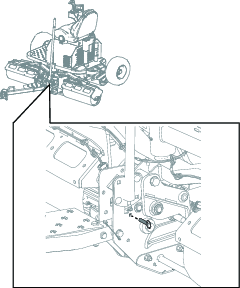
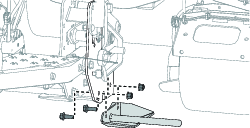
Remove the outer roller motors by completing the steps below:
-
Remove the right skid plate on the drawbar by removing the 2 bolts and 2 nuts. Repeat on the left skid plate.
-
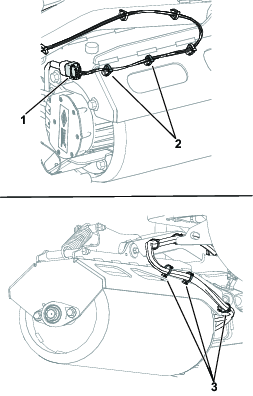
On each roller shell, remove the 2 cable ties that hold the motor wire harness and the 3 cable ties nearest the motor holding phase cable wires. Disconnect the connector from the motor wire harness.
-
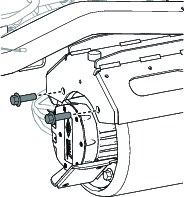
On each roller shell, remove the 2 bolts securing the roller shell to the roller motor. Retain the 2 bolts.
-
Remove the roller motor assembly from roller by sliding it straight out of the roller to disengage it from the splined shaft.
-
-
Remove the center roller motor by removing the 2 bolts securing the roller motor to the roller shell assembly. Retain the 2 bolts.
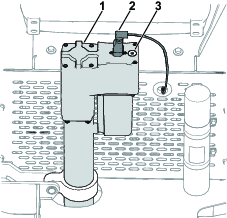
Changing the Roller Motor Oil
-
Position the roller motor as shown below. Over a suitable receptacle, remove the top plug and bottom plug. Allow the fluid to drain.
-
Install the bottom plug and torque it to 7 to 8 N∙m (62 to 70 in-lb).
-
Remove the side plug.
-
Add fluid, as specified at the beginning of this procedure, through the top hole until the level reaches the side plug opening.
-
Install the top plug and side plug. Torque the plugs to 7 to 8 N∙m (62 to 70 in-lb).
Installing the Roller Motors to the Roller Shells
Note: Grease the splined shafts with moly grease prior to installation.
-
Install the roller motor assembly into the roller by sliding it onto the splined roller shaft.
-
Use the previously removed 2 bolts to install the center roller motor to the shell assembly.
-
Install the outer roller motors by completing the steps below:
-
On each roller shell, place the roller motor into the roller shell and secure it with the previously removed 2 bolts.
-
On each roller shell, install the new 5 cable ties in the places where they were previously removed. Connect the motor wire harness connector to the harness.
-
Install the right skid plate on the drawbar and secure it with the 2 bolts and 2 nuts. Repeat on the left skid plate.
-
Storage
Cleaning and Storage
| Maintenance Service Interval | Maintenance Procedure |
|---|---|
| Before storage |
|
-
Park the machine on a level surface, shut off the machine, remove the key, and wait for all moving parts to stop before leaving the operating position.
-
Remove grass, dirt, and grime from the external parts of the entire machine using compressed air.
Important: Do not use water to clean the machine, otherwise you could damage the motors and other electric components.
-
Grease the machine; refer to Greasing the Drive-Roller Bearings and Lift Actuator.
-
Check and tighten all fasteners. Repair or replace any part that is damaged or missing.
-
Paint all scratched or bare metal surfaces with paint from an authorized Toro distributor.
-
Store the machine in a clean, dry garage or storage area. Remove the key from the switch and store it in a memorable place. Cover the machine to protect it and keep it clean.
-
For prolonged storage, follow the battery storage requirements; refer to Battery Storage Requirements.
Battery Storage Requirements
Note: You do not need to remove the batteries from the machine for storage.
Refer to the temperature limits for storage in the following table:
| Storage Temperature | Appropriate Storage Time |
| 45° to 55°C (113° to 131°F) | 1 week |
| 25° to 45°C (77° to 113°F) | 3 weeks |
| -20° to 25°C (-4° to 77°F) | 52 weeks |
Important: Temperatures outside of these ranges will damage your batteries.The temperature that the batteries are stored at will affect their long-term life. Storage for long periods of time at extreme temperatures will reduce the battery life. For temperatures above 25°C (77°F), only store the machine for the appropriate amount of time indicated in the table.
-
Before you store the machine, charge or discharge the batteries between 40% to 60% (54.3V to 57.3V).
Note: A 50% charge is optimal to ensure a maximum battery life. When the batteries are charged to 100% before storage, the battery life shortens.If you anticipate that the machine will be stored for a longer period of time, charge the batteries to around 60%.
-
For every 6 months of storage, check the battery-charge level and ensure that it is between 40% to 60%. If the charge is below 40%, charge the batteries between 40% to 60%.
-
You can use a multimeter to check the charge level when the machine is off. Refer to the following table for the amount of voltage that is equal to the charge level:
Voltage Charge Level 57.3V 60% 55.4V 50% 54.3V 40% -
After charging the batteries, disconnect the battery charger from power. Disconnect the power connector during storage to minimize the discharging of the batteries.
-
If you leave the charger on the machine, it will shut off after the batteries are fully charged and does not turn back on unless the charger is disconnected and reconnected.
Troubleshooting
| Problem | Possible Cause | Corrective Action |
|---|---|---|
| SPN 524035 or SPN 524042, FMI 9 |
|
|
| SPN 4992, FMI 16 or FMI 3 |
|
|
| SPN 4990, FMI 31 |
|
|
| SPN 520196, FMI 16 |
|
|
| SPN 4992, FMI 4 |
|
|
| SPN 520193, FMI 3 |
|
|
| SPN 524032, FMI 3 |
|
|
| SPN 520193, FMI4 |
|
|
| SPN 524033, FMI 31 |
|
|
| SPN 524035 or SPN 524042, FMI 9 |
|
|
| SPN 524160, FMI 31 |
|
|