Safety

Safety and Instructional Decals

Graphic

Safety decals and instructions are easily visible to the operator and are located near any area of potential danger. Replace any decal that is damaged or missing.

decal136-1921

Installation

Preparing the Machine

  1. Park the machine on a level surface.

  2. Disengage the PTO, engage the parking brake, and move the motion-control levers outward to the NEUTRAL-LOCK position.

  3. Shut off the engine and remove the key.

  4. Allow the engine to cool.

  5. Disconnect the negative (-) battery cable from the battery.

  6. Disconnect the positive (+) battery cable from the battery.

Installing the Rear Lights

Parts needed for this procedure:

Left light assembly 1
Right light assembly 1
Flange nut (3/8 inch) 4
U-bolt 2
Wide pivot bracket (Model 74056TE only)1
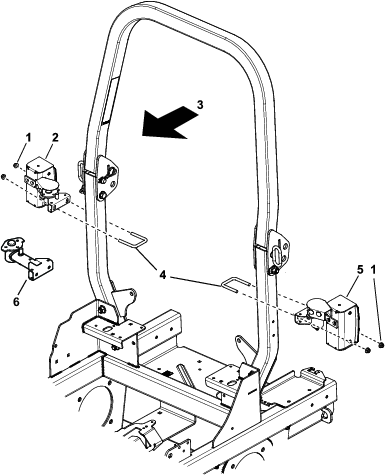
  1. Loosely install the left light assembly to the left side of the lower roll bar frame with a U-bolt and 2 locknuts (3/8 inch); refer to Figure 1.

  2. For model 74056TE only, use the wide pivot bracket (Figure 1).

    1. Remove the 3 bolts (1/4 x 3/4 inches) and 3 locknuts (1/4 inch).

    2. Replace the standard bracket pivot with the wide pivot bracket.

    3. Secure the bracket with the nuts and bolts previously removed.

  3. Loosely install the right light assembly to the right side of the lower roll bar frame with a U-bolt and 2 locknuts (3/8 inch); refer to Figure 1.

    g397782

Installing the Front Lights

Parts needed for this procedure:

Light mount assembly2
Screw (1/4 x 3/4 inch)2
Front-right light assembly1
Front-left light assembly1
Screw (M12 x 60 mm) 2
  1. Remove the caps from each of the machines castor-arm hubs.

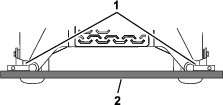
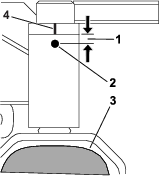
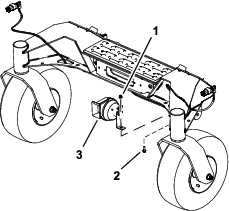
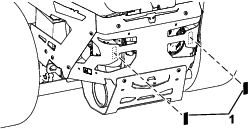
  2. Using the groove in the light mount assembly bushings, mark the center of the caster tubes by temporarily using the light mounts and a straight edge as shown in Figure 2 and Figure 3.

    g397999
  3. Mark a line 10 mm (13/32 inch) down and drill a 7 mm (9/32 inch) hole in the front caster housing. Refer to Figure 3 and Figure 4.

    g392570
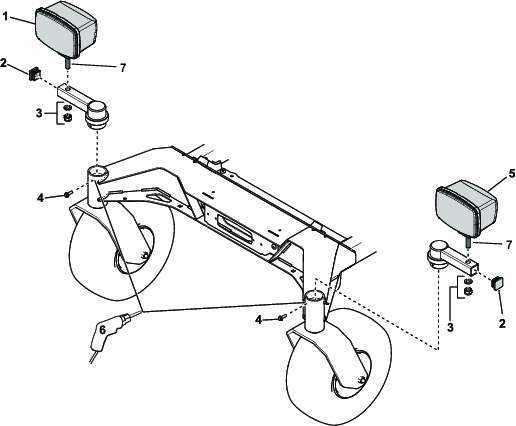
  4. Install a light mount assembly into each caster arm and secure each with a screw (1/4 x 3/4 inch); refer to Figure 4.

  5. Replace the existing light assembly mounting screw (M12 X 30 mm) with the new screw (M12 X 60 mm) supplied in the kit for each light assembly.

  6. Install the left light assembly to the left side of front light bracket with the washer and nut supplied with the light; refer to Figure 4.

  7. Install the right light assembly to the right side of front light bracket with the washer and nut supplied with the light; refer to Figure 4.

    Note: Ensure both headlights are pointing straight forward.

    g392266
  8. Install the horn to the front with a bolt (M8 X 25 mm) and a flange nut (M8).

    g398195

Installing the Controls

Parts needed for this procedure:

Control assembly1
License-plate mount assembly 1
Carriage bolt (1/4 x 3/4 inch)2
Carriage bolt (3/8 x 1-1/4 inches)3
Locknut (1/4 inch)4
Carriage bolt (1/4 x 1-1/4 inches)2
Nut (3/8 inch)3
Rivet (3/16 inch)6
Speed-decal plate 2
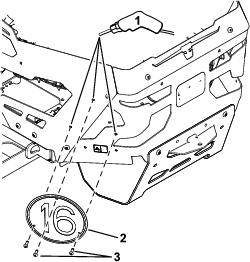
16 km/h decal 1
10 km/h decal (France only)1
Push-in fasteners2
  1. Behind the seat, remove the nuts holding the MY RIDE suspension bracket. Do not remove the bolts and retain the nuts.

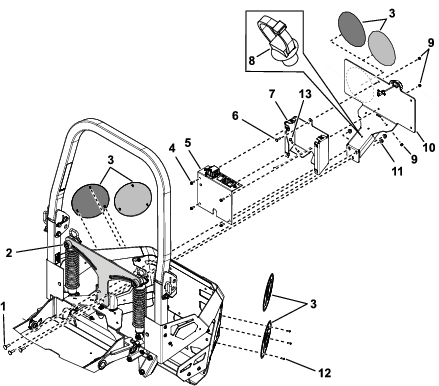
  2. Remove the control panel from the control assembly and retain the fasteners (Figure 7).

  3. Install the control assembly to the license-plate mount assembly with 2 carriage bolts (1/4 x 1 inch), 2 carriage bolts (1/4 x 1-1/4 inches), and 4 locknuts (1/4 inch); refer to Figure 7.

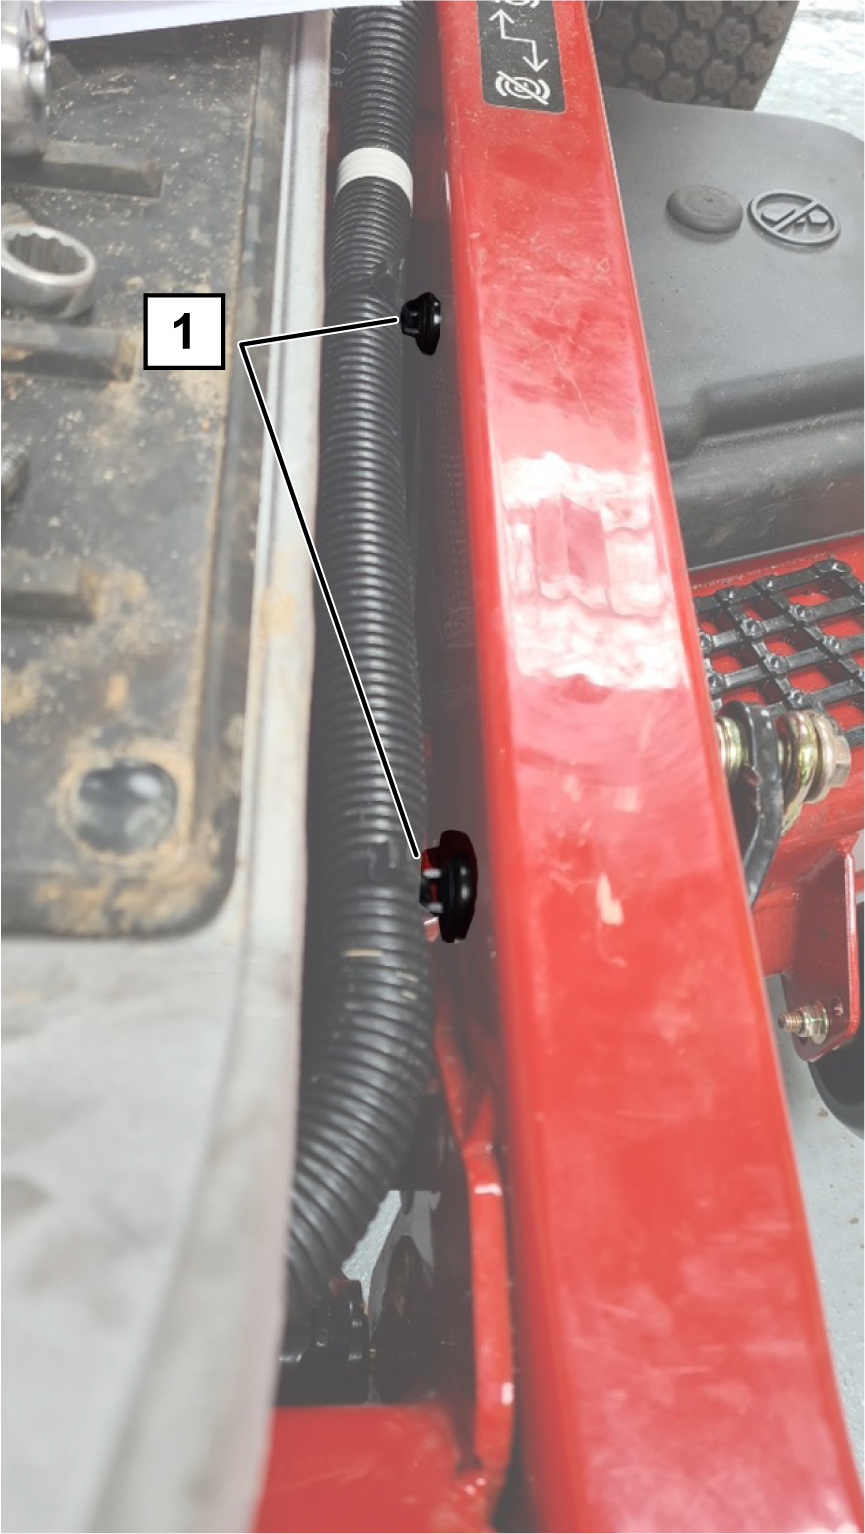
  4. Install 2 push-in fasteners into the 2 holes on the license-plate mount assembly (Figure 7).

  5. Install the license plate and control box assembly to the MY RIDE suspension bracket, with 3 bolts (3/8 x 1-1/4 inches) and 3 locknuts (3/8 inch).

    Note: Replace the bolts individually to ensure the suspension plate remains secured.

  6. Using a speed-decal plate as a template, position it to mark the hole locations on both sides of the machine (Figure 6 and Figure 7).

  7. Drill 5 mm (3/16 inch) holes into each side of the machine (Figure 6).

  8. Install each speed-decal plate with 3 rivets (3/16 inch; refer to Figure 6 and Figure 7.

    g401009
  9. Adhere the appropriate speed decal for your country to the license plate mount.

    g392568

Installing the Left Control Lever

Parts needed for this procedure:

Left control-lever assembly1
  1. If it is installed, disconnect the electric lift switch.

  2. Remove the existing left control lever and retain the fasteners.

  3. Install the new left control lever with the light control switch (Figure 8).

  4. Align both control levers and tighten the levers.

    g392566

Installing the Electric Lift Control

Parts needed for this procedure:

New electric-lift wire harness (Machines with electric lift only)1

Note: This procedure is for machines with the electric-lift control only. If your machine does not have the electric-lift control, proceed to Installing the Beacon.

  1. Loosen the 2 screws and remove the electric-lift switch from the previously removed left-control arm that was previously removed.

  2. Pull the switch housing off of the control arm.

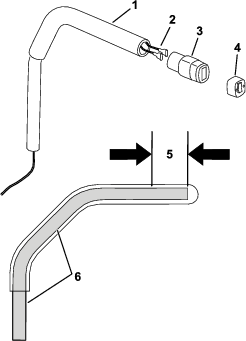
  3. Measure and cut 75 mm (3 inches) from the metal end of the right-control arm, and its rubber grip (Figure 9).

    g393699
  4. Feed the handle wire harness up through the center of the right-control arm.

  5. Install the switch housing by pushing firmly onto the end of the right control-arm tube (Figure 9).

    Note: Ensure that the housing does not twist. If required, apply a small amount of super glue.

  6. Connect the handle wire harness to the switch and install the switch to the control arm.

    Note: The connections are the following: the grey wire to terminal 2, the orange wire to the center terminal, and the yellow wire to terminal 1.

  7. Move the rubber grip up the control arm to the switch as required.

  8. Route the handle wire harness under the operator platform and out to the left side of the machine; connect it to the machine’s harness where the original switch harness was removed.

  9. Install the magnetic harness anchors to the handle wire harness and install the anchors to either side of the plate under the operator platform.

  10. Secure all wires away from moving parts and hot parts.

Installing the Beacon

Parts needed for this procedure:

Beacon light1
Beacon socket1
Beacon bracket 1
Clamp (50 mm)1
Bolt (M8 x 30 mm)2
Locknut (M8)2
Washer (5/16 inch)2
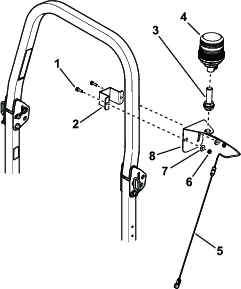
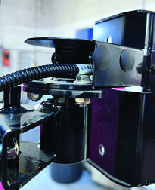
  1. Use the clamp (50 mm) to loosely secure the beacon bracket to the left side of the roll bar; refer to Figure 10.

    Note: Secure the beacon bracket with the top surface approximately 141.5 cm (55-3/4 inches) above the ground.

  2. Secure the beacon socket to the beacon bracket using the nut, washer, and serrated washer supplied with it.

    Note: Ensure the socket is vertical when viewed from the side of the machine; adjust accordingly when you tighten the bracket.

  3. Route the wire harness from the beacon down the front of the roll bar frame and leave it loose for installation later.

  4. Install the beacon to the beacon socket (Figure 10).

    g392429

Installing the Wire Harnesses

Parts needed for this procedure:

Light kit wire harness 1
Power adapter wire harness 1
Magnetic harness anchor4
Rear light2
Screw (#10 x 1-1/4 inches)4
Bolt (M6 x 16 mm)2
Short cable ties10
Long cable ties15
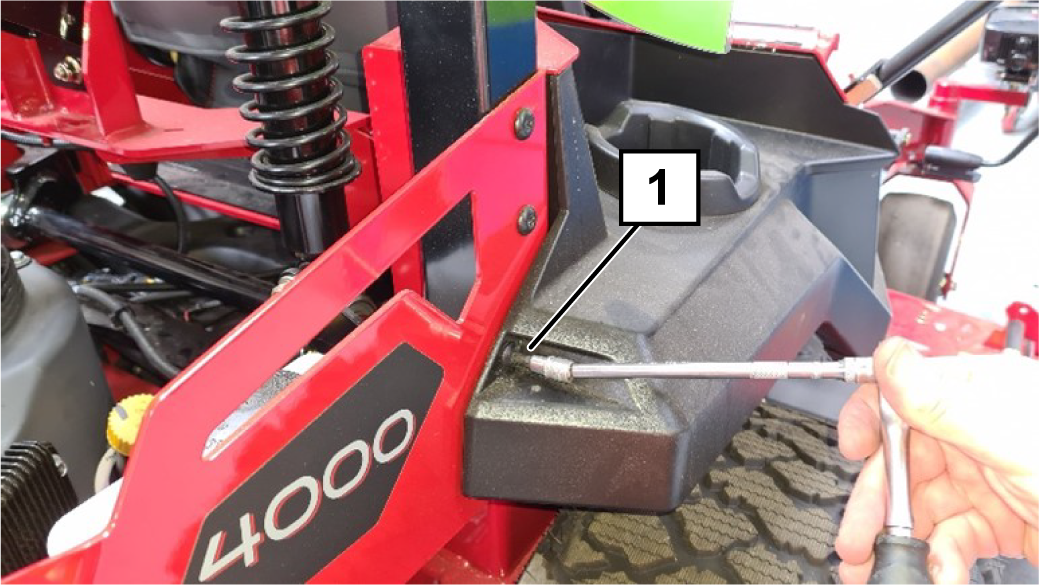
  1. Remove the 4 Torx® head screws securing the cover below the machines control panel. Retain the cover and screws.

    g394020
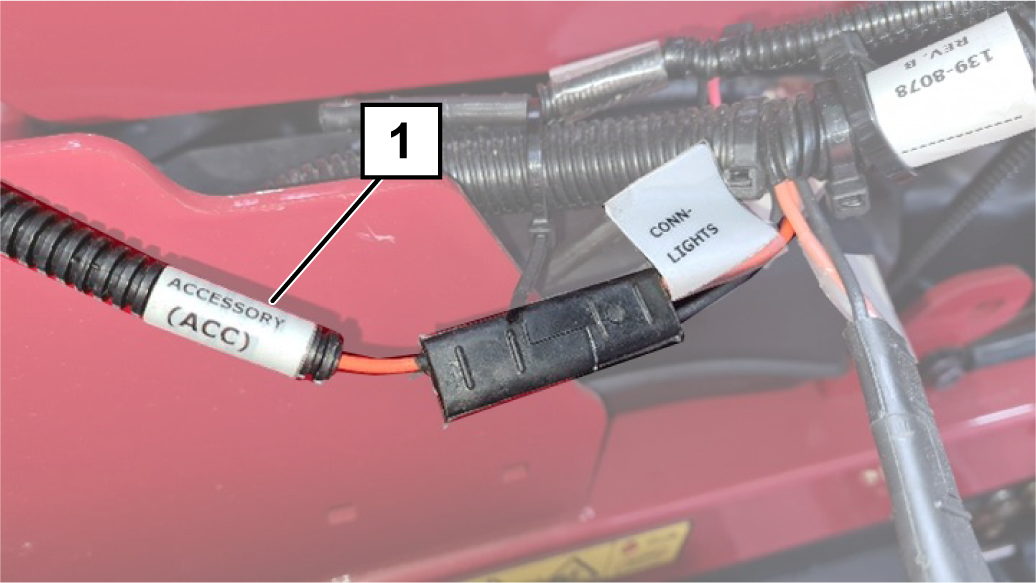
  2. Lay the power adapter wire harness over the engine and feed the 2 pin connector (Labeled ACCESSORY ACC) through the right side to the area of the removed cover.

  3. Connect the 2 pin connector to the connector labled, CONN LIGHTS; refer to Figure 12.

    g394017
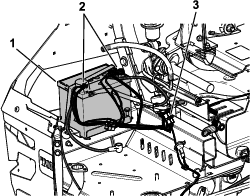
  4. Route the power adapter wire harness to the left side and lay the battery connectors near (but unable to touch) the battery terminals (Figure 13). Do not connect the harness to the battery.

    g394104
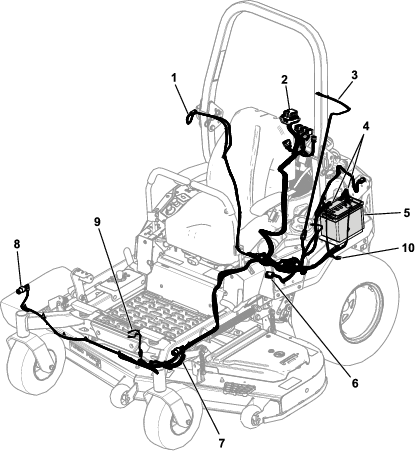
  5. Route the light kit wire harness by starting from the rear of the machine. Route the harness under the seat, on top of the hydraulic oil tank, along the inside of the left chassis rail, and to the front headlights, horn, and light switch connectors.

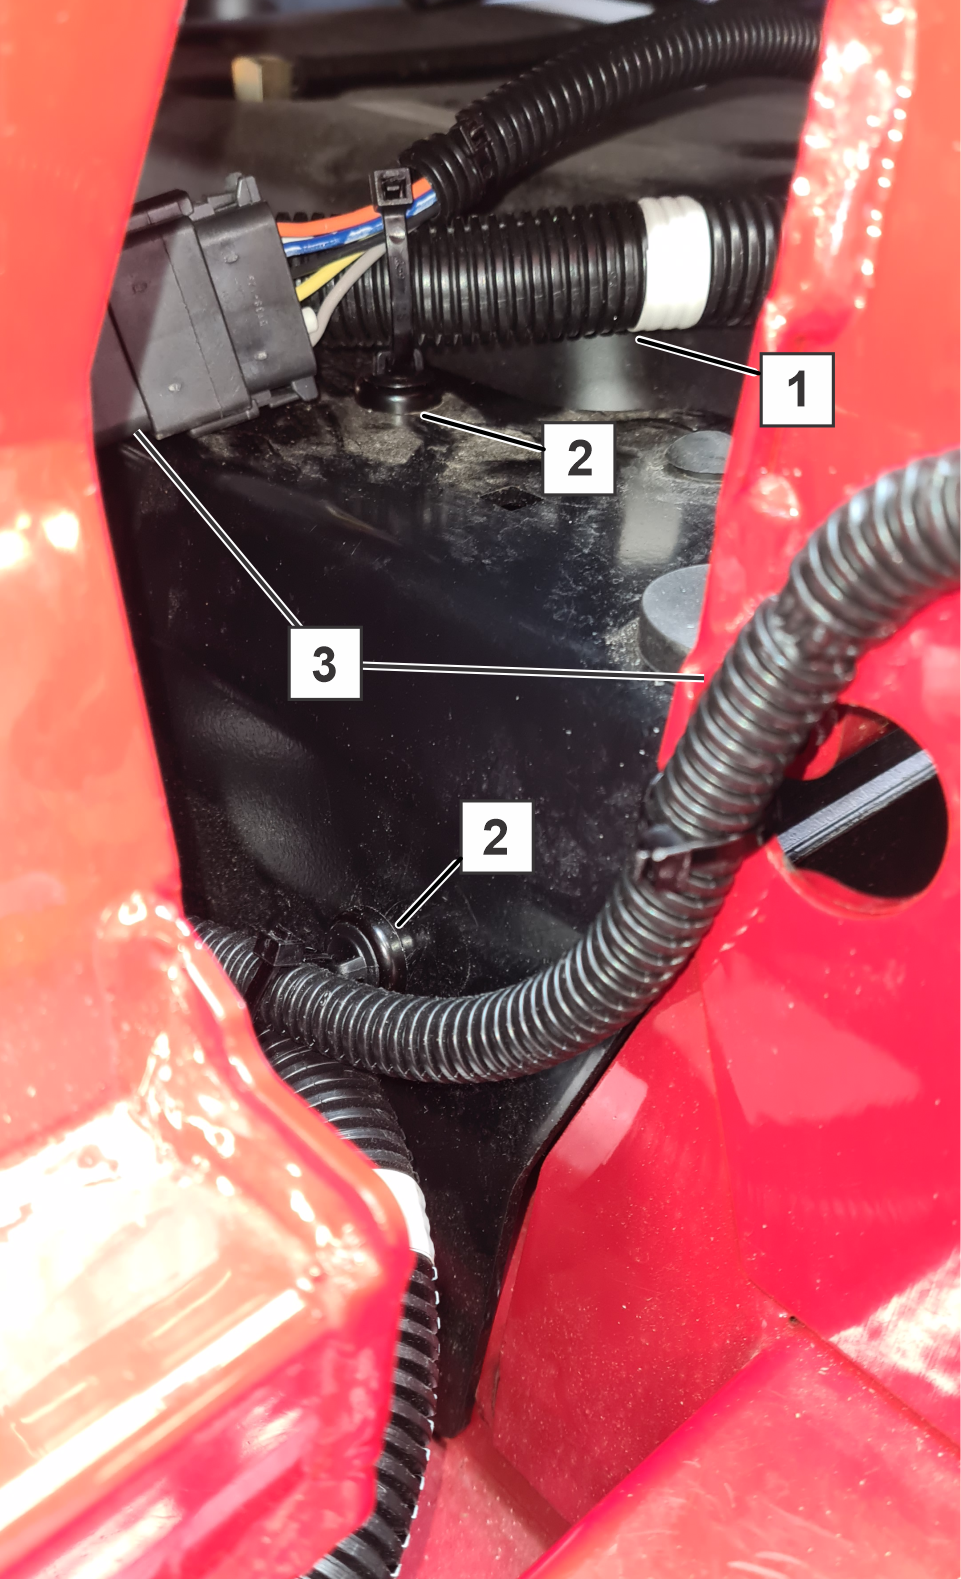
  6. Route the light-kit wire harness along the height-of-cut mechanism bar at the front of the machine, and 2 anchors to the inside of the left chassis rail below the operator platform (Figure 14).

    g392367
    g402524
  7. Identify and mark the left and right front light connectors. The right connector has blue, yellow, grey, and black wires. The left connector has brown, yellow, grey, and black wires.

  8. Route the two front light connectors to the correct front light (Figure 15 and Figure 19).

  9. Connect the front light connectors on the light kit harness to the front lights. Ensure that the harness conduit is secure to the shell.

  10. Connect the front light connectors on the light kit harness to the front lights.

  11. Connect the horn.

  12. Secure the light-kit wire harness to the height-of-cut mechanism bar and to the caster arms.

  13. Connect the control lever connector to the light kit wire harness (Figure 19).

  14. Layout the wiring harness connections to their approximate positions at the rear of the machine (Figure 19).

  15. Connect the 3 pin accessory connector to the accessory (ACC) connector of the power adapter harness installed earlier (Figure 13).

  16. Use cable ties to secure the harness to the main light kit harness.

  17. Connect the beacon wire harness to the beacon connector of the light kit wire harness.

  18. Route the left-rear light connector up the front of the roll bar frame next to the beacon wire harness. Push the connector through the rear light mount and connect it to a rear light with 2 screws (#10 x 1-1/4 inches); refer to Figure 16 and Figure 17.

    g392884
    g401337
  19. Adjust the light until it is 92 cm (36-1/4 inches) from the ground.

  20. Repeat steps 19 and 20 for the right-rear light.

  21. Use cable ties to secure the wires for the rear lights and beacon harness to the roll bar.

    Note: Allow for some slack in the beacon harness to allow the roll bar to be folded.

  22. Remove the fuse box cover and install the fuse box to the control panel with 2 button head screws (M6 x 16 mm); refer to Figure 7.

  23. Connect the light kit wire harness to each switch, to the flasher unit, and to the license plate light.

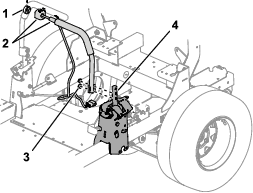
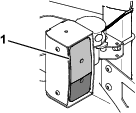
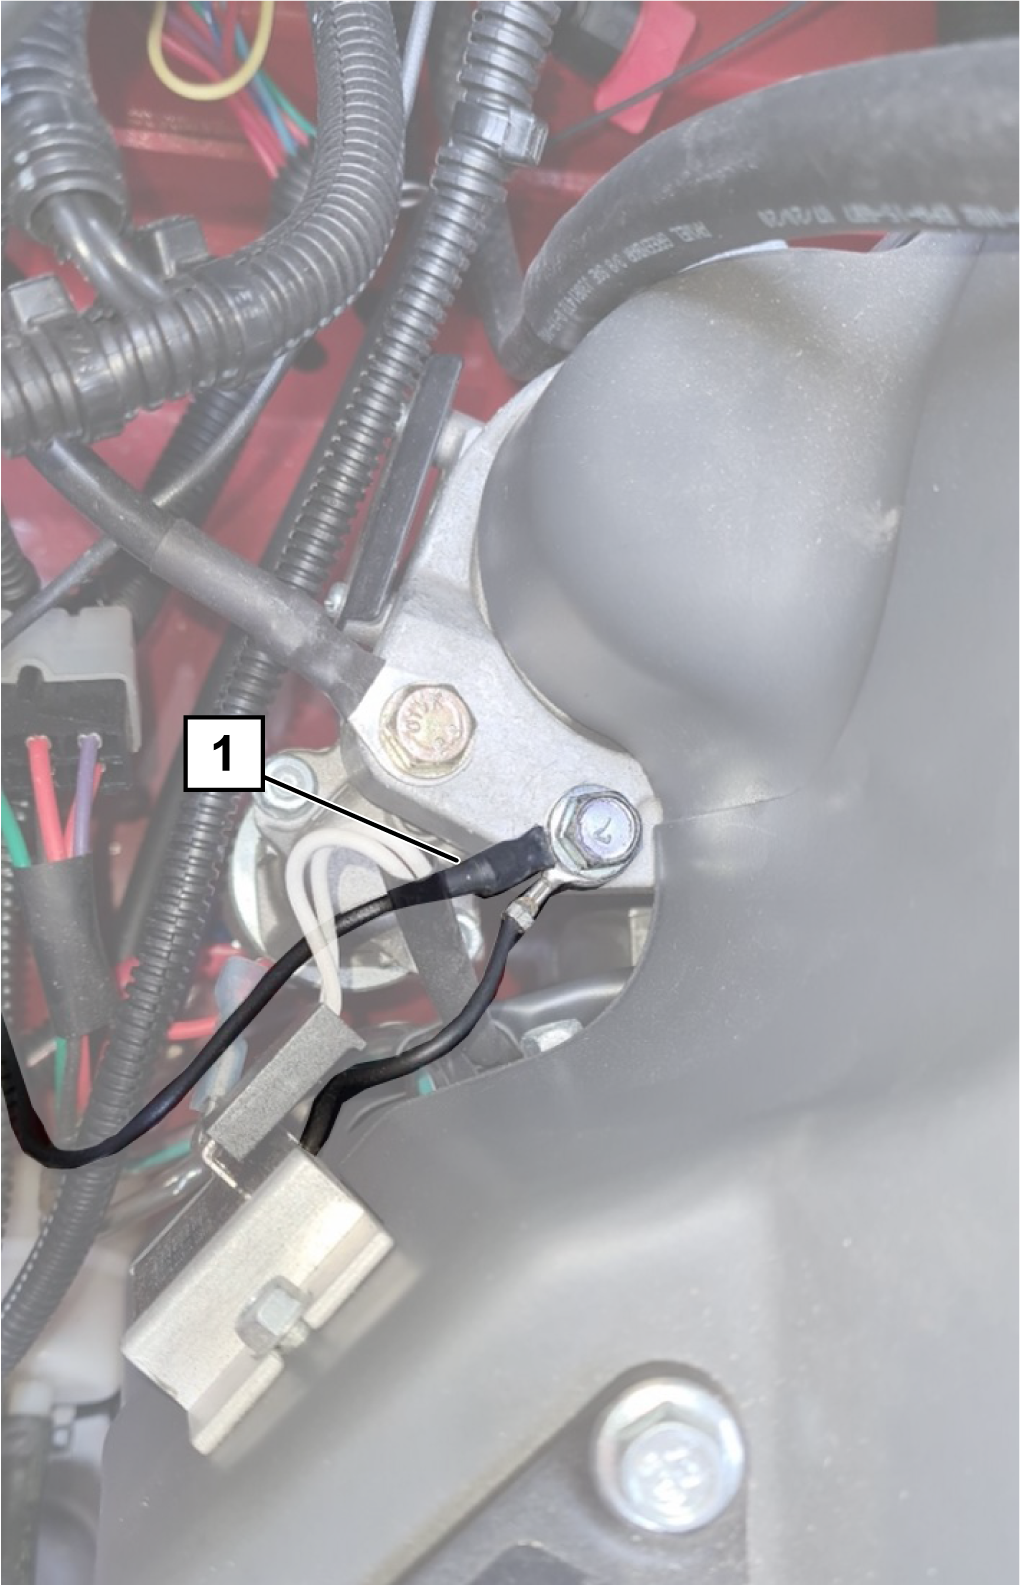
  24. Connect the single black wire from the light kit wire harness to the ground on top of the engine (Figure 18).

    Note: Use the inner connection.

    g394018
  25. Install the plastic panel under the machines control panel using the 4 Torx head screws previously removed (Figure 11).

  26. Connect the positive battery cable and positive ring terminal from the power adapter harness.

  27. Connect the negative battery cable and negative ring terminal from the power adapter harness.

  28. Secure all the wires and harnesses away from moving parts and hot parts with cable ties.

    g392430

Testing the Lights

  1. Switch on the hazard warning lights and ensure all 4 lights flash.

  2. Switch on the ignition switch to the RUN position and check the beacon.

  3. Switch the light switch rearward to activate the road lights. The front side lights and the red rear lights should come on.

  4. Move to the left control arm and switch on the headlights. Ensure both lights have turned on.

  5. Check each direction indicator lights work. Ensure the correct lamp flashes when selected at the control arm switch.

  6. Check the horn.

  7. If all is working, use cable ties to secure the wire harnesses in all areas. You may need to loop some wires and proceed to the next section.

  8. If anything is not working, check the connections to the failed light and switch.

    Note: Ensure all grounded wires and battery connections are installed properly.

Installing the Reflectors, Serial Number Decal, and Vehicle Information Plate

Parts needed for this procedure:

Red reflector2
Vehicle information plate (Germany only)1
Aluminum rivet (Germany only)4
Light Kit serial number decal1
  1. Install a red reflector to each side of the rear of the machine (Figure 20).

    g393667
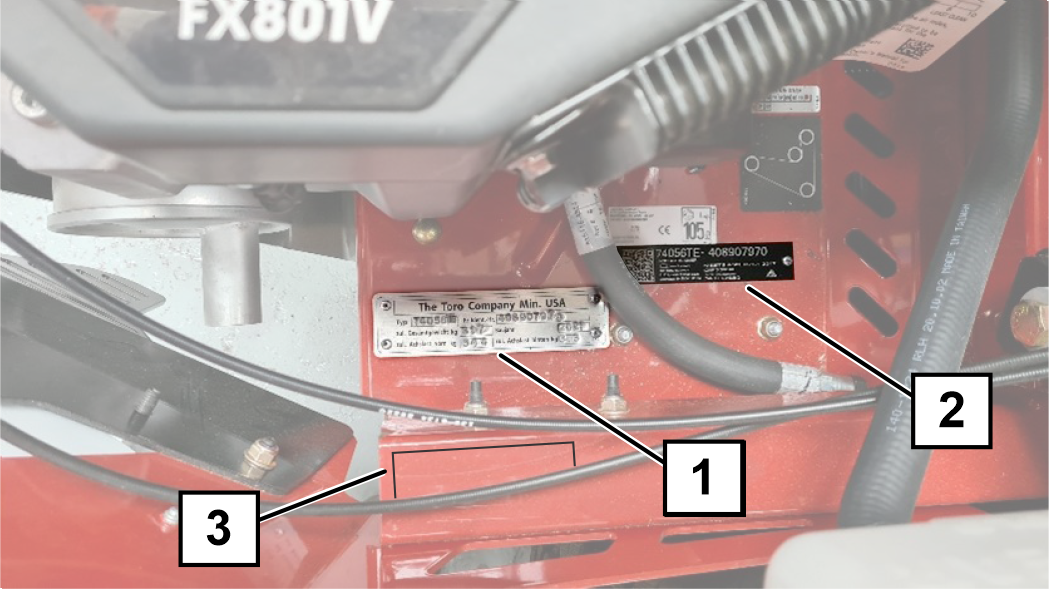
  2. For machines used in Germany, stamp the required information onto the vehicle information plate. See the table below.

    TYP Model Number
    Fz-Ident-HREnter machines serial number
    Zul- Gesamtgewicht Kg817
    BaujahrEnter Year of Manufacture
    Zul-Achslast vorn Kg436 (74048TE)
    544 (74053TE and 74056TE)
    Zul-Achslast Hinten Kg653
  3. Using the vehicle information plate as a template, align the plate and mark the holes; refer to Figure 21.

  4. Drill 4 holes (3 mm) into the engine deck.

    Note: Use caution when drill to ensure no parts are damaged under the engine deck.

  5. Rivet the plate onto the engine deck (Figure 21).

    g398469
  6. Install the light-kit serial number decal (Figure 21).

  7. If there is a requirement in your country to stamp the serial number on the machine frame, and the authority does not state a specified location, stamp the serial number on right caster arm.

Setting the Machine Speed

Important: This procedure is only for machines used in France.

Method 1—Using the Tachometer

  1. Jack up the machine, and securely support it with jack stands so the wheels are off the ground.

  2. Have someone sit in the operator’s seat or add a weight to the seat to activate the operator presence control switch in the seat.

  3. Start the machine, release the brake, and push one control lever fully forward.

  4. Use a tachometer to measure the wheel speed. The maximum speed should be 100 rpm.

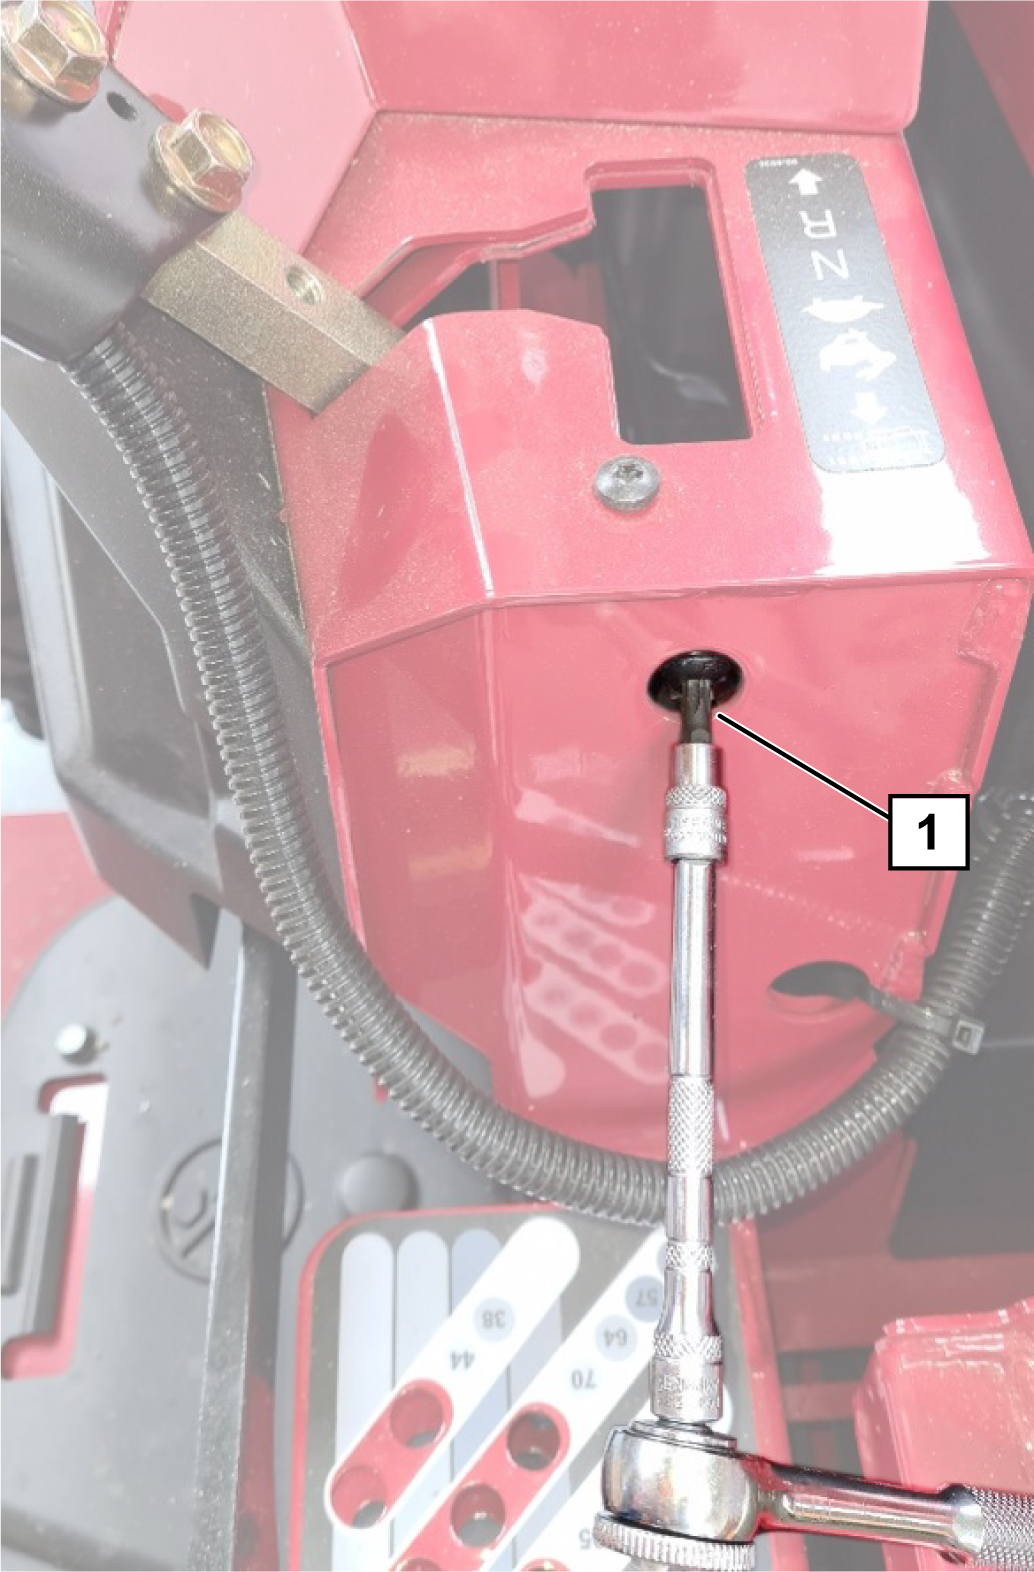
  5. If needed, use a T30 Torx Key, to adjust the control arm stop and check the wheel speed.

    g398468
  6. Repeat the process for the wheel on the other side.

Method 2—Using the Ground Speed

  1. Mark 2 lines on a straight, flat piece of ground 20 m (22 yd) apart.

    Note: Allow enough room for the machine to accelerate to full speed before reaching the first line, and to brake at the other end, after passing the second line.

  2. Measure the time it takes to drive at full speed (control arms fully forward) between the 2 marks. For 10 km/h, the time required should be 7 seconds max.

  3. Adjust the control arm stop as per the tachometer method, and check the speed.

Operation

Operating the Lights

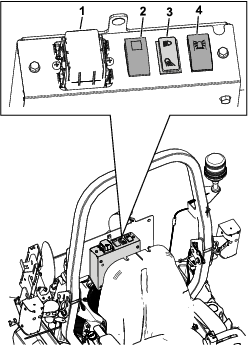
  • To illuminate the marker lights, run the engine and press the rear of the light switch on the control panel (Figure 23).

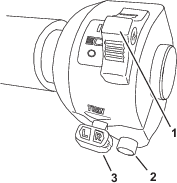
  • To illuminate the headlights and marker lights, run the engine, press the rear of the light switch on the control panel and push the light switch on the left control arm to the I position (Figure 23).

    To switch off the lights, push the front of the light switch on the control panel.

  • To operate the work lights when installed, press the front of the light switch on the control panel.

    Note: You cannot use the work lights when using the road lights.

  • To illuminate the hazard lights, press the top of the hazard light switch to flash all indicator lights simultaneously (Figure 23).

    Note: You do not need the ignition switch in the RUN position.

    g392345
  • The direction indicator switch operates the right and left direction indicator lights. It works only if the ignition is switched to ON (Figure 24).

    g393446
    • Press the left-hand side of the switch toggle to turn on the left-hand direction indicator lights.

    • Press the right-hand side of the switch toggle to the central (OFF) position to turn off the left-hand direction indicator lights.

    • Press the right-hand side of the switch toggle to turn on the right-hand direction indicator lights.

    • Press the left-hand side of the switch toggle to the central (OFF) position to turn off the right-hand direction indicator lights.

  • The horn switch operates the horn only when the ignition is switched on.

    • Push the button to sound the horn.

    • Release the button to stop the horn.

  • To switch the beacon light on, push the top of the beacon switch (Figure 23).

Maintenance

  • Periodically check that all lights are working.

  • Ensure that the headlights are adjusted correctly.

  • Clean the lights daily.

  • Keep the lenses clean by wiping them with a damp cloth. Do not use solvent-based cleaners.

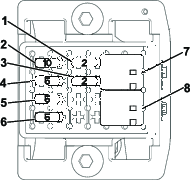
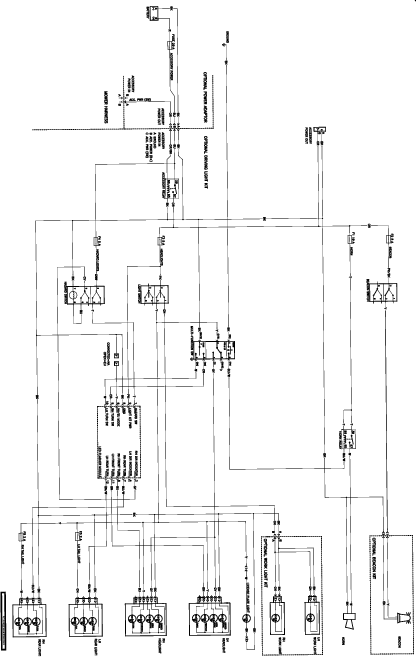
Fuses and Schematic

g396725
g397348