GrandStand® 81cm Side Discharge Cutting Unit

Disclaimers and Regulatory Information
This product complies with all relevant European directives; for details, please see the separate product specific Declaration of Conformity (DOC) sheet.
Gross or Net Torque: The gross or net torque of this engine was laboratory rated by the engine manufacturer in accordance with the Society of Automotive Engineers (SAE) J1940 or J2723. As configured to meet safety, emission, and operating requirements, the actual engine torque on this class of mower will be significantly lower. Please refer to the engine manufacturer’s information included with the machine.


Introduction
 

Intended Use

This rotary-blade, stand-on lawn mower is intended to be used by professional, hired operators. It is designed primarily for cutting grass on well-maintained lawns on residential or commercial properties. Using this product for purposes other than its intended use could prove dangerous to you and bystanders.
Read this information carefully to learn how to operate and maintain the product properly and to avoid injury and product damage. The operator is responsible for operating the product properly and safely.

Getting Help

Graphic
G603694
Visit www.Toro.com for product safety and operation training materials, accessory information, help finding a dealer, or to register your product.
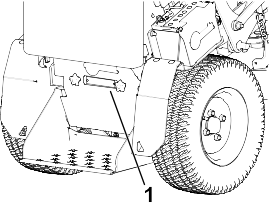
Whenever you need service, genuine Toro parts, or additional information, contact an Authorized Service Dealer or Toro Customer Service and have the model and serial numbers of your product ready. These numbers are located on the serial plate on your product . Write the numbers in the space provided.
Important  
With your mobile device, you can scan the QR code on the serial number decal (if equipped) to access warranty, parts, and other product information.
 
Model Number:
Serial Number:

Manual Conventions

This manual identifies potential hazards and has safety messages identified by the safety-alert symbol, which signals a hazard that may cause serious injury or death if you do not follow the recommended precautions.
Graphic
G405934
This manual uses 2 words to highlight information. Important calls attention to special mechanical information and Note emphasizes general information worthy of special attention.
Safety Alert Classifications
The safety-alert symbol shown in this manual and on the machine identifies important safety messages that you must follow to prevent accidents.
Safety-alert symbol appears above information that alerts you to unsafe actions or situations and is followed by the word DANGER, WARNING, or CAUTION.
Danger
Danger indicates an imminently hazardous situation which, if not avoided, will result in death or serious injury.
 
Warning
Warning indicates a potentially hazardous situation which, if not avoided, could result in death or serious injury.
 
Caution
Caution indicates a potentially hazardous situation which, if not avoided, may result in minor or moderate injury.


Safety
 

General Safety

This product is capable of amputating hands and feet and of throwing objects. Always follow all safety instructions to avoid serious personal injury or death.
  • Read, understand, and follow the instructions and warnings in this Operator’s Manual and on the machine, engine, and attachments before starting the engine.
  • Do not allow children or untrained people to operate or service the machine. Allow only people who are responsible, trained, familiar with the instructions, and physically capable to operate or service the machine.
  • Keep bystanders, particularly children, away from the operating area.
  • Do not operate the machine near drop-offs, ditches, embankments, water, or other hazards.
  • Do not put your hands or feet near moving parts.
  • Do not operate the machine without all safety shields, guards, switches, and other devices in place and working properly.
  • Park the machine on a level surface, disengage the drives, engage the parking brake, shut off the engine, and wait for all moving parts to stop before leaving the operator’s position.
  • Wait for the machine to cool before servicing, adjusting, fueling, cleaning, or storing it.

Safety and Instructional Decals

Image
Safety decals and instructions are easily visible to the operator and are located near any area of potential danger. Replace any decal that is damaged or missing.
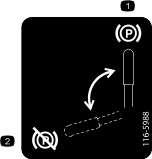
Decal Part: 116-5988
Graphic
s_decal116-5988
  1.  Parking brake—engaged
  2.  Parking brake—disengaged
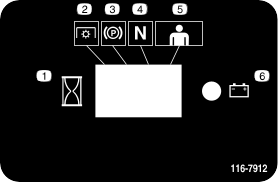
Decal Part: 116-7912
Graphic
s_decal116-7912
  1.  Interval
  2.  Power Take-off (PTO)
  3.  Parking brake
  4.  Neutral
  5.  Operator presence control
  6.  Battery
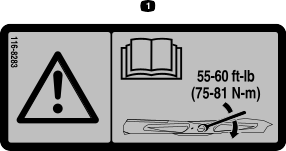
Decal Part: 116-8283
Graphic
s_decal116-8283
  1.  Warning—read the Operator’s Manual for instructions on torquing the blade bolt/nut to 75 to 81 N∙m (55 to 60 ft-lb).
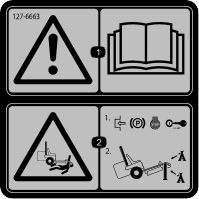
Decal Part: 127-6663
Graphic
decal127-6663
  1.  Warning—read the Operator's Manual.
  2.  Crushing hazard—engage the parking brake, shut off the engine, and remove the key; support the machine using jackstands.
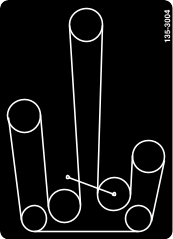
Decal Part: 135-3004
Graphic
s_decal135-3004
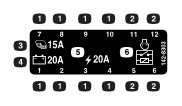
Decal Part: 142-8303
Graphic
decal142-8303
  1.  Fuse location
  2.  Relay location
  3.  Auxiliary, 15A
  4.  Regulator, 20A
  5.  Main, 20A
  6.  Start relay
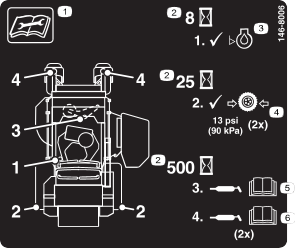
Decal Part: 146-8006
Graphic
s_decal146-8006
  1.  Read the instructions before servicing or performing maintenance.
  2.  Time interval
  3.  Check the engine oil level.
  4.  Check the tire pressure (2 locations).
  5.  Grease the idler pivot; refer to the Operator's Manual for further instructions.
  6.  Grease the caster pivots; refer to the Operator's Manual for further instructions (2 locations).
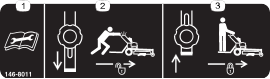
Decal Part: 146-8011
Graphic
decal146-8011
  1.  Read the Operator’s Manual before performing maintenance.
  2.  Bypass lever position for pushing the machine.
  3.  Bypass lever position for operating the machine.
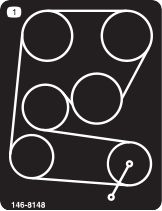
Decal Part: 146-8148
Graphic
decal146-8148
  1.  Belt routing
Decal Part: 146-8277
Graphic
decal146-8277
  1. Read the Operator’s Manual.
  2. Push button down to unlock.
  3. Release button to lock.
  4. Height of cut
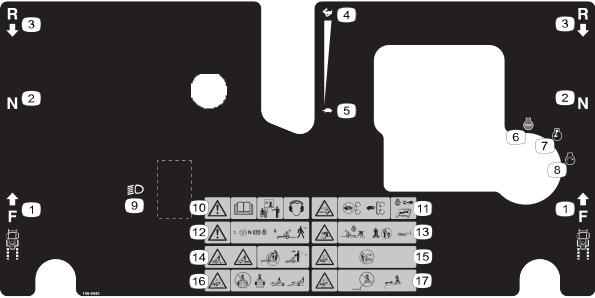
Decal Part: 146-8443
Graphic
decal146-8443
  1. Forward
  2. Neutral
  3. Reverse
  4. Throttle—fast
  5. Throttle—slow
  6. Engine—off
  7. Engine—on
  8. Engine—start
  9. Optional light accessory
  10. Warning—read the Operator’s Manual; all operators should be trained before operating the machine; wear hearing protection.
  11. Warning—stay away from moving parts; keep all guards and shields in place; shut off the engine and remove the key before performing maintenance.
  12. Warning—disengage the PTO, move the drive levers to the neutral position, engage the parking brake, and stop the engine before leaving the machine.
  13. Thrown object hazard—shut off the machine, wait for moving parts to stop, and pick up debris before mowing; keep bystanders away; lower the deflector before operating the machine.
  14. Crushing/dismemberment hazard of bystanders—do not carry passengers, look forward and down when operating the machine, look behind and down when moving in reverse.
  15. Tipping hazard—only operate across slopes; do not operate up and down slopes; do not use on slopes greater than 12 degrees.
  16. Tipping hazard—do not use dual ramps when loading onto a trailer; use a singular ramp wide enough for the machine; back up the ramp when loading the machine and drive forward off the ramp when unloading.
  17. Tipping hazard—do not use the machine near drop-offs or on slopes; stay at least 2 widths of the machine away from drop-offs.
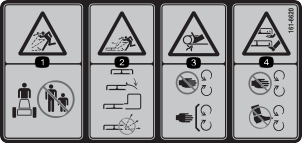
Decal Part: 161-6620
Graphic
s_decal161-6620
  1. Thrown object hazard—keep bystanders away from the machine.
  2. Thrown object hazard, raised deflector—lower the deflector before operating the machine; always operate the machine with the deflector, discharge cover, or grass collection system in place; do not operate the machine with the discharge opening uncovered.
  3. Entanglement hazard—keep away from moving parts; keep all guards and shields in place.
  4. Severing hazard of hand or foot—keep hands and feet away from moving parts.


Product Overview
 

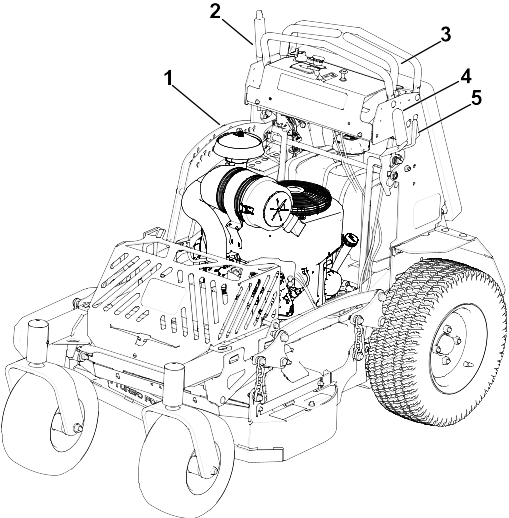
Graphic
G611670
  1.  Height of cut
  2.  Deck lift handle
  3.  Motion controls
  4.  Parking-brake lever
  5.  Parking-brake latch
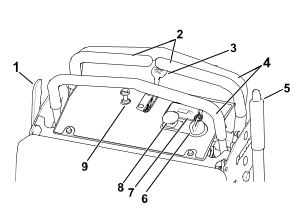
Control Panel
Note: Become familiar with all of the controls before starting the engine and operating the machine.
Graphic
G586136
  1.  Parking brake
  2.  Motion controls
  3.  Throttle
  4.  Reference bar
  5.  Deck lift lever
  6.  Ignition
  7.  Display
  8.  PTO engagement switch
  9.  Choke
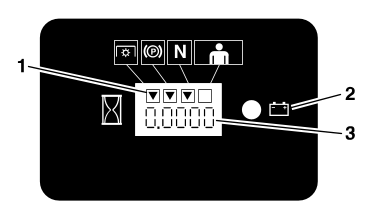
Hour Meter
The hour meter records the number of hours that the engine has operated.
Graphic
G519141
  1. LCD indicators
  2. Low voltage indicator
  3. Hour/voltage display
The hour meter is recording when the decimal point is flashing in the hour/voltage display.
The hours are displayed when the key is off or when the machine is running.
Note: If the ignition key is turned to the On position for a few seconds before cranking the engine, the battery voltage will display in the area where the hours are normally displayed.
The LCD indicators appear when each of the controls meet the “safe to start” mode.
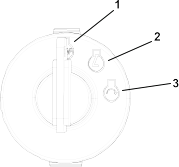
Key Switch
Use the key switch to start or shut off the engine.
Graphic
G375755s
  1.  Shut off the engine
  2.  Run the engine
  3.  Start engine
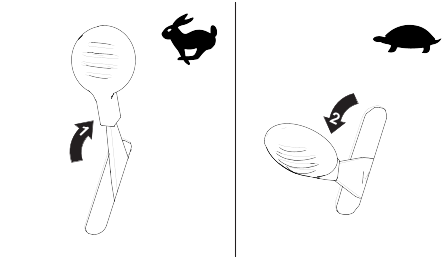
Throttle Control
The throttle is used to control the engine speed.
Graphic
G603695
  1.  Fast
  2.  Slow
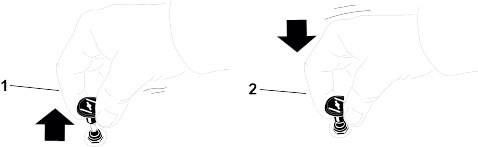
Choke Control
Use the choke control to aid in starting a cold engine.
Graphic
G419508
  1. Engaged
  2. Disengaged
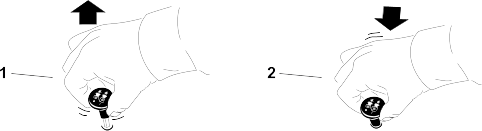
Power-Takeoff (PTO) Switch
The power-takeoff (PTO) switch engages and disengages power to the mower blades.
Graphic
G442765
  1. Engaged
  2. Disengaged
Motion-Control Levers
The motion control levers control the forward and reverse motion of the machine.
Moving the levers forward or backward turns the wheel on the same side forward or reverse respectively. Wheel speed is proportional to the amount the lever is moved.
Note: When the motion control levers are in the neutral position, and park brake is engaged, a LCD indicator displays on the message display.
Graphic
G586158
  1.  Neutral position

Parking-Brake Latch

The parking-brake latch helps prevent accidental engagement of the parking-brake lever. Rotate the parking-brake latch forward to release the parking-brake lever and allow the lever to move.
Graphic
G611688

Parking Brake

Whenever you shut off the engine, engage the parking brake to prevent accidental movement of the machine.
Graphic
G611672
Specifications
Note: Specifications and design are subject to change without notice.
Width (deflector up)
95 cm (37.4 inches)
Width (deflector down)
112.3 cm (44.2 inches)
Tread width (center to center of tires, widthwise)
83.3 cm (32.8 inches)
Length
173.5 cm (68.3 inches)
Height
120.1 cm (47.3 inches)
Weight (weight will vary slightly depending on the size of the deck)
340 kg (750 lb)

Attachments/Accessories

A selection of Toro approved attachments and accessories is available for use with the machine to enhance and expand its capabilities. Contact your Authorized Service Dealer or authorized Toro distributor or go to www.Toro.com for a list of all approved attachments and accessories.
To ensure optimum performance and continued safety certification of the machine, use only genuine Toro replacement parts and accessories.


Operation
 

Before Operation Safety

  • Evaluate the terrain to determine what accessories and attachments are needed to properly and safely perform the job. Only use accessories and attachments approved by Toro.
  • Inspect the area where the machine is to be used and remove all rocks, toys, sticks, wires, bones, and other foreign objects. These can be thrown or interfere with the operation of the machine and may cause personal injury to the operator or bystanders.
  • This mower was designed for one operator only. Do not carry passengers.
  • Wear appropriate personal protective equipment such as safety glasses, long pants, substantial slip-resistant footwear, and hearing protection. Tie back long hair and avoid loose clothing and loose jewelry which may get tangled in moving parts.
  • This machine produces sound levels in excess of 85 dBA at the operator’s ear and can cause hearing loss through extended periods of exposure. Wear hearing protection when operating this machine.
  • Check that the following items are in place and in proper working condition: the operator presence controls, safety switches, guards, shields, discharge deflector and/or the entire grass catcher system. Do not operate the machine unless they are in proper working condition. Replace worn or deteriorated parts with genuine Toro parts when necessary.
    Danger
    It is essential that operator safety mechanisms be connected and in proper operating condition prior to use. Contacting the blade will result in serious personal injury.
    Shut off the engine, remove the key, and wait for all moving parts to stop before leaving the operating position. When the key is turned to the Off position, the engine should shut off and the blade should stop. If not, stop using the machine immediately and contact an Authorized Service Dealer.
     
  • Do not operate the mower when people, especially children, or pets are in the area. Shut off the machine and attachment(s) if anyone enters the area.
  • Do not operate the machine without the entire grass collection system, discharge deflector, or other safety devices in place and in proper working condition. Grass catcher components are subject to wear, damage and deterioration, which could expose moving parts or allow objects to be thrown. Frequently check for worn or deteriorating components and replace them with the manufacturer’s recommended parts when necessary.
Fuel Safety
Danger
Gasoline is extremely flammable and vapors are explosive.
A fire or explosion from gasoline can burn you, others, and cause property damage.
  • Fill the fuel tank outdoors on level ground, in an open area, when the engine is cold. If fuel is spilled, do not attempt to start the engine. Move away from the area of the spill and avoid creating any source of ignition until fuel vapors have dissipated.
  • Do not refill the fuel tank or drain the machine indoors or inside an enclosed trailer.
  • Never smoke when handling gasoline, and stay away from an open flame or where gasoline fumes may be ignited by spark.
  • Add fuel before starting the engine. Never remove the cap of the fuel tank or add fuel when engine is running or when the engine is hot.
  • Store gasoline in an approved container and keep it out of the reach of children.
  • Do not operate without entire exhaust system in place and in proper working condition.
 
  • In certain conditions during fueling, static electricity can be released causing a spark which can ignite gasoline vapors.
    • Do not fill containers inside a vehicle or on a truck or trailer bed with a plastic liner. Always place containers on the ground and away from your vehicle before filling.
    • When practical, remove gas-powered equipment from the truck or trailer and refuel the equipment with its wheels on the ground. If this is not possible, then refuel such equipment on a truck or trailer from a portable container, rather than from a gasoline dispenser nozzle.
    • If a gasoline dispenser nozzle is used, keep the nozzle in contact with the rim of the fuel tank or container opening at all times until fueling is complete. Do not use a nozzle lock open device.
  • Do not overfill the fuel tank. Fill the fuel tank to the bottom of the filler neck. The empty space in the tank allows gasoline to expand. Overfilling may result in fuel leakage or damage to the engine or emission system.
  • Gasoline is harmful or fatal if swallowed. Long-term exposure to vapors may cause serious injury and illness.
    • Avoid prolonged breathing of vapors.
    • Keep face away from nozzle and gas tank/container opening.
    • Keep away from eyes and skin.
  • To help prevent fires:
    • Keep engine and engine area free from accumulation of grass, leaves, excessive grease or oil, and other debris which can accumulate in these areas.
    • Clean up oil and fuel spills and remove fuel soaked debris.
    • Allow the machine to cool before storing the machine in any enclosure. Do not store the machine or fuel container, or refuel, where there is an open flame, spark, or pilot light such as on a water heater or other appliance.

Fuel

Fuel Specifications
Capacity
19 L (5 US gallons)
Type
Unleaded gasoline
Minimum octane rating
87 (US) or 91 (research octane; outside the US)
Ethanol
No more than 10% by volume
Methanol
None
MTBE (methyl tertiary butyl ether)
Less than 15% by volume
Oil
Do not add to the fuel
Use only clean, fresh (no more than 30 days old), fuel from a reputable source.
Important  
To reduce starting problems, add fuel stabilizer/conditioner to fresh fuel as directed by the fuel-stabilizer/conditioner manufacturer.
 
Filling the Fuel Tank
  1. Park the machine on a level surface, disengage the PTO, move the motion-control levers to the Neutral-Lock position, and engage the parking brake.
  2. Shut off the engine, remove the key, and wait for all moving parts to stop before leaving the operating position.
  3. Clean around the fuel-tank cap and remove the cap.
  4. Fill the fuel tank to the bottom of the filler neck.
    Note: Do not fill the fuel tank completely full. The empty space in the tank allows the fuel to expand.
  5. Install the fuel-tank cap securely. Wipe up any spilled fuel.
    Graphic
    g038312

Performing Daily Maintenance

Before starting the machine each day, perform the Each Use/Daily procedures listed in the Maintenance Schedule.

Break-In Time

New engines take time to develop full power. Mower decks and drive systems have higher friction when new, placing additional load on the engine. Allow 40 to 50 hours of break-in time for new machines to develop full power and best performance.

Safety-Interlock System Checks

Warning
If the safety-interlock switches are disconnected or damaged, the machine could operate unexpectedly, causing personal injury.
  • Do not tamper with the interlock switches.
  • Check the operation of the interlock switches daily and replace any damaged switches before operating the machine.
 
Note: If the machine does not pass any of these tests, do not operate the machine. Contact an Authorized Service Dealer.
Verifying the Engine Starts Normally
Note: It is not necessary for the operator to be on the platform to start the engine.
  1. Refer to the table below to verify the engine starts normally.
     
    System
     
    Parking Brake
    PTO (Blades)
    Motion Control Levers
    Operator
    Outcome
    State of System
    Engaged
    Disengaged
    Levers in neutral
    On platform or off the platform
    Starter should crank
    Image
    Image
    Image
    ImageImage
    Image
    Engaged
    Up position, but blades disengaged*
    Levers in neutral
    On platform or off the platform
    Starter should crank
    Image
    Image
    Image
    ImageImage
    Image
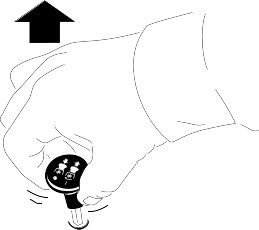
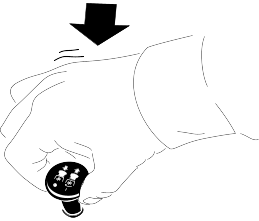
    Note: The starter will crank with the PTO switch in the On (pulled up) position; however, the system will disengage the PTO and a reset PTO error will occur. Engaging the PTO will require the operator to reset the PTO switch by turning it Off (pushed down) and then turning it On.
Checking the Engine Starting Circuit
Note: The state of system item that is bold is being checked in each scenario.
  1. Refer to the table below to check the function of the engine starting circuit.
     
    System
     
    Parking Brake
    PTO (Blades)
    Motion Control Levers
    Operator
    Outcome
    State of System
    Disengaged
    Disengaged
    Levers in neutral
    On platform or off the platform
    Starter must not crank
    Graphic
    G604125
    Image
    Image
    Image
    Image
    Image
Checking the Shutdown Circuit
Note: The state of system item(s) that is bold is being checked in each scenario.
  1. Refer to the table below to check the function of the shutdown circuit .
     
    System
     
    Engine
    Parking brake
    PTO (Blades)
    Motion Control Levers
    Operator
    Outcome
    State of System
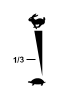
    Running idle (1/3 throttle)
    Engaged or disengaged
    Engaged
    Levers in neutral
    Off of the platform
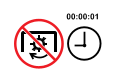
    PTO must begin shutdown within 1 second; engine stays running.
    Image
    ImageImage
    Image
    Image
    Image
    Image

During Operation

During Operation Safety
The operator must use their full attention when operating the machine. Do not engage in any activity that causes distractions; otherwise, injury or property damage may occur.
Warning
Operating engine parts, especially the muffler, become extremely hot. Severe burns can occur on contact and debris, such as leaves, grass, brush, etc. can catch fire.
Clean the machine as stated in the Maintenance section. Keep engine and engine area free from accumulation of grass, leaves, excessive grease or oil, and other debris which can accumulate in these areas.
 
  • Operate the engine only in well-ventilated areas. Exhaust gases contain carbon monoxide, which is an odorless deadly poison.
  • Do not operate the machine while ill, tired, or under the influence of alcohol or drugs.
  • Operate the machine only in good visibility and appropriate weather conditions. Do not operate the machine when there is the risk of lightning.
  • Keep away from holes, ruts, bumps, rocks, and other hidden hazards. Use care when approaching blind corners, shrubs, trees, tall grass or other objects that may hide obstacles or obscure vision. Uneven terrain could overturn the machine or cause the operator to lose their balance or footing.
  • Start the engine with your feet well away from the blades.
  • Do not operate the machine without all safety shields, guards, switches, and other devices in place and in proper working condition.
  • Keep your hands and feet away from the moving parts. Keep clear of the discharge opening.
  • Do not mow with the discharge deflector raised, removed, or altered unless there is a grass-collection system or mulch kit in place and working properly.
  • Never raise the deck with blades running.
  • Be aware of the mower discharge path and direct discharge away from others. Avoid discharging material against a wall or obstruction as the material may ricochet back toward the operator. Stop the blades, slow down, and use caution when crossing surfaces other than grass and when transporting the mower to and from the area to be mowed.
  • Be alert, slow down and use caution when making turns. Do not mow in reverse unless it is absolutely necessary. Always look down and behind you before moving the machine in reverse.
  • Park the machine on level ground. Stop engine, wait for all moving parts to stop, and remove key:
    • Before checking, cleaning or working on the mower.
    • After striking a foreign object or abnormal vibration occurs (inspect the mower for damage and make repairs before restarting and operating the mower).
    • Before clearing blockages.
    • Whenever you leave the mower. Do not leave a running machine unattended.
  • Stop engine, wait for all moving parts to stop:
    • Before refueling.
    • Before dumping the grass catcher.
    • Before making height adjustments.
  • Tragic accidents can occur if the operator is not alert to the presence of children. Children are often attracted to the machine and the mowing activity. Never assume that children will remain where you last saw them.
    • Keep children out of the mowing area and under the watchful care of another responsible adult, not the operator.
    • Be alert and turn the machine off if children enter the area.
    • Before and while backing or changing direction, look behind, down, and side-to-side for small children.
    • Never allow children to operate the machine.
    • Do not carry children, even with the blades shut off. Children could fall off and be seriously injured or interfere with the safe operation of the machine. Children that have been given rides in the past could suddenly appear in the working area for another ride and be run over or backed over by the machine.
Slope Safety
  • Slopes are a major factor related to loss of control and rollover accidents, which can result in severe injury or death. The operator is responsible for safe slope operation. Operating the machine on any slope requires extra caution. Before using the machine on a slope, the operator must:
    • Review and understand the slope instructions in the manual and on the machine.
    • Evaluate the site conditions of the day to determine if the slope is safe for machine operation. Use common sense and good judgment when performing this evaluation. Changes in the terrain, such as moisture, can quickly affect the operation of the machine on a slope.
  • Operate across slopes, never up and down. Avoid operation on excessively steep or wet slopes. Poor footing could cause a slip and fall accident.
  • Identify hazards at the base of the slope. Do not operate the machine near drop offs, ditches, embankments, water or other hazards. The machine could suddenly roll over if a wheel goes over the edge or the edge collapses. Keep a safe distance between the machine and any hazard. Use a hand held tool to operate in these areas.
  • Avoid starting, stopping or turning the machine on slopes. Avoid making sudden changes in speed or direction; turn slowly and gradually.
  • Do not operate a machine under any conditions where traction, steering or stability is in question. Be aware that operating the machine on wet grass, across slopes or downhill may cause the machine to lose traction. Loss of traction to the drive wheels may result in sliding and a loss of braking and steering. The machine can slide even if the drive wheels are stopped.
  • Remove or mark obstacles such as ditches, holes, ruts, bumps, rocks or other hidden hazards. Tall grass can hide obstacles. Uneven terrain could overturn the machine.
  • If you lose control of the machine, step away from the direction of travel of the machine.
  • Always keep the machine in gear when going down slopes. Do not coast downhill.
Starting the Engine
  1. With the motion control levers in the Neutral position, pull the parking brake up and rearward to engage the parking brake.
  2. Push down on the PTO switch to the Disengage position.
  3. Place the throttle midway between the Slow and Fast positions.
  4. On a cold engine, pull the choke knob upward into the On position. On a warm engine, leave the choke in the Off position.
  5. Turn the ignition switch to the Start position. Release the switch as soon as the engine starts.
    Important  
    Do not crank the engine continuously for more than 10 seconds at a time. If the engine does not start, allow a 60 second cool-down period between starting attempts. Failure to follow these guidelines can burn out the starter motor.
     
  6. If the choke is in the On position, gradually return the choke to the Off position as the engine warms up.
Stopping the Engine
  1. Bring the machine to a full stop.
  2. With the motion control levers in the Neutral position, place the throttle midway between the Slow and Fast positions.
  3. Push down on the PTO switch to disengage the blades.
  4. Engage the parking brake.
  5. Allow the engine to run for a minimum of 15 seconds, then turn the ignition switch to the Off position to stop the engine.
Operating the Mower Blade-Control Switch (PTO)
Danger
The rotating blades under the mower deck are dangerous. Blade contact will cause serious injury or death.
Do not put your hands or feet under the mower or mower deck when the blades are engaged.
 
Danger
An uncovered discharge opening allows objects to be thrown toward you or bystanders. Also, contact with the blade could occur. Thrown objects or blade contact will cause serious injury or death.
Do not operate the mower with the discharge deflector raised, removed, or altered unless a grass collection system or mulch kit is in place and working properly.
 
  1. Move the throttle control to the Fast position.
  2. Engage the blade-control switch.
    Graphic
    G603707
  3. Mow as desired.
  4. Disengage the blade-control switch.
    Graphic
    G603708
Driving the Machine
Caution
Machine can spin very rapidly by positioning one lever too much ahead of the other. Operator may lose control of the machine, which may cause damage to the machine or injury.
  • Use caution when making turns.
  • Slow the machine down before making sharp turns.
 
Important
To begin movement (forward or backward), the brake lever must be disengaged (pushed forward) before the motion control levers can be moved.
 
When the motion control levers are positioned in the center, the drive system is in the neutral position.
Note: The N LCD indicator appears when the levers are in the neutral position and the brake is engaged.
With the brake disengaged, the drive system is in the operate position.

Driving Forward

  1. Step onto the platform of the machine.
    Note: The OPC LCD indicator appears when the operator is on the platform.
  2. Make sure the motion control levers are in the neutral position.
  3. Release the parking brake.
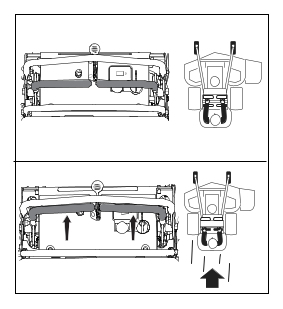
  4. To move forward in a straight line, move both rear levers forward with equal pressure.
    Graphic
    G586234
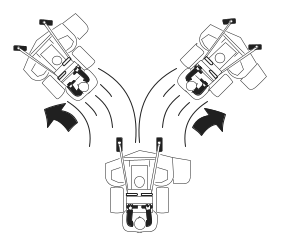
  5. To turn left or right, pull the motion control lever back toward neutral in the desired turn direction. The machine will move faster the farther the motion control levers are moved from the neutral position.
    Graphic
    G344905s
  6. To stop, position both motion control levers in the neutral operate position.

Driving Backward

  1. Move both motion-control levers to the Neutral position.
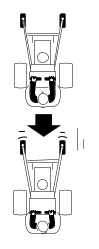
  2. Slowly pull the motion-control levers rearward with equal pressure to move rearward.
    • To turn right, release pressure on the right motion control lever.
    • To turn left, release pressure on the left motion control lever.
    Graphic
    G192741s
  3. To stop, position both motion control levers in the Neutral position.
Adjusting the Cutting Height
The cutting height of the mower deck is adjusted from 5.1 cm to 12.7 cm (2 to 5 inches) in 6.35 mm (1/4 inch) increments.
  1. Stop the machine and move the motion control levers to the neutral locked position.
  2. Disengage the PTO.
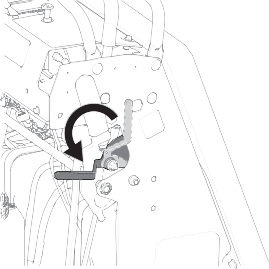
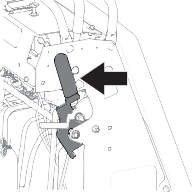
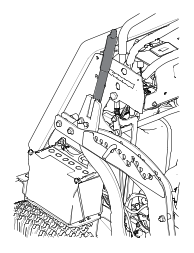
  3. Push the button down on top of the lever to disengage the deck lift latch. Pull the handle all the way rearward and release the button to latch the cutting deck into the 12.7 cm (5.0 inch) transport position.
    Note: When changing the cutting height positions, always come to a complete stop and disengage the PTO.
    Graphic
    G586119
  4. Insert the height adjustment pin into the hole corresponding to the desired cutting height. See the decal on the side of the deck lift plate for cut heights.
  5. Slightly pull the deck lift handle rearward and push the button down on top of the lever to disengage the transport lock. Slowly release the handle downward to allow the deck to lower to the cutting height. Release the button.

After Operation

After Operation Safety
  • Park the machine on a level surface, disengage the drives, engage the parking brake, shut off the engine and wait for all moving parts to stop before leaving the operator’s position.
  • Wait for the machine to cool before servicing, adjusting, fueling, cleaning, or storing it.
  • Clean grass, leaves, excessive grease and oil, and other debris from the mower deck, muffler, drives, grass catcher, and engine area to help prevent fires.
  • Close the fuel-shutoff valve (if equipped) before storing or transporting the machine.
  • Use full-width ramps for loading the machine into a trailer or truck.
  • Tie the machine down securely using straps, chains, cable, or ropes. Both front and rear straps should be directed down and outward from the machine.
Cleaning the Machine
Clean the machine after each use.
  1. Park the machine on a level surface, disengage the blade-control switch, and move the motion-control levers to the neutral lock position.
  2. Shut off the engine, remove the key, and wait for all moving parts to stop before leaving the operating position.
  3. Clean grass and debris from cutting unit, muffler, drives, grass catcher, and engine. Use compressed air when possible.
    Important  
    You can wash the machine with a mild detergent and water. Do not pressure wash the machine. Avoid excessive use of water, especially near the control panel, under the seat, and around the engine, hydraulic pumps, and motors.
     
Hauling the Machine
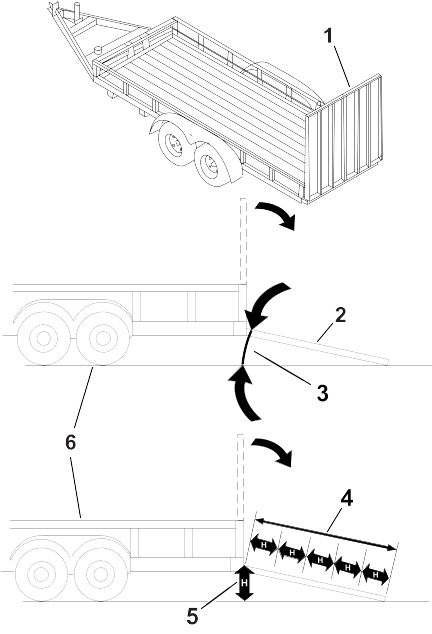
Use a heavy-duty trailer or truck to haul the machine. Use a full-width ramp. Ensure that the trailer or truck has all the necessary brakes, lighting, and marking as required by law. Please carefully read all the safety instructions. Knowing this information could help you or bystanders avoid injury. Refer to your local ordinances for trailer and tie-down requirements.
Warning
Driving on the street or roadway without turn signals, lights, reflective markings, or a slow-moving-vehicle emblem is dangerous and can lead to accidents causing personal injury.
Do not drive the machine on a public street or roadway.
 
Trailer Requirements
Warning
Loading a machine onto a trailer or truck increases the possibility of tip-over and could cause serious injury or death.
  • Use only a full-width ramp; do not use individual ramps for each side of the machine.
  • Do not exceed a 12-degree angle between the ramp and the ground or between the ramp and the trailer or truck.
  • Ensure that the length of ramp is at least 5 times as long as the height of the trailer or truck bed to the ground.
 
Graphic
G613942
  1.  Full-width ramp(s) in stowed position
  2.  Side view of full-width ramp in loading position
  3.  Not greater than 12 degrees
  4.  Ramp is at least 5 times as long as the height of the trailer or truck bed to the ground
  5.  H = height of the trailer or truck bed to the ground
  6.  Trailer
Loading the Machine
Warning
Loading a machine onto a trailer or truck increases the possibility of tip-over and could cause serious injury or death.
  • Use extreme caution when operating a machine on a ramp.
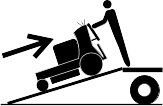
  • Back the machine up the ramp and drive it forward down the ramp.
  • Avoid sudden acceleration or deceleration while driving the machine on a ramp as this could cause a loss of control or a tip-over situation.
 
  1. If using a trailer, connect it to the towing vehicle and connect the safety chains.
  2. If applicable, connect the trailer brakes.
  3. Lower the ramp, ensuring that the angle between the ramp and the ground does not exceed 12 degrees.
  4. Graphic
    G603709
  5. Back the machine up the ramp.
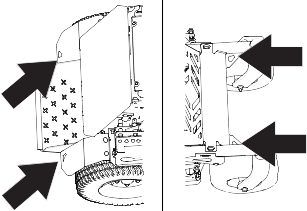
  6. Shut off the engine, remove the key, and move the motion-control levers outward to the Park position.
  7. Graphic
    G603710
  8. Tie down the machine using straps, chains, cable, or ropes. Refer to local regulations for tie-down requirements.
    Note: Direct the straps down and away from the machine.
Unloading the Machine
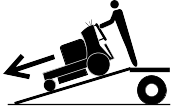
    Graphic
    G603711
  1. Lower the ramp, ensuring that the angle between the ramp and the ground does not exceed 12 degrees.
  2. Drive the machine forward down the ramp.
Moving a Non-Functioning Machine
  1. Park the machine on a level surface and disengage the PTO.
  2. Shut off the engine, remove the key, and wait for all moving parts to stop before leaving the operating position.
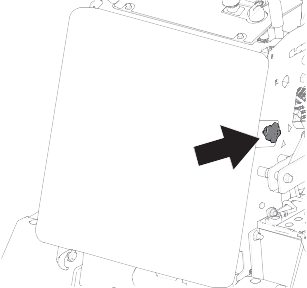
  3. Loosen the knob on the right side of the machine and remove the rear cushion.
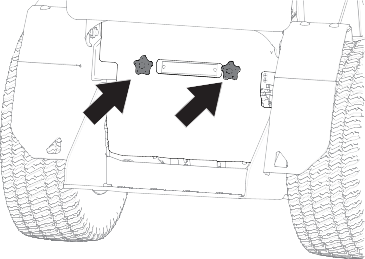
  4. Remove the rear guard by removing the 2 knobs.
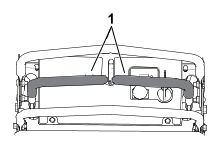
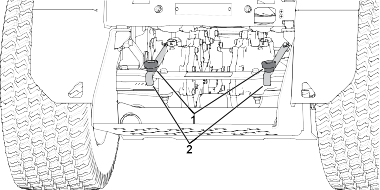
  5. Loosen the knobs on each drive-release lever.
    Graphic
    G586814
    1. Knobs
    2. Drive-release levers
  6. Pull the drive-release levers fully rearward and then tighten the drive-release knobs.
  7. Move the machine to the desired location.
    Important  
    Do not move the machine faster than 8 km/h (5 mph).
     
  8. Immediately after moving the machine, engage the drive wheel release valves.
    1. Loosen the knobs on each drive-release lever.
    2. Push the drive-release levers fully forward and tighten the knobs.
    3. Install the rear guard and secure it with the 2 knobs.
    4. Install the rear cushion and tighten the right knob.


Maintenance
 

Maintenance Safety

  • If you leave the key in the switch, someone could accidently start the engine and seriously injure you or other bystanders. Remove the key from the switch before you perform any maintenance.
  • Before you leave the operator’s position, do the following:
    • Park the machine on a level surface.
    • Disengage the drives.
    • Engage the parking brake.
    • Shut off the engine and remove the key.
    • Wait for the machine to cool before performing maintenance.
  • Do not allow untrained personnel to service the machine.
  • Keep your hands and feet away from moving parts or hot surfaces. If possible, do not make adjustments with the engine running.
  • Keep all guards, shields, switches, and all safety devices in place and in proper working condition. Frequently check for worn or deteriorating components and replace them with genuine Toro parts when necessary.
  • Carefully release pressure from components with stored energy.
    Warning
    Removing or modifying original equipment, parts, and/or accessories may alter the warranty, controllability, and safety of the machine. Making unauthorized modifications to the original equipment or failing to use original Toro parts could lead to serious injury or death.
     
  • Check the parking brake operation frequently. Adjust and service it as required.
  • Never tamper with safety devices. Check their proper operation regularly.
  • Clean grass, leaves, excessive grease and oil, and other debris from the cutting unit, muffler, drives, grass catcher, and engine compartment to prevent fires.
  • Clean up oil or fuel spills and remove fuel-soaked debris.
  • Do not rely solely on mechanical or hydraulic jacks to support the machine. Use adequate jack stands.
  • Keep all parts in good working condition and all hardware tightened, especially the blade-attachment hardware.
  • To ensure optimum performance, use only genuine Toro replacement parts and accessories. Replacement parts and accessories made by other manufacturers could be dangerous.
  • For machines equipped with an accessory frame: If any maintenance or repair requires the accessory frame to be in the raised position, use the cylinder lock to secure the accessory frame in the raised position.
Recommended Maintenance Schedule

Pre-Maintenance Procedures

Removing the Thigh Pad
    Graphic
    G603714
  1. Loosen the knob on the right side of the machine.
  2. Lower the thigh pad and remove it from the lower bolts.
Removing the Rear Guard
    Graphic
    G603715
  1. Loosen the 2 knobs securing the rear guard and remove the guard from the machine.

Lubrication

Lubricating the Grease Fittings
  1. Park the machine on a level surface, disengage the PTO, and engage the parking brake.
  2. Shut off the engine, remove the key, and wait for all moving parts to stop before leaving the operating position.
  3. Lubricate fittings with NLGI grade #2 multi-purpose gun grease.
    Refer to the following chart for fitting locations and lubrication schedule.
    Fitting Locations
    Initial Pumps
    Number of Places
    Service Interval
    Deck belt idler pivot
    1
    1
    Yearly
    Graphic
    G556302
    1. Deck belt idler pivot

Engine Maintenance

Engine Safety
  • Keep your hands, feet, face, other body parts, and clothing away from the muffler and other hot surfaces. Wait for the engine to cool before performing maintenance.
  • Do not change the engine governor speed or overspeed the engine.
Servicing the Air Cleaner
Removing the Filters
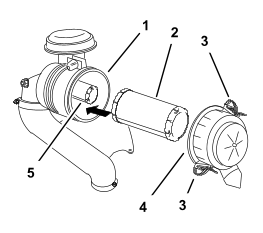
    Graphic
    g001883S
  1. Park the machine on a level surface, disengage the blade-control switch, and move the motion-control levers outward to the Neutral-Lock position, and engage the parking brake.
  2. Shut off the engine, remove the key, and wait for all moving parts to stop before leaving the operating position.
  3. Release the latches on the air cleaner and pull the air-cleaner cover off the air-cleaner body.
  4. Clean the inside of the air-cleaner cover with compressed air.
  5. Gently slide the primary filter out of the air-cleaner body .
    Note: Avoid knocking the filter into the side of the body.
  6. Remove the safety filter only to replace it.
Inspecting the Filters
  1. Inspect the safety filter. If it is dirty, replace both the safety and primary filters.
    Important  
    Do not attempt to clean the safety filter. If the safety filter is dirty, then the primary filter is damaged.
     
  2. Inspect the primary filter for damage by looking into the filter while shining a bright light on the outside of the filter. If the primary filter is dirty, bent, or damaged, replace it.
    Note: Holes in the filter appear as bright spots. Do not clean the primary filter.
Installing the Filters
Important  
To prevent engine damage, always operate the engine with both air filters and the cover installed.
 
  1. If you are installing new filters, check each filter for shipping damage.
    Note: Do not use a damaged filter.
  2. If you are replacing the inner filter, carefully slide it into the filter body.
  3. Carefully slide the primary filter over the safety filter.
    Note: Ensure that the primary filter is fully seated by pushing on the outer rim while installing it.
    Important
    Do not press on the soft, inside area of the filter.
     
  4. Install the air-cleaner cover and secure the latches.
Servicing the Engine Oil
Engine-Oil Specifications
Oil Type
Detergent oil (API service SF, SG, SH, SJ, or SL)
Crankcase Capacity
2.0 L (67.2 fl oz) with a filter change; 1.8 L (60.8 fl oz) without a filter change
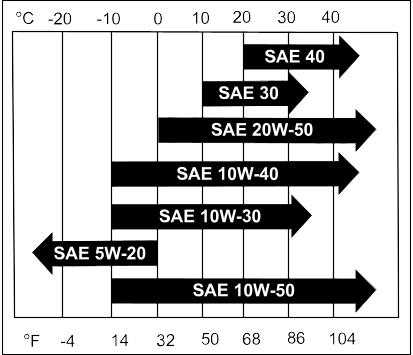
Viscosity
See the table below
Image
Note: Although 10W-40 engine oil is recommended for most conditions, you may need to change oil viscosity to accommodate atmospheric conditions. Using 20W-50 engine oil in higher ambient temperatures can reduce oil consumption.
Checking the Engine-Oil Level
  1. Park the machine on a level surface, disengage the PTO, and engage the parking brake.
  2. Shut off the engine, remove the key, and wait for all moving parts to stop before leaving the operating position.
  3. Wait for the engine to cool so that the oil has had time to drain into the sump.
  4. To keep dirt, grass clippings, etc., out of the engine, clean the area around the oil-fill cap and dipstick before removing it.
  5. Check the engine-oil level as shown.
    Graphic
    G307458s
    Important  
    If you overfill or underfill the engine crankcase with oil and run the engine, you may damage the engine.
     
Changing the Engine Oil
  1. Note: Dispose of the used oil at a recycling center.
    Start the engine and let it run for 5 minutes.
    Note: This warms the oil so that it drains better.
  2. Park the machine on a level surface, disengage the PTO, and engage the parking brake.
  3. Shut off the engine, remove the key, and wait for all moving parts to stop before leaving the operating position.
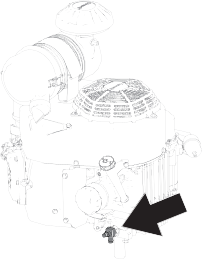
  4. Place a drain pan under the oil drain valve.
  5. Loosen the oil drain valve.
    Graphic
    G604538
  6. Drain the oil from the engine.
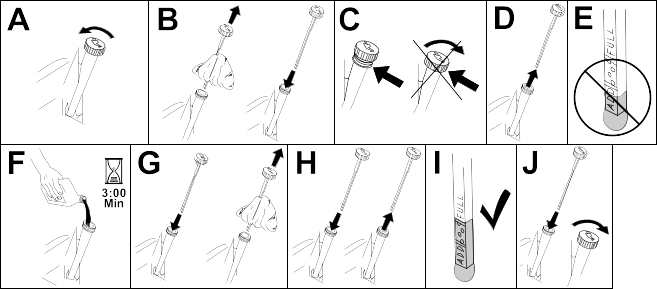
  7. Slowly pour approximately 80% of the specified oil into the filler tube and slowly add the additional oil to bring it to the Full mark.
    Graphic
    G594022
  8. Start the engine and let it run for a few seconds.
  9. Shut off the engine and check the oil level again.
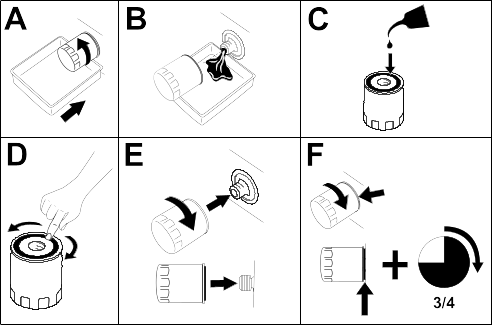
Changing the Engine-Oil Filter
  1. Drain the oil from the engine.
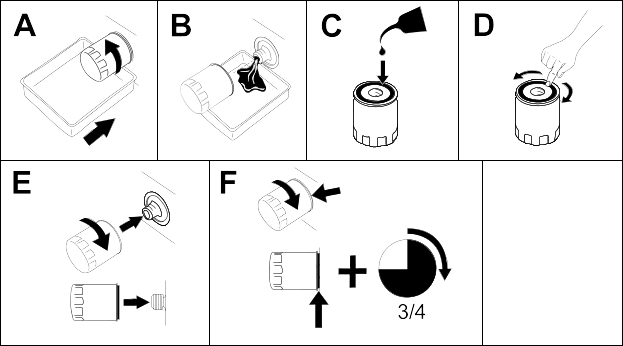
  2. Change the engine-oil filter.
    Graphic
    g027477s
    Note: Ensure that the oil-filter gasket touches the engine, and then turn the oil filter an extra 3/4 turn.
  3. Fill the crankcase with the proper type of new oil.
Servicing the Spark Plug
Ensure that the air gap between the center and side electrodes is correct before installing the spark plug. Use a spark plug wrench for removing and installing the spark plug and a gapping tool or feeler gauge to check and adjust the air gap. Install a new spark plug if necessary.
Type: NGK® BPR4ES
Air gap: 0.76 mm (0.03 inch)
Removing the Spark Plug
  1. Park the machine on a level surface, disengage the PTO, and engage the parking brake.
  2. Shut off the engine, remove the key, and wait for all moving parts to stop before leaving the operating position.
  3. Clean the area around the base of the plug to keep dirt and debris out of the engine.
  4. Remove the spark plug.
    Graphic
    G437139
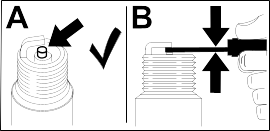
Checking the Spark Plug
Important  
Do not clean the spark plug(s). Always replace the spark plug(s) when it has a black coating, worn electrodes, an oily film, or cracks.
 
If you see light brown or gray on the insulator, the engine is operating properly. A black coating on the insulator usually means the air cleaner is dirty.
  1. Set the gap to 0.76 mm (0.03 inch).
    Graphic
    G437150
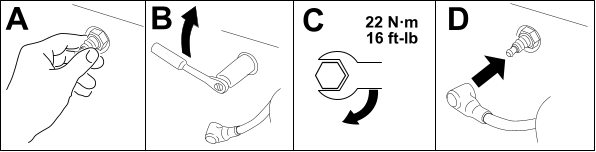
Installing the Spark Plug
Graphic
G560324

Fuel Maintenance

Danger
In certain conditions, fuel is extremely flammable and highly explosive. A fire or explosion from fuel can burn you and others and can damage property.
 
Replacing the Fuel Filter
  1. Park the machine on a level surface, disengage the PTO, and engage the parking brake.
  2. Shut off the engine, remove the key, and wait for all moving parts to stop before leaving the operating position.
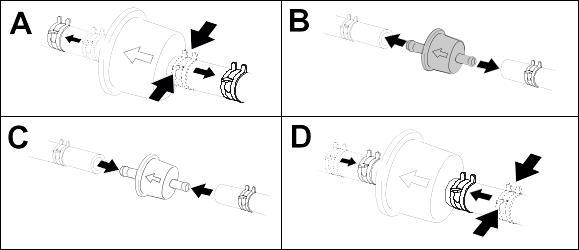
  3. Clamp the fuel lines on both sides of the fuel filter.
  4. Replace the filter.
    Note: Ensure that the flow-direction arrow on the replacement filter points toward the engine.
    Important
    Never install a dirty filter after removing it from the fuel line.
     
    Graphic
    G420323
  5. Remove the clamps blocking the fuel flow.

Electrical System Maintenance

Electrical System Safety
  • Disconnect the cable from the negative terminal of the battery before repairing the machine.
  • Charge the battery in an open, well-ventilated area, away from sparks and flames. Unplug the charger before connecting or disconnecting the battery. Wear protective clothing and use insulated tools.
Battery Service
Removing the Battery
Warning
Battery terminals or metal tools could short against metal machine components, causing sparks. Sparks can cause the battery gasses to explode, resulting in personal injury.
  • When removing or installing the battery, do not allow the battery terminals to touch any metal parts of the machine.
  • Do not allow metal tools to short between the battery terminals and metal parts of the machine.
 
Warning
Incorrectly removing the cables from battery could damage the machine and cables, causing sparks. Sparks can cause the battery gasses to explode, resulting in personal injury.
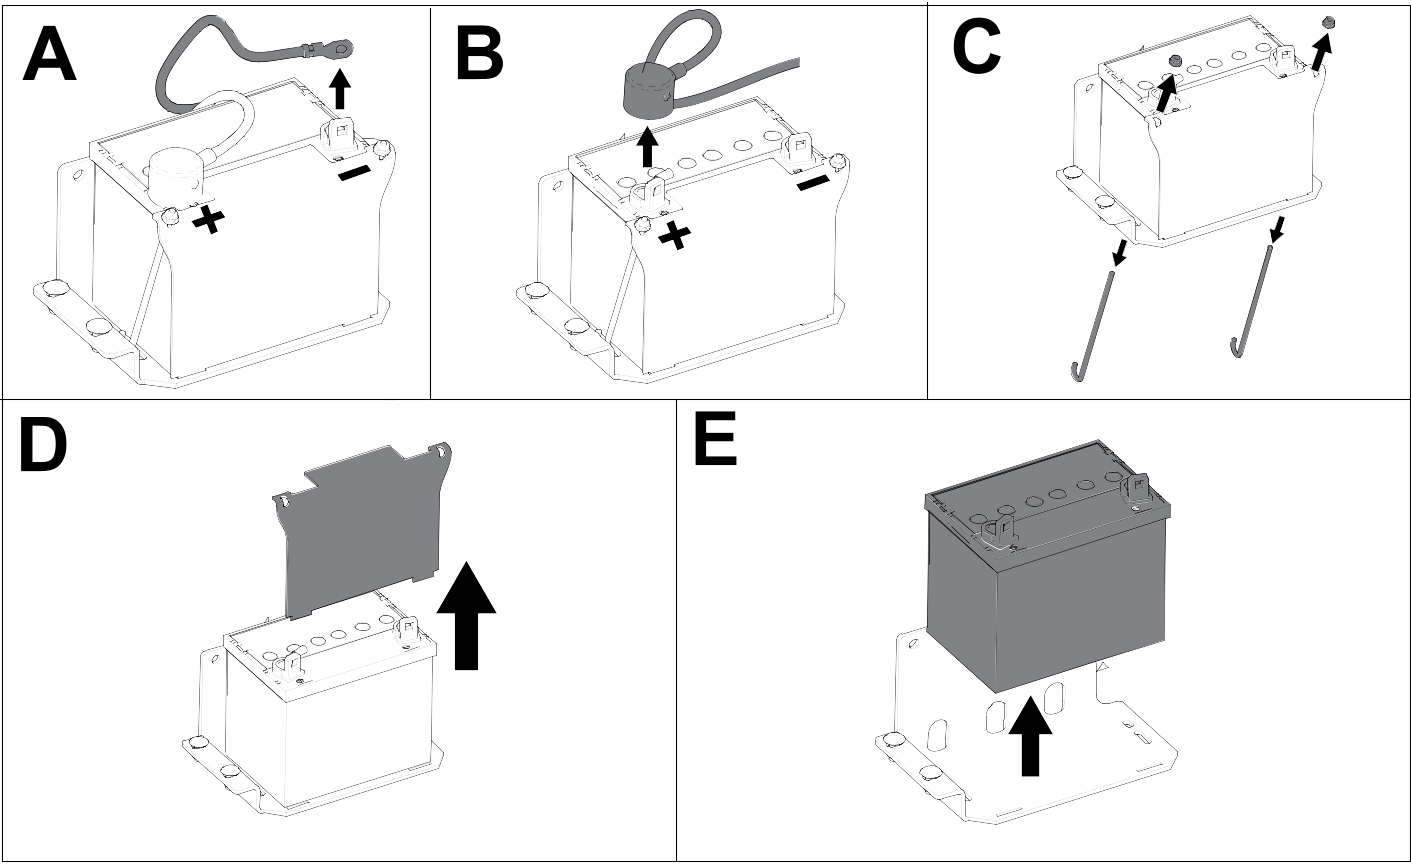
  • Always disconnect the negative (black) battery cable before disconnecting the positive (red) cable.
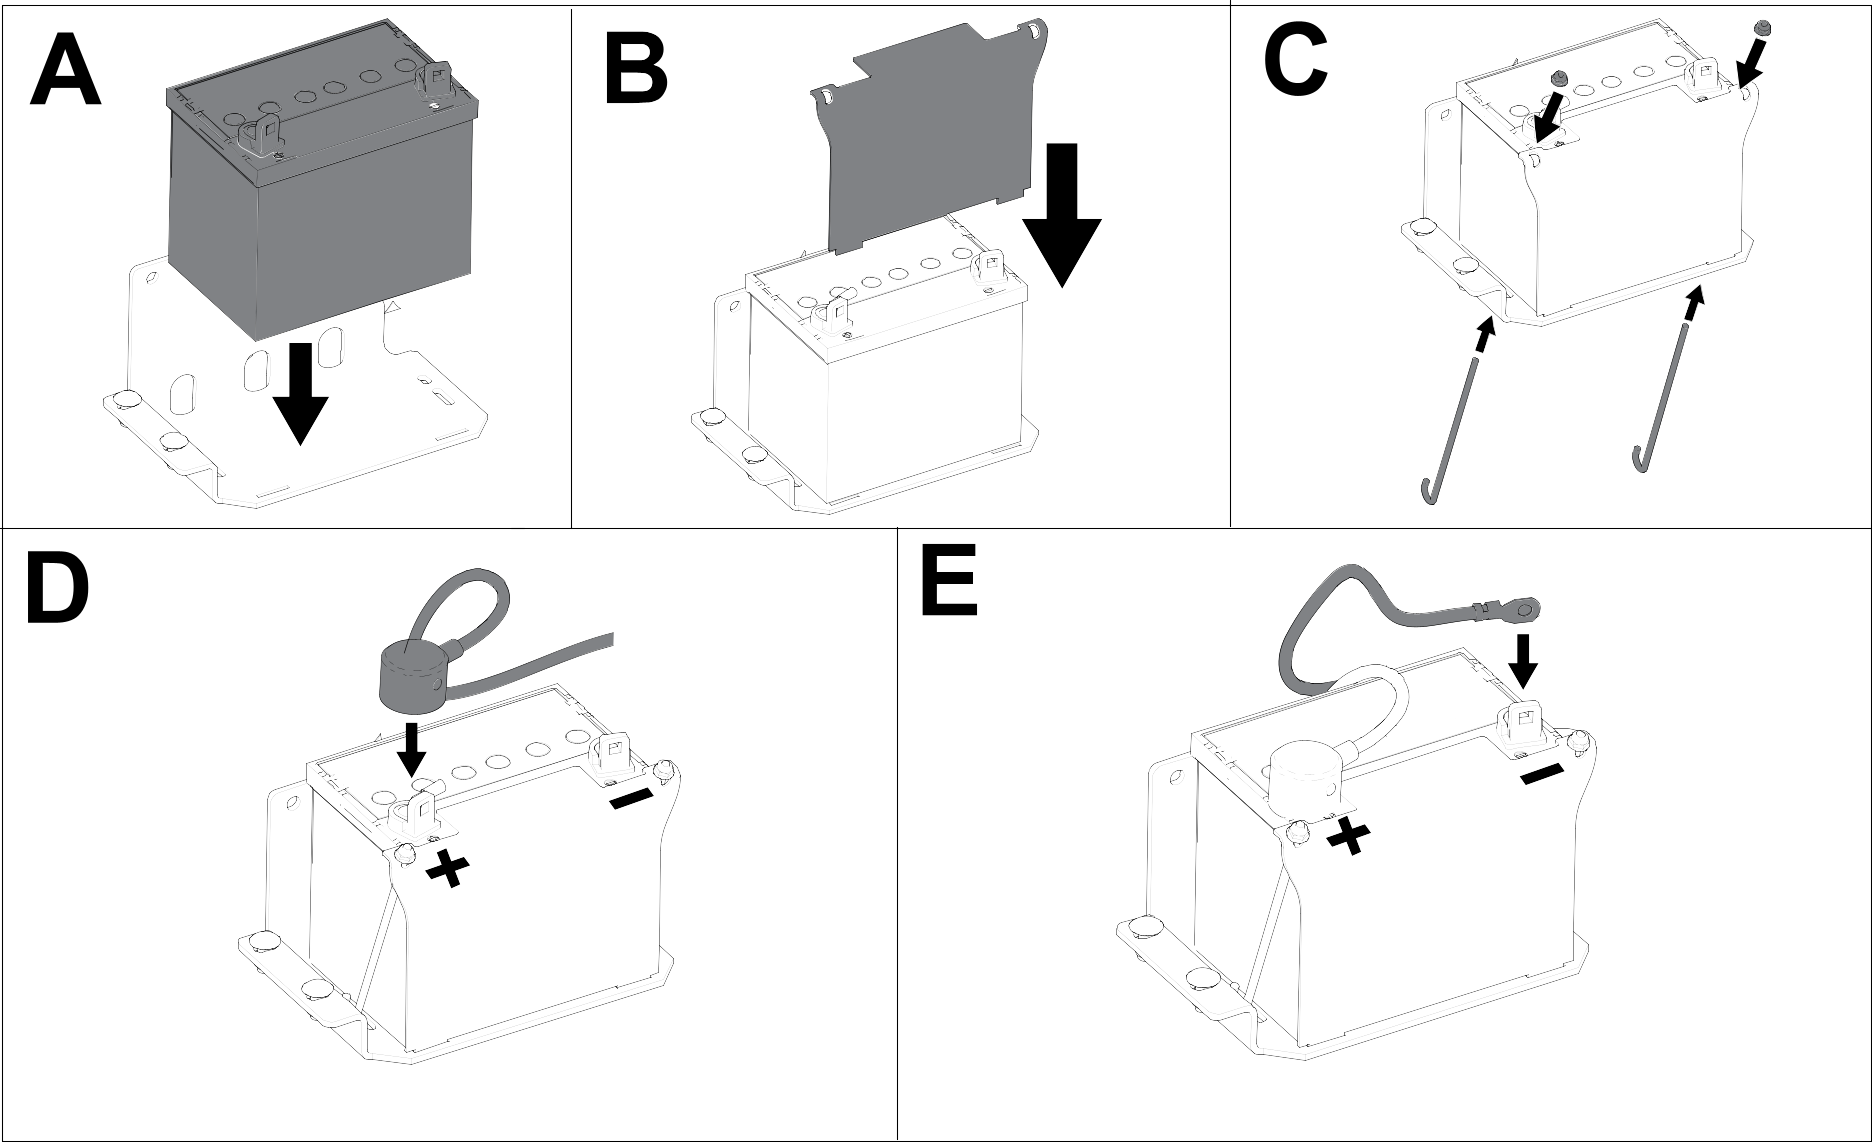
  • Always connect the positive (red) battery cable before connecting the negative (black) cable.
 
  1. Park the machine on a level surface, disengage the PTO, and engage the parking brake.
  2. Shut off the engine, remove the key, and wait for all moving parts to stop before leaving the operating position.
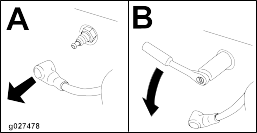
  3. Remove the battery as shown in the following figure.
    Graphic
    G604570
Charging the Battery
Warning
Charging the battery produces gasses that can explode.
Never smoke near the battery and keep sparks and flames away from battery.
 
Important
Always keep the battery fully charged. This is especially important to prevent battery damage when the temperature is below 0°C (32°F).
 
  1. Remove the battery from the machine.
  2. Charge the battery per the battery charger manufacturer’s instructions.
    Important  
    Do not overcharge the battery; otherwise, you could damage it.
     
    Graphic
    G003792S
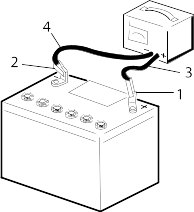
    1.  Positive battery post
    2.  Negative battery post
    3.  Red (+) charger lead
    4.  Black (-) charger lead
  3. When the battery is fully charged, unplug the charger from the electrical outlet (if applicable), then disconnect the charger leads from the battery posts.
Installing the Battery
  1. Install the battery as shown in the following figure.
    Graphic
    G604572
Jump-Starting the Machine
Warning
Jump-starting the battery can produce gasses that can explode.
Do not smoke near the battery, and keep sparks and flames away from battery.
 
Danger
Jump-starting a weak battery that is cracked or frozen or has a low electrolyte level or an open/shorted battery cell can cause an explosion, resulting in serious personal injury.
Do not jump-start a weak battery if these conditions exist.
 
  1. Check and clean corrosion from the battery terminals before jump-starting. Ensure that the connections are tight.
    Caution
    Corrosion or loose connections can cause unwanted electrical voltage spikes at any time during the jump-starting procedure.
    Do not attempt to jump-start the machine with loose or corroded battery terminals, or damage to the engine may occur.
     
  2. Make sure that the booster battery is a good and fully charged lead-acid battery at 12.6 V or greater.
    Note: Use properly sized jumper cables with short lengths to reduce voltage drop between systems. Make sure that the cables are color coded or labeled for the correct polarity.
    Warning
    Batteries contain acid and produce explosive gases.
    • Shield your eyes and face from the batteries at all times.
    • Do not lean over the batteries.
     
    Note: Ensure that the vent caps are tight and level. Place a damp cloth, if available, over any vent caps on both batteries. Also ensure that the machines do not touch and that both electrical systems are off and at the same rated system voltage. These instructions are for negative ground systems only.
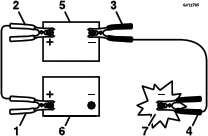
  3. Connect the positive (+) cable to the positive (+) terminal of the discharged battery that is wired to the starter or solenoid as shown:
    Graphic
    g012785
    1.  Positive (+) cable on discharged battery
    2.  Positive (+) cable on booster battery
    3.  Negative (–) cable on the booster battery
    4.  Negative (–) cable on the engine block
    5.  Booster battery
    6.  Discharged battery
    7.  Engine block
  4. Connect the other end of the positive (+) jumper cable to the positive terminal of the battery in the other machine.
  5. Connect an end of the negative (-) jumper cable to the negative post of the battery in the other machine.
  6. Connect the other end of the negative (-) jumper cable to a ground point, such as an unpainted bolt or chassis member.
  7. Start the engine in the other machine. Let it run a few minutes, then start your engine.
  8. Remove the cables in the reverse order of connection.
  9. Install the cover to the jump post.

Drive System Maintenance

Tire Pressure
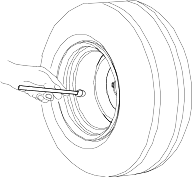
Maintain the air pressure in the rear tires at 83 to 97 kPa (12 to 14 psi).
Important  
Uneven tire pressure can cause an uneven cut.
 
Note: The front tires are semi-pneumatic tires and do not require air-pressure maintenance.
Graphic
G484084
Adjusting the Caster-Pivot Bearing
  1. Park the machine on a level surface, disengage the PTO, and engage the parking brake.
  2. Shut off the machine, remove the key, and wait for all moving parts to stop before leaving the operating position.
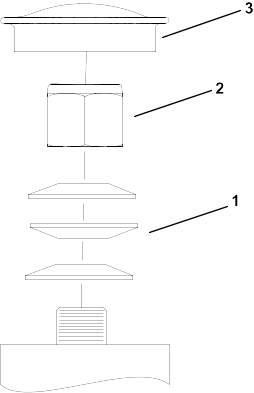
  3. Remove the dust cap from the caster.
  4. Tighten the locknut until the spring washers are flat, and then back off a 1/4  turn to properly set the preload on the bearings.
    Important  
    Make sure that the spring washers are installed correctly as shown.
     
  5. Install the dust cap.
    Graphic
    G484653
    1. Spring washer
    2. Locknut
    3. Dust cap
Checking the Wheel-Lug Nuts
  1. Check and torque the wheel-lug nuts to 122 to 136 N∙m (90 to 100 ft-lb).
    Note: Do not use anti-seize compound on the wheel hub.
Adjusting Motion-Control Tracking
Note: The motion control lever needs to be in neutral while making any necessary adjustments.
If the machine travels or pulls to one side when the motion control levers are in the full forward position, adjust the control links.
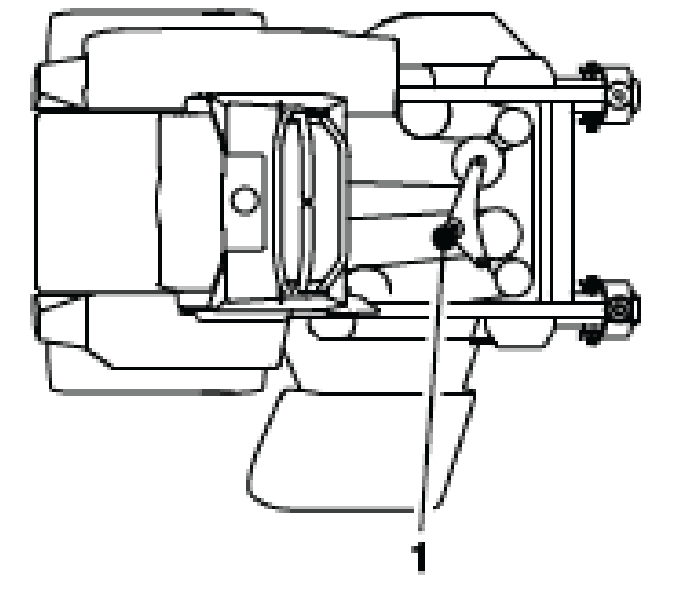
  1. Lower the thigh pad.
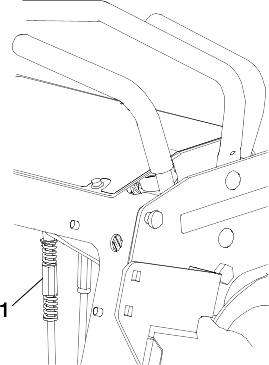
  2. Adjust the control link.
    • Shorten the link to increase the speed
    • Lengthen the link to decrease the speed.
    Graphic
    G604044
    1. Link
  3. Secure the thigh pad.
  4. Drive the machine and check the full forward tracking.
  5. Repeat the steps above until the desired tracking is obtained.

Hydraulic System Maintenance

Hydraulic System Safety
  • Seek immediate medical attention if hydraulic fluid is injected into the skin. Injected fluid must be surgically removed within a few hours by a doctor familiar with this form of injury; otherwise, gangrene may result.
  • Ensure that all hydraulic-fluid hoses and lines are in good condition and all hydraulic connections and fittings are tight before applying pressure to the hydraulic system.
  • Keep your body and hands away from pinhole leaks or nozzles that eject high-pressure hydraulic fluid.
  • Use cardboard or paper, not your hands, to find hydraulic leaks.
  • Safely relieve all pressure in the hydraulic system before performing any work on the hydraulic system.
Hydraulic-Fluid Specifications
Hydraulic Fluid Type: Toro Premium Hydro Oil (preferred) or Mobil 1™ 15W50
Hydraulic System Capacity: 2.3 L (77 fl oz) per side
Important  
Use the specified fluid. Other fluids could damage the system.
 
Checking the Hydraulic Fluid
  1. Park the machine on a level surface, disengage the blade-control switch, and move the motion-control levers outward to the Park position.
  2. Shut off the engine, remove the key, and wait for all moving parts to stop before leaving the operating position.
  3. Allow the machine to cool.
    Important  
    Only check the hydraulic fluid when the system is cool (less than 38°C or 100°F). Adding fluid when the system is warm could result in overfilling the transaxle and damage the breather assembly.
     
  4. Graphic
    G560031
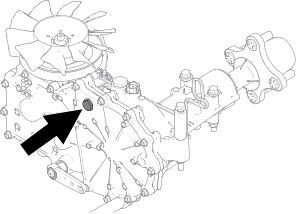
  5. Remove the fill-port plug and ensure that fluid appears at the bottom of the hole.
  6. If the level is low, add the specified fluid through the port to raise it to the bottom of the hole.
  7. Install the plug and torque it to 13.6 N∙m (120 in-lb).
Replacing the Hydraulic Fluid and Filters
Change the hydraulic fluid more frequently in severe conditions or in a hot operating climate. Contact your Authorized Service Dealer for a hydraulic kit to replace the hydraulic filters.
Warning
Hot hydraulic fluid can cause severe burns.
Allow the hydraulic fluid to cool before performing any maintenance on the hydraulic system.
 
  1. Park the machine on a level surface, disengage the PTO, and engage the parking brake.
  2. Shut off the engine, remove the key, and wait for all moving parts to stop before leaving the operating position.
  3. Allow the machine to cool.
    Important  
    Only change the hydraulic fluid when the system is cool (less than 38°C or 100°F). Changing the fluid when the system is warm could result in overfilling the transaxle and damage the breather assembly.
     
  4. Remove the rear guard.
  5. Raise the rear of machine up and support with jack stands (or equivalent support) just high enough to allow drive wheels to turn freely.
    Caution
    Raising the mower for service or maintenance relying solely on mechanical or hydraulic jacks could be dangerous. The mechanical or hydraulic jacks may not be enough support or may malfunction allowing the unit to fall, which could cause injury.
    Do not rely solely on mechanical or hydraulic jacks for support. Use adequate jack stands or equivalent support.
     
  6. Remove the left and right drive tires.
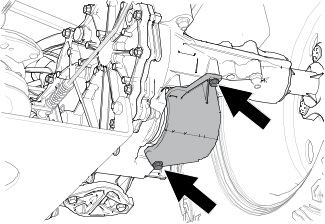
  7. Remove the filter guard from the transaxle.
    Graphic
    G560039
  8. Carefully clean the area around the filter.
    Important  
    Do not allow dirt to enter the hydraulic system, or contamination may occur.
     
  9. Place a drain pan under the filter.
  10. Replace the filter.
    Graphic
    G398545s
  11. Install the filter guard. Torque the bolts to 7 N∙m (65 in-lb).
  12. Remove the fill-port plug and add the specified fluid through the port to raise it to the bottom of the hole.
    Graphic
    G560031
  13. Install the plug and torque it to 13.6 N∙m (120 in-lb).
  14. Repeat the procedure for the other transaxle.
  15. Bleed the hydraulic system.
  16. Install the left and right drive tires.
  17. Remove the jack stands
  18. Install the rear guard.
Bleeding the Hydraulic System
  1. Park the machine on a level surface, disengage the PTO, and engage the parking brake.
  2. Shut off the engine, remove the key, and wait for all moving parts to stop before leaving the operating position.
  3. Raise the rear of the machine onto jack stands high enough to raise the drive wheels off the ground.
    Caution
    Raising the mower for service or maintenance relying solely on mechanical or hydraulic jacks could be dangerous. The mechanical or hydraulic jacks may not be enough support or may malfunction allowing the unit to fall, which could cause injury.
    Do not rely solely on mechanical or hydraulic jacks for support. Use adequate jack stands or equivalent support.
     
  4. Start the engine, move the throttle control ahead to the 1/2 throttle position, and disengage the parking brake.
  5. With the bypass valves open and the engine running, slowly move the motion-control levers both forward and rearward 5 or 6 times.
  6. With the bypass valves closed and the engine running, slowly move the motion-control levers both forward and rearward 5 or 6 times.
  7. Shut off the engine and remove the key.
  8. Check the hydraulic-fluid level and add fluid as needed.
  9. Repeat the procedure as needed until the air is completely purged from the system.
    Note: The air is completely purged when the transaxle operates at normal noise levels and moves smoothly forward and reverse at normal speeds.
  10. Remove the jack stands.

Belt Maintenance

Checking the Belts
  1. Park the machine on a level surface, disengage the PTO, and engage the parking brake.
  2. Shut off the engine, remove the key, and wait for all moving parts to stop before leaving the operating position.
  3. Look on the top side of the cutting deck to check the mower blade drive belt condition.
  4. Look under the engine deck to check the pump drive belt condition.
  5. Check all idler arms to ensure they pivot freely.
Pump Drive Belt Tension
  1. The belt is self-tensioning and requires no adjustment.
Mower Deck Drive Belt Tension
  1. The belt is self-tensioning and requires no adjustment.

Mower-Deck Maintenance

Blade Service
To ensure a superior quality of cut, keep the blades sharp. For convenient sharpening and replacement, keep extra blades on hand.
Replace the blades if they hit a solid object, or if the blade is out of balance or bent.
Blade Safety
  • Inspect the blades periodically for wear or damage.
  • Use care when checking the blades. Wrap the blade(s) or wear gloves and use caution when servicing them. Only replace damaged blades; never straighten or weld them.
  • On multi-bladed machines, take care as rotating one blade can cause other blades to rotate.
  • Replace worn or damaged blades and bolts in sets to preserve balance.
Inspecting the Blades
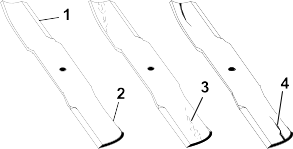
    Graphic
    G006530s
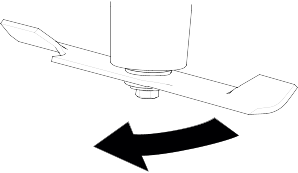
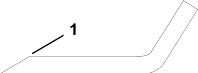
  1. Inspect the cutting edges .
  2. If the edges are not sharp or have nicks, remove and sharpen the blade.
  3. Inspect the blades, especially in the curved area .
  4. If you notice any cracks , wear, or a slot forming in this area, immediately install a new blade.
Checking for Bent Blades
The machine must be on a level surface for this procedure.
  1. Raise the mower deck to the highest height-of-cut position.
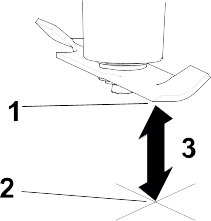
  2. While wearing thickly padded gloves, or other adequate hand protection, slowly rotate the blade into a position that allows you to measure the distance between the cutting edge and the level surface.
    Graphic
    G603653
  3. Measure from the tip of the blade to the level surface.
    Graphic
    G603656
    1.  Blade (in position for measuring)
    2.  Level surface
    3.  Measured distance between blade and the surface (A)
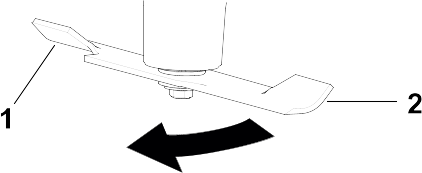
  4. Rotate the same blade 180 degrees so that the opposite blade edge is now in the same position.
    Graphic
    G603657
    1.  Blade edge previous measured
    2.  Opposite blade edge
  5. Measure from the tip of the blade to the level surface.
    Graphic
    G603656
    1.  Blade (in position for measuring)
    2.  Level surface
    3.  Measured distance between blade and the surface (B)
  6. If the difference between A and B is greater than 3 mm (1/8 inch), replace the blade.
    Note: If you replace the blade and the difference continues to exceed 3 mm (1/8 inch), the blade spindle could be bent. Contact an Authorized Service Dealer for service.
  7. Repeat this procedure each blade.
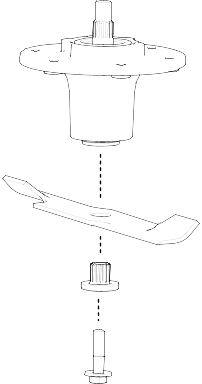
Removing the Blades
  1. Hold the blade end using a rag or thickly padded glove.
  2. Remove the blade as shown.
    Graphic
    G603678
Sharpening the Blades
    Graphic
    G000552s
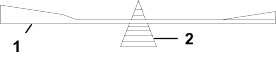
  1. Use a file to sharpen the cutting edge at both ends of the blade. Ensure to maintain the original angle .
    Note: Remove the same amount of material from both cutting edges so that the blade retains its balance.
  2. Graphic
    G000553s
  3. Check the balance of the blade by putting it on a blade balancer .
    Note: If the blade stays in a horizontal position, the blade is balanced and can be used.
    If the blade is not balanced, file some metal off the end of the sail area only.
  4. Repeat this procedure until the blade is balanced.
Installing the Blades
Warning
Operating a machine after incorrectly installing the blade assembly and/or not using genuine Toro blade and blade hardware could allow a blade or blade component to be thrown out from under the deck, resulting in serious injury or death.
Always install genuine Toro blades and blade hardware according to the instructions.
 
    Graphic
    G603678
  1. Install the blade as shown.
    Note: The curved part of the blade must be pointing upward toward the inside of the mower to ensure proper cutting.
  2. Torque the blade bolt to 67.8 to 81.4 N·m (50 to 60 ft-lb).
Leveling the Mower Deck
Ensure that the mower deck is level any time you install the mower deck or when you see an uneven cut on your lawn.
Note: Your mower deck may differ from the version shown in the following procedures.
Preparing to Level the Mower Deck
  1. Park the machine on a level surface, disengage the PTO, and engage the parking brake.
  2. Shut off the engine, remove the key, and wait for all moving parts to stop before leaving the operating position.
  3. Ensure that the tires are inflated to the correct specifications and the caster wheels are facing straight forward.
  4. Check the mower deck for bent blades; remove and replace any bent blades.
  5. Pull the deck lift handle all the way rearward to latch the cutting deck into the raised transport position.
  6. Insert the height adjustment pin into the 10.2 cm (4 inches) cutting height location.
  7. Release the transport lock and allow the deck to lower to the cutting height.
  8. Raise the discharge deflector.
Checking the Mower-Deck Level
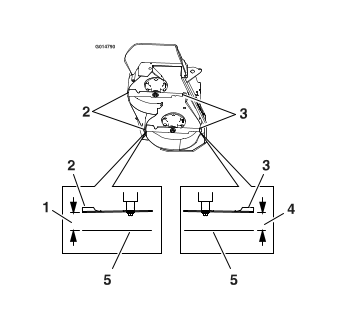
  1. Position the blades front-to-rear.
  2. Measure from the level surface to the front tip of the center blade. The measurement should read 10.2 cm (4 inches).
    Note: In most conditions, the back tips on the side blades should be adjusted 3.2 to 6.4 mm (1/8 to 1/4 inch) higher than the front.
    Graphic
    g014790S
    1. 10.5 to 10.8 cm (4-1/8 to 4-1/4 inches)
    2. Back blade tip
    3. Front blade tip
    4. 10.2 cm (4 inches)
    5. Level surface
  3. If the measurement is not correct, level the mower deck.
Leveling the Mower Deck
  1. Raise the deck to transport position.
  2. Place 4 blocks under the deck. Refer to the measurements below.
    Place the appropriate block directly in front of the blade.
    • Right-front block thickness: 9.25 cm (3.64 inches)
    • Left-front block thickness: 9 cm (3.58 inches)
    Place the appropriate block directly behind the blade.
    • Right-rear block thickness: 9.83 cm (3.87 inches)
    • Left-rear block thickness: 9.58 cm (3.77 inches)
  3. Set the height of the cut lever to the 10.2 cm (4 inches) position.
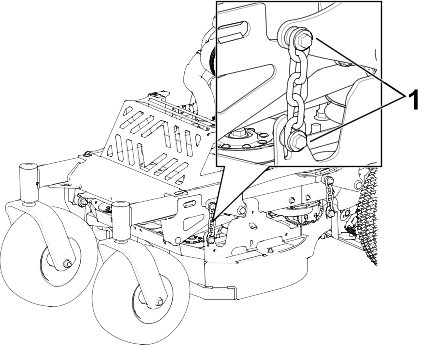
  4. Loosen the lower fasteners securing the brackets to all 4 corners of the deck and ensure that the mower deck sits securely on all 4 blocks.
    Graphic
    G604108
    1. Deck fasteners
  5. Remove any slack from the lift chains and ensure that the lift lever is resting against the height adjustment pin.
  6. Tighten the fasteners.
  7. Raise the deck and remove the blocks. Lower the deck back to 10.2 cm (4 inches) and recheck the cutting height.
Replacing the Grass Deflector
Danger
An uncovered discharge opening allows objects to be thrown toward you or bystanders. Also, contact with the blade could occur. Thrown objects or blade contact will cause serious injury or death.
Do not operate the mower with the discharge deflector raised, removed, or altered unless a grass collection system or mulch kit is in place and working properly.
 
  1. Park the machine on a level surface, disengage the PTO, and engage the parking brake.
  2. Shut off the engine, remove the key, and wait for all moving parts to stop before leaving the operating position.
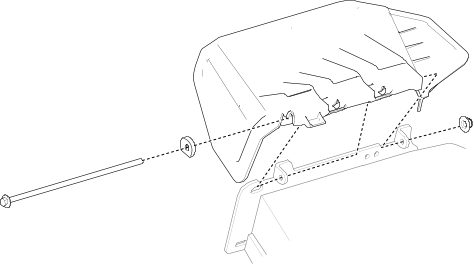
  3. Remove the damaged or worn grass deflector as shown.
    Graphic
    G560316
  4. Use the removed fasteners to install the new deflector.

Chassis Maintenance

Checking for Loose Hardware
  1. Park the machine on a level surface, disengage the PTO, and engage the parking brake.
  2. Shut off the engine, remove the key, and wait for all moving parts to stop before leaving the operating position.
  3. Visually inspect the machine for any loose hardware or any other possible problem. Tighten the hardware or correct the problem before operating.

Cleaning

Cleaning Debris from the Machine
  1. Stop engine, wait for all moving parts to stop, and remove key. Engage parking brake.
  2. Clean off any oil, debris, or grass build-up on the machine and cutting deck, especially under deck belt shields, around the fuel tank, around engine and exhaust area.
    Important  
    You can wash the machine with mild detergent and water. Do not pressure wash the machine. Avoid excessive use of water, especially near the control panel, around the engine, hydraulic pumps, and motors.
     
Cleaning the Engine and Exhaust System Area
Warning
Excessive debris around engine cooling air intake and exhaust system area can cause engine, exhaust area, and hydraulic system to overheat which can create a fire hazard.
Clean all debris from engine and exhaust system area.
 
  1. Stop engine, wait for all moving parts to stop, and remove key. Engage parking brake.
  2. Clean all debris from rotating engine air intake screen, around engine shrouding, and exhaust system area.
  3. Wipe up any excessive grease or oil around the engine and exhaust system area.
  4. Clean oil coolers (if equipped) of all debris, dirt, and oil.
Cleaning the Cooling Fins
  1. Stop engine, wait for all moving parts to stop, and remove key. Engage parking brake.
  2. Remove cooling shroud access panels from engine and clean cooling fins. Also clean dust, dirt, and oil from external surfaces of engine which can cause improper cooling.
  3. Make sure cooling shroud access panels are properly reinstalled. Operating the engine without cooling shroud access panels will cause engine damage due to overheating.
Cleaning Grass Build-Up the Under Deck
  1. Stop the engine, wait for all of the moving parts to stop, and remove the key. Engage the parking brake.
  2. Raise the deck to the transport (maximum cutting height) position. Lift the front of unit and support the machine using jack stands or equivalent support.
  3. Clean out any grass build-up from the underside of deck and in discharge deflector.
Disposing of Waste
Engine oil, batteries, hydraulic fluid, and engine coolant are pollutants to the environment. Dispose of these according to your state and local regulations.


Storage
 

Storage Safety

  • Park the machine on a level surface, disengage the drives, engage the parking brake, shut off the engine, remove the key, and wait for all moving parts to stop before leaving the operator’s position.
  • Wait for the machine to cool before servicing, adjusting, fueling, cleaning, or storing it.
  • Clean grass and debris from the cutting unit, muffler, drives, grass catcher, and engine compartment to prevent fires.
  • Clean up oil and fuel spills and remove fuel-soaked debris.
  • Do not store the machine or fuel container where there is an open flame, spark, or pilot light, such as on a water heater or other appliance.

Preparing the Machine for Storage Over 30 Days

  1. Park the machine on a level surface, disengage the PTO, and engage the parking brake.
  2. Shut off the engine, remove the key, and wait for all moving parts to stop before leaving the operating position.
  3. Clean the machine.
    Important  
    You can wash the machine with a mild detergent and water. Do not pressure-wash the machine. Avoid excessive use of water, especially near the drive system and engine. Pressure-washing can force dirt and water into critical parts, such as spindle bearings and electrical switches.
     
    1. Remove grass clippings, dirt, and grime from the external parts of the entire machine, especially the engine.
    2. Scrape any heavy buildup of grass and dirt from the underside of the mower, then wash the machine with a garden hose.
    3. Run the machine with the PTO switch engaged and the engine at high idle for 2 to 5 minutes after washing.
  4. Check the parking brake operation.
  5. Grease the machine.
  6. Check the tire pressure.
  7. Charge the battery.
  8. Check the condition of the cutting blades.
  9. Prepare the fuel system.
    1. Add a petroleum-based fuel stabilizer/conditioner to the fuel in the tank. Do not use an alcohol-based stabilizer (ethanol or methanol).
    2. Run the engine to distribute conditioned fuel through the fuel system for 5 minutes.
    3. Shut off the engine, allow it to cool, and drain the fuel tank using a pump-type syphon or operate the engine until it shuts off.
    4. Dispose of fuel properly per local regulations.
      Important  
      Do not store fuel containing stabilizer/conditioner longer than the duration recommended by the fuel-stabilizer manufacturer.
       
  10. Prepare the engine.
    1. Service the air cleaner.
    2. Change the engine oil; dispose of used oil per local regulations.
    3. Remove the spark plugs and pour 30 ml (2 tablespoons) of engine oil into the spark plug holes.
    4. Place a rag over the spark plug holes to catch any oil spray, then crank the engine and distribute the oil inside the cylinder.
    5. Install the spark plugs, but do not install the wires.
  11. Remove the battery or disconnect the negative (-) battery cable.
    Note: Store the battery in a cool, dry location, where it will not be exposed to extreme temperatures or water. Keep the battery fully charged, especially in temperatures below 0°C (32°F).
  12. Check and tighten all fasteners. Repair or replace any worn, damaged, or missing parts.
  13. Paint all scratched or bare metal surfaces with paint available from your Authorized Service Dealer.
  14. Store the machine in a clean, dry garage or storage area. Cover the machine to protect it and keep it clean.

Storing the Battery

Note: Follow the tips below to properly store the battery.
  • If you are storing the machine for more than 30 days, remove the battery and charge it fully.
  • Store it either on the shelf or on the machine.
  • Leave the cables disconnected if the battery is stored on the machine.
  • Store the battery in a cool atmosphere to avoid quick deterioration of the charge in the battery.
  • To prevent the battery from freezing, ensure that it is fully charged.
  • The specific gravity of a fully charged battery is 1.265 to 1.299.
Battery Storage Tips
If you are storing the battery outside the machine, do the following:
  • Store the battery in a cool, dry area in an upright position.
  • Do not stack batteries directly on top of each other, unless they are in cartons.
  • Do not stack more than 3 batteries (only 2 if the battery type is commercial).
  • Test a wet battery every 4 to 6 months and charge it, if necessary.
  • Always test and charge the battery before installation.


Troubleshooting
 

The starter does not crank.
Possible Cause
Corrective Action
The PTO switch is engaged
  1. Disengage the PTO
The parking brake is not engaged.
  1. Ensure the parking brake is in the engaged position.
The battery does not have a full charge.
  1. Charge the battery.
Electrical connections are corroded, loose, or faulty.
  1. Check the electrical connections for good contact.
  2. Clean the connector terminals thoroughly with electrical contact cleaner, apply dielectric grease and reconnect.
A fuse is blown.
  1. Replace the blown fuse.
A neutral LCD indicator does not illuminate.
  1. Check that the brake switch is fully applied.
Relay or switch is damaged.
  1. Contact an Authorized Service Dealer.
The engine will not start, starts hard, or fails to keep running.
Possible Cause
Corrective Action
The fuel tank is empty.
  1. Fill the fuel tank.
The throttle and choke are not in the correct position.
  1. Be sure the throttle control is midway between the Slow and Fast positions, and the choke is in the On position for a cold engine or the Off position for a warm engine.
There is dirt in fuel filter.
  1. Replace the fuel filter.
There is dirt, water, or stale fuel is in the fuel system.
  1. Contact an Authorized Service Dealer.
The air cleaner is dirty.
  1. Clean or replace the air cleaner element.
Electrical connections are corroded, loose or faulty.
  1. Check the electrical connections for good contact.
  2. Clean connector terminals thoroughly with electrical contact cleaner, apply dielectric grease and reconnect.
The relay or switch is defective.
  1. Contact an Authorized Service Dealer.
There is a faulty spark plug.
  1. Clean, adjust, or replace spark plug.
The spark plug wire is not connected.
  1. Check the spark plug wire connection.
The engine loses power.
Possible Cause
Corrective Action
The engine load is excessive.
  1. Reduce the ground speed.
The air cleaner is dirty.
  1. Clean or replace the air cleaner element.
The oil level in the crankcase is low.
  1. Add oil to the crankcase.
The cooling fins and air passages for the engine are plugged.
  1. Remove the obstructions from the cooling fins and air passages.
The vent system filter plugged.
  1. Inspect vent filter; replace if dirty.
There is dirt in fuel filter.
  1. Replace the fuel filter.
There is dirt, water, or stale fuel is in the fuel system.
  1. Contact an Authorized Service Dealer.
The engine overheats.
Possible Cause
Corrective Action
The engine load is excessive.
  1. Reduce the ground speed.
The oil level in the crankcase is low.
  1. Add oil to the crankcase.
The cooling fins and air passages for the engine are plugged.
  1. Remove the obstructions from the cooling fins and air passages.
The mower pulls left or right (with levers fully forward).
Possible Cause
Corrective Action
The tire pressure in the drive tires is not correct.
  1. Adjust the tire pressure in the drive tires.
The tracking needs an adjustment.
  1. Turn turnbuckle in the direction that the mower needs to be adjusted to.
  2. Rotate the turnbuckle in 1/4 turn increments until the mower tracks correctly.
The machine does not drive.
Possible Cause
Corrective Action
The bypass valve is not closed tight.
  1. Tighten the bypass valve.
The drive or pump belt is worn, loose, or broken.
  1. Change the belt.
The drive or pump belt is off a pulley.
  1. Change the belt.
The cutting height is uneven.
Possible Cause
Corrective Action
The blade(s) is not sharp.
  1. Sharpen the blade(s).
A cutting blade(s) is/are bent.
  1. Install a new cutting blade(s).
The mower is not level.
  1. Level the mower from side-to-side and front-to-rear.
The underside of the mower deck is dirty.
  1. Clean the underside of the mower deck.
The tire pressure is incorrect.
  1. Adjust the tire pressure.
A blade spindle is bent.
  1. Contact an Authorized Service Dealer.
The tips of the adjacent blades are at an uneven cutting height. The blade tips should be even within 3/16 inch which is approximately one blade thickness.
  1. Replace the blades, spindles and (or) check for damage to the mower deck.
There is an abnormal vibration.
Possible Cause
Corrective Action
The cutting blade(s) is/are bent or unbalanced
  1. Install a new cutting blade(s).
The blade mounting bolt is loose.
  1. Tighten the blade mounting bolt.
The engine mounting bolts are loose.
  1. Tighten the engine mounting bolts.
There is a loose engine pulley, idler pulley, or blade pulley.
  1. Tighten the loose pulley.
The engine pulley is damaged.
  1. Contact an authorized service dealer.
The blade spindle is bent.
  1. Contact an authorized service dealer.
The belt is damaged.
  1. Install a new belt.
The blades do not rotate.
Possible Cause
Corrective Action
The drive belt is off pulley.
  1. Check the belt for damage; replace if necessary.
  2. Install the drive belt and check the adjusting shafts and belt guides for the correct position.
The deck belt is worn, loose or broken.
  1. Install the new deck belt.
The deck belt is off the pulley.
  1. Install the deck pulley and check the idler pulley, idler arm and spring for the correct position and function.
The idler spring is broken or missing.
  1. Replace the idler spring.
The electric clutch is damaged.
  1. Contact an authorized service dealer.
The clutch will not engage.
Possible Cause
Corrective Action
The fuse is blown.
  1. Replace the fuse.
  2. Check the coil resistance, battery charge, charging system, and wiring connections and replace if necessary
There is a low voltage supply at the clutch.
  1. Check the coil resistance, battery charge, charging system, and wiring connections and replace if necessary.
The coil is damaged
  1. Replace the clutch
There is not enough current.
  1. Repair or replace the clutch lead wire or electrical system.
  2. Clean the connector contacts.
The rotor/armature airgap is too large.
  1. Remove a shim, if equipped, or replace the clutch.


Schematics
 

Electrical Diagram
Graphic
g375992s